
How to make a kaleidoscope I am excited to be offering 30 days of fun crafts to keep kids active and entertained this summer! You won’t want to miss a day of these fun crafts for kids from some amazing bloggers! Please be sure to pay them a visit! This is Mandy from Little Birdie Secrets, and we’re so excited to be a part of Skip To My Lou’s craft camp again this year! My boys are very curious, so this is a cool craft that can also be a physics lesson. Supplies for DIY Kaleidoscope: *Plastic report cover (mine came in a pack of 6, which will make at least 12 kaleidoscopes!) How to make a kaleidoscope 1. Score another line 1 3/8″ from the first line, and another at 1 3/8″ from that line. 2. 3. Punch a hole in the middle of it. Tape it onto one end of your paper towel roll. 4. 5. 6. Fill your cup with shiny objects. 7. 8. Hold your kaleidoscope up to the light and turn to see different shapes and colors dance before your eyes!
How to make Gak (Slime) We had a few days of rain around here so we made some slime to occupy our time inside. Just two ingredients and you will be able to really impress your kids! To make simply mix equal parts of liquid starch and glue together. We placed 1/4 cup liquid starch into a sandwich bag and added about 3 drops of green food coloring. Next add in 1/4 cup glue Mix well. Take it out of the bag and have fun! Looking for more ways to impress your kids? Need a way to use up the rest of the starch? You will find other rainy day activities here. Thanks Laci for asking us how to make Gak.
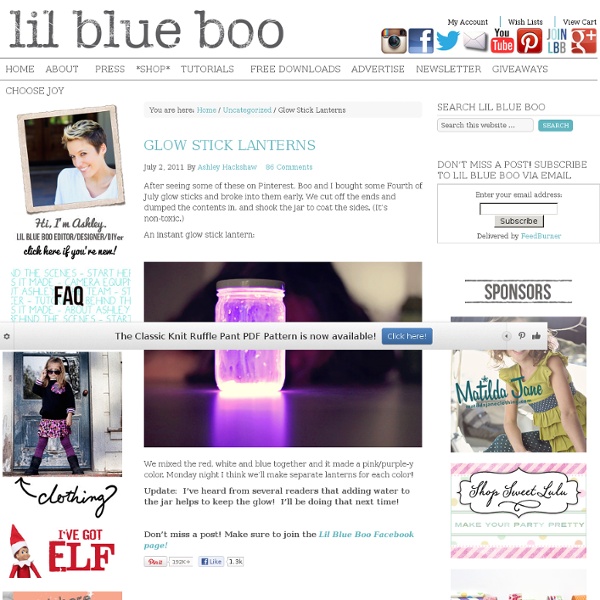
Uses Of Mason Jars <div class="greet_block wpgb_cornered"><div class="greet_text"><div class="greet_image"><a href=" rel="nofollow"><img src=" alt="WP Greet Box icon"/></a></div>Hello there! If you are new here, you might want to <a href=" rel="nofollow"><strong>subscribe to the RSS feed</strong></a> for updates on this topic.<div style="clear:both"></div><div class="greet_block_powered_by">Powered by <a href=" title="WP Greet Box WordPress Plugin" style="text-decoration:none;">WP Greet Box</a><a href=" title="WordPress Plugin" style="text-decoration:none;">WordPress Plugin</a></div><div style="clear:both"></div></div></div> Let’s check out some of the beauties I found… mostly with the help of my BFF, Pinterest . Herb Garden Lights
Felt Magnets – DIY Fun! {Tutorial} Felt Magnets are a sweet and simple project…perfect for Summer Camps and sleepovers, or while you’re enjoying a little afternoon coffee break. It’s no surprise to see another felt project on my blog, I’m sure. I love felt! Here’s how I put together these fun little magnets… Gather up a selection of beautiful felt for inspiration. Bring out you collection of embroidery floss…more pretty colors! You can find these business card magnets at your local office supply or craft store. Cut you rectangle out and stitch a sweet little something on it. Quick and easy felt projects never fail to make me smile! I’m planning to make a few more to keep on hand for gifts. Have you used business card magnets for any other crafts? ~Kim
How to Make a God’s Eye When Jaime and I were brainstorming ideas for our patio makeovers we talked a lot about embracing the southwest but with a modern twist. I love how these Native-American-inspired elements contribute to a stylish yet relaxed and approachable space. One of the DIY project that took on the southwest more literally is this giant God’s Eye that I made for over my bench. I’m not sure how long we will keep this outside. 2. 3. After you twist the wire around the intersection until secure, twist a loop at the back for hanging. 4. 5. 6. 7. If your wood is showing anywhere, adjust the yarn. 8. 9. 10. And you are done! Relax and Enjoy! TAGS: Baby + Kid, By Craft, Crafting With Kids, Decor, In One Evening, Nursery, Prudent Home, The Season of Cozy, Under $5, Yarn
String Balls Whattya need? BalloonStringScissorsGlueJar How do I make glue string balls? Step 1: Hang inflated balloon from ceiling. Step 2: Put string and glue in the jar with a hole in the lid. Step 3: Wait until dry (try to contain yourself). Created by Dane Holweger Glass Etching Have you ever done any glass etching? Well, neither had I before today. But wow. Such an easy, yet sweet little touch that you can add to any glass. Check out my new and improved etched Trifle Bowl. The perfect bowl for desserts of all kinds…..and even a great place for fresh fruit on the counter. Glass etching is also a great way to stamp your name on your pyrex dishes, to make sure they come back to you. And how about adding a little extra detail, just because…… (Edited to Add: The font used here is called Smiley Monster and I downloaded the font for free here.) Sweet in every way. Are you wanting to make your own? (This technique permanently etches your glass. First, you’ll need a piece of vinyl with an adhesive back, like the vinyl you buy for vinyl wall decor. Then peel away the shapes, leaving the negative space all in one piece. The Silhouette code for the bird/branch is: bird_on_branch_C00044_23067 01/18/2010 Then peel the vinyl backing away. See how there are air bubbles? Good luck!
Movie Inspired Craft: Snail Shell Candles I love a good movie. Some movies have scenes so inspiring, tragic, or just so well-staged, that they are tattooed into my eyeballs forever after seeing them. The English Patient came out when I was in High School. I’ve seen it dozens of times since then, and one scene in particular has always haunted me. Today’s craft, making snail shell candles, is inspired by that very scene. To make a path of burning snail shell candles which will lead your lover to a barn where you wait in the shadows, you will need the following: - Escargot shells - Braided candle wick thread - Standard wick tabs (the metal base) - Pliers - Hot Glue Gun & Hot Glue Sticks - 1 pound block bees wax - Double boiler, or metal bowl and saucer of boiling water - Empty egg cartons - Funnel - Paper towels or napkins - Barn - Lover After picking up a container of escargot snail shells (and meats!) Next, I inserted the wicks into each shell. I used my plastic funnel to help pour the hot liquid wax into each shell. - etc. etc!
Craft Project: Easter Rabbit Soap Holder A folded towel can be fashioned into a cute gift. This guide is about making a rabbit soap holder. Solutions Read and rate the best solutions below by giving them a "thumbs up". Easter Rabbit Soap Holder Rabbit made from washcloth. Approximate Time: 10 minutes Supplies: Lightweight white terry washcloth 12 inches ribbon one quarter inch wide One half inch pink pompom for nose One inch white pompom for tail 2 plastic eyes Oval bar of gift soap Tacky glue Instructions: Roll two diagonal corners of the washcloth until they meet in the middle. Bend roll to form body of rabbit. Bend the two points backward to form head and ears. Using tacky glue, stick eyes and nose in place. Glue on tail. Slip bar of soap into body of bunny. By Preserver from Manitoba Share Your Feedback: Once you try any of the above solutions, be sure to come back and give a "thumbs up" to the one that worked the best for you. Related Guides Related Posts
Craft Website Paper crafts: mini grad cards It’s that time of year again – graduation season. I don’t know about you, but every year we know of quite a few graduates. To save money, and to add a personal touch to what is usually a card full of money, I made these mini graduation cards. Here is what you will need to make these cute little cards: 3×6 pieces of card stockblack and white card stockembroidery threadglue dotsbradsa template for your grad hats – I made mine by drawing a diamond for one piece. 1. 2. 3-6. 7. In my original card plan, there was no sentiment (which is why the stamping materials are not pictured in the supplies list). 8. 9. 10. Use glue dots to attach the hats and banners to the front of the cards and you are done! You can customize the cards to match school colors or to match your graduates favorite colors.
Fourth of July Star Jars These transformed mason jars are a fun way to both decorate an outdoor table for a 4th of July celebration or a safe way to entertain the kids during fireworks. Red spray paint Mason Jars Star stickers Newspaper Scatter star stickers onto the mason jar, make sure they’re stuck on very tight Screw on the mason jar lid and cap and place on top of a table covered in newspaper in a well ventilated area Spray with the paint from a nice distance around the entire jar until it’s coated well but without drips. Wait at least a couple hours for the jar to dry and carefully peel off the star stickers Place 2-3 battery operated votive candles in each jar and enjoy your festive 4th of July evening! Crafty Friday This craft project was inspired by something almost identical I saw in a fancy shop here in NYC. It cost almost $500, and I thought to myself, "hey, I can make that". And so I did! Start by printing out butterflies. Hot-glue or super-glue a small branch to a vintage saucer. Fold the butterflies a little, so they look more alive and simple hot-glue them all to the branches. Photos by Alexandra Grablewski