RPi Low-level peripherals
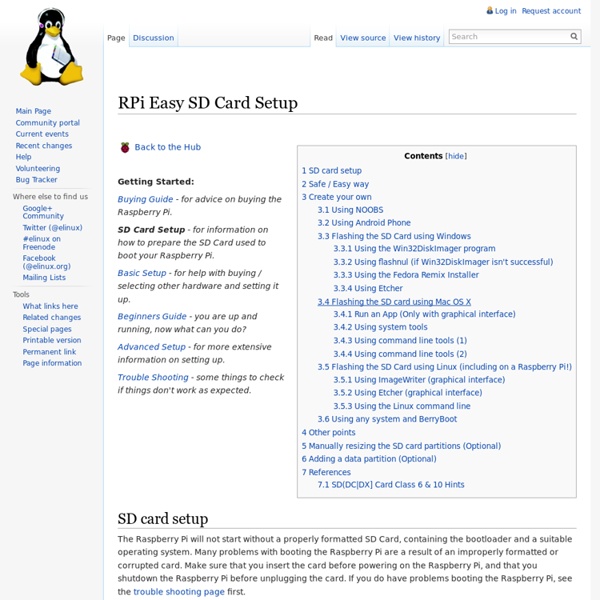
Back to the Hub. Hardware & Peripherals: Hardware and Hardware History. Low-level Peripherals and Expansion Boards. Screens, Cases and Other Peripherals. Introduction In addition to the familiar USB, Ethernet and HDMI ports, the R-Pi offers lower-level interfaces intended to connect more directly with chips and subsystem modules. General Purpose Input/Output (GPIO) The layout of the Raspberry Pi P1 pin-header seen from the top, containing pins useable for general purpose I/O. General Purpose Input/Output (a.k.a. The Raspberry Pi allows peripherals and expansion boards (such as the Rpi Gertboard) to access the CPU by exposing the inputs and outputs. For further general information about GPIOs, see: the wikipedia article. The production Raspberry Pi board has a 26-pin 2.54 mm (100 mil)[1] expansion header, marked as P1, arranged in a 2x13 strip. GPIO voltage levels are 3.3 V and are not 5 V tolerant. All the GPIO pins can be reconfigured to provide alternate functions, SPI, PWM, I²C and so.
RaspBox - Boitier Acrylique pour Raspberry Pi
Vous voulez protéger votre précieux board Raspberry Pi des court-circuits, tout en préservant l'accès aux connecteurs ? Ce boîtier au look hi-tech est constitué de deux plaques de verre acrylique et d'entretoises métalliques. Il se monte sans colle: les différentes pièces s’emboîtent les unes dans les autres autour du Raspberry Pi, et le tout se verrouille avec 8 vis. Si vous inversez la disposition des plaques supérieures et inférieures, vous pouvez fixer sur votre boîtier un Micro-Hub USB Yoctopuce et jusqu'à trois modules Yoctopuce, ce qui permettra à votre Raspberry Pi d'interagir avec le monde réel. Yoctopuce offre gratuitement le design de ce boîtier, sous license Creative Commons Attribution-ShareAlike 3.0 License. Spécifications Articles liés et exemples d'applications Accessoires et produits liés Téléchargements
Speech Recognition using the Raspberry Pi | aO(N²)
I've finally received my Raspberry Pi, and I've immediately gotten to work transferring the speech recognition system I used for the robotic arm to the pi. Due to its small size and low power requirements, the Raspberry Pi is an excellent platform for the Julius open-source speech recognition system. This opens up almost limitless possibilities for voice command applications. EDIT: I am no longer working on Julius/HTK for speech recognition. Please see this post for more information. There do exist commercial offerings of electronic voice command modules, as well as voice command applications appearing in recent smartphones (i.e. In this tutorial, I will be demonstrating how to use the Raspberry Pi for a simple speech recognition system to control the Maplin USB Robotic Arm. Requirements: Raspberry Pi set up and running debian (please follow setup instructions from www.raspberrypi.org) and preferably connected to the internetUSB microphone Loading Drivers sudo modprobe snd_bcm2835 Software .
Raspberry Pi Kernel Compilation
The Raspberry Pi cannot run a vanilla Linux kernel. A patched version of the kernel is maintained by the Raspberry Pi Foundation and is available from their github Prerequisites To compile a kernel, you require dev-vcs/git to download the source code and genkernel to manage the build process. root # emerge --ask git genkernel Get the Kernel Source root # cd /opt root # git clone --depth 1 # ln -s /opt/linux /usr/src/linux Compile and Install the Kernel Note Compiling will take about 6 hours. Using genkernel you can build a linux kernel with support for many different features. Default Kernel In this example the configuration options from the running kernel are used to compile the new kernel. root # genkernel --kernel-config=/proc/config.gz kernel After the kernel has compiled it will be installed into the /boot folder. Kernel with initramfs root # genkernel --kernname=rpi --menuconfig all [Collapse] Kernel configuration
RPi Low-level peripherals
Back to the Hub. Hardware & Peripherals: Hardware and Hardware History. Low-level Peripherals and Expansion Boards. Screens, Cases and Other Peripherals. Introduction In addition to the familiar USB, Ethernet and HDMI ports, the Raspberry Pi offers the ability to connect directly to a variety of electronic devices. Digital outputs: turn lights, motors, or other devices on or off Digital inputs: read an on or off state from a button, switch, or other sensor Communication with chips or modules using low-level protocols: SPI, I²C, or serial UART Connections are made using GPIO ("General Purpose Input/Output") pins. Note that no analogue input or output is available. Links For further specific information about the Raspberry Pi's BCM2835 GPIOs, see: RPi BCM2835 GPIOs. Model A and B (Original) The Raspberry Pi Model A and B boards have a 26-pin 2.54 mm (100 mil)[1] expansion header, marked as P1, arranged in a 2x13 strip. Revision 1 PCBs also do not have the P5 header (see below). Useful P2 pins:
Plus de 50 idées pour votre Raspberry Pi
Nous sommes nombreux à nous être procuré un petit ordinateur Raspberry Pi pour nous lancer dans des projets de ouf malade... C'est très cool, mais à part le classique Media Center XBMC, qu'avez-vous fait avec votre Raspberry Pi ? Si vous séchez niveau idées, voici une petite sélection que j'ai rassemblée au cours des derniers mois. J'imagine qu'il y a encore beaucoup d'autres idées et de tutos, donc n'hésitez pas à partager les liens dans les commentaires, je les rajouterai à ma liste. Merci ! En attendant, j'espère que ceux-ci vous donneront de l'inspiration... On peut donc en faire : Et si vous cherchez un moyen rapide et pas cher de faire un boitier de protection pour vos Raspberry Pi, pensez aux LEGO. Bon, je pourrai continuer comme ça toute la journée, mais va bien falloir que je m'arrête. Amusez-vous bien ! Rejoignez les 60492 korbenautes et réveillez le bidouilleur qui est en vous Suivez KorbenUn jour ça vous sauvera la vie..
How to build a satellite receiving station using a Raspberry Pi
Space and satellites are something that only few people are fortunate enough to interact with. However, this is starting to change due to the rapid growth in capability of consumer electronics. In fact, you can receive and decode transmissions from satellites using only a Raspberry Pi, a USB software-defined radio receiver, and a few other cheap parts. In this blog post, I'll describe in detail how to put together such a system. Experimenting with receiving satellite signals is a lot of fun. Goal Build a satellite receiving station for amateur radio band cubesats using a Raspberry Pi. Parts needed Raspberry PiRTL-SDR or FUNcube Dongle Pro+ USB radio receiverLow-noise amplifier for the 70 cm amateur radio band e.g. Background The satellites we are going to receive are typically orbiting between 300 and 700 km altitude. The orbits of all satellites are regularly measured by NORAD radar and their orbital parameters (known as TLEs or Keps) are publicly available. Hardware construction Preparation