
hand-sewn passport cover Have passport, will travel . . . yes. Have passport in a hand-sewn leather case? JET SETTER. See the full how-to after the jump! Materials leatherwaxed threadcontact cementbeeswax Tools knifecutting matmetal rulerstitch spacer (overstitch wheel)leather awltwo leather needles Instructions 1. 2. 3. 4. 5. 6. 7.
vintage-style book dustcovers Looking at this picture, can you tell which of these books are actually hardbound? I’m not super fussy over the books on my shelves, but I will admit that sometimes a really garish or unattractive book spine will jump out from the bunch and irritate me every time I walk by. I don’t think I would ever take the leap to cover all of my books, but I really like the idea of using these nifty deceptive hardbound dustcovers by Alex Cobbe to gussy up the real eyesores in my collection. Alex used a few inexpensive materials — construction paper, a ruler, a gold pen — to quickly turn her collection of paperbacks into a library of classics — even the Chuck Norris book looks like a masterpiece :) This would be a fun rainy day activity, and the possibilities for customizing this look are endless. Have a DIY project you’d like to share? Materials construction paper (enough to cover your books)rulerscissorspencil and eraserthin gold pengold markeradhesive (Elmer’s or archival glue) Instructions 1. 2. 3.
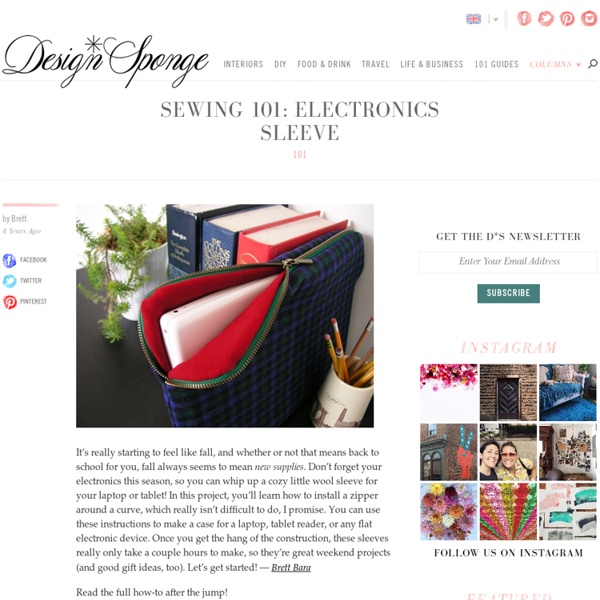
How to sew your own laptop sleeve With more and more people toting around laptops and netbooks, the market for third-party notebook sleeves and cases has heated up. However, as many of us already know, those offerings can sometimes be hit or miss—laptop sleeves can be ugly, expensive, or both. So why not show off how much of a unique snowflake you are by using something unconventional and creative? Making your own stuff has always been a popular pastime among the geek crowd, but DIY projects have taken off especially well in the last couple of years. For the purposes of this tutorial, we are using a sewing machine, which you may also have (don't be bashful, guys—we here at Ars already know that many of you either have your own or have access to one. What you need: Half yard (or so) of outer sleeve fabricHalf yard of lining fabricThread (preferably in a matching or complementary color, but it can be any color you want)Your laptop measurements Optional: Sew-on or glue/iron-on velcro, or a button Getting started Optional flap
Cajitas organizadoras en tela The Wool Food Mama Siempre tenemos en casa infinidad de pequeños objetos que nunca encuentran su lugar, ¿verdad? En LasManualidades te proponemos una solución hecha en casa: unas cajitas organizadoras en tela que, además de súper prácticas, son adorables. Un buen proyecto de costura para quienes gustan de coser cosas para el hogar, y por qué no, un bonito regalo. ¡Manos a la obra! Materiales 1 metro de tela para 12 cajitasBotonesHilo de algodón duroAlfileresTijeraMáquina de coserAgujaPlancha Paso a paso Cortar cuadrados de 30x30 cm. Cortar las esquinas como muestra la imagen, midiendo 7 cm desde los vértices. Abrir el doblez. Volver a doblar en diagonal en la posición opuesta. Cortar las esquinas midiendo 7 cm desde los vértices. Tomar 2 piezas cortadas de este modo y unirlas por el lado derecho. Sostener con alfileres y luego coser todo el contorno comenzando por abajo y deteniéndose al llegar al alfiler superior. Recortar los excedentes en las esquinas y meter las puntas hacia adentro.
diy wednesdays: door organizer we tend to subscribe to the “a place for everything, and everything in its place” philosophy, but when it came to derek’s running-out-the-door essentials (phone, notebook, pen) we hadn’t quite worked out a solution. this fused felt door-handle organizer was a super simple way to eliminate a frantic and frustrating search from our morning routine. have fun!derek & lauren CLICK HERE for the full project instructions after the jump… Derek and Lauren’s Door Organizer here’s what you’ll need: -3 pieces of 9″x 12″ pre-cut felt -9″x12″ piece of double-sided fusible webbing -scissors circle template that measures the same size as your doorknob (we used the bottom of a drinking glass) pen or chalk sewing machine or needle & thread 1. cut out 3 pieces of felt that are approximately the same size. 2. cut out two pieces of double-sided fusible webbing that are slightly smaller than the felt. 4. square up all the edges with your scissors until all three pieces are exactly the same size.
Les explications des housses pour ordinateur portable du N°80 Voici toutes les explications, motifs et schémas des pages 142 et 143 du N°80 de Marie Claire Idées. Les dimensions d'un ordinateur portable variant d'une marque à l'autre, ce schéma vous permettra de mesurer le vôtre pour chaque création. Trompe-l'œil - 50 cm de similicuir en grande largeur - une grande fermeture éclair épaisse et résistante, longueur : A + B + 8 cm. - fil a coudre résistant assorti au textile - une machine à coudre avec une capacité pour coudre les textiles épais et une aiguille pour ce type de textile. Le similicuir que j'ai choisi était épais et doublé d'une sorte de feutre blanc. 1° Prenez les mesures A, B et C de votre ordinateur. 2° Découpez deux rectangles de (A + 4 cm) X (B + 4 cm) ou plus de 4 cm selon vos souhaits. Pour incérer la fermeture éclair, découpez 2 bandes de (C + 3 cm) de large et d'environ A + B + 12 cm de long. 3° Coudre la fermeture éclair entre les deux bandes de (C + 3 cm). 5° Coudre de la même façon le deuxième rectangle (A + 4 cm) X (B + 4 cm).
Simple técnica para hacer tus propias telas estampadas Hacer nuestras propias cosas y personalizarlas para que no haya dos iguales en el mundo es una de las cosas más lindas e importantes de realizar manualidades. Y por eso, en esta ocasión te contamos como hacer tus propias telas estampadas. Una técnica muy linda y divertida. Materiales: Lápiz Tijeras o cúter Plancha de corcho adhesivo Palote a amasar Pintura para telas Tela lisa Paso a paso: 1. Vía | Craftchi vintage postcard calendar journal Growing up, I kept a daily journal. I always enjoyed looking back at previous entries to see what had changed over the course of a year. These days, I can’t seem to find the time to journal, but I do try to jot down a little note from each day on my perpetual calendar/journal. The first year is the least rewarding, but I imagine that in 10 years, it will be a daily treat to be reminded of what happened on that date over the last decade. CLICK HERE for the full how-to after the jump! I’m always trying to give new life to things I can’t pass up at flea markets. Materials fruit box and 12 postcards found at flea markets (my box was $1.00, postcards $1.00 or less each)180 4 x 6″ lined index cardsdate stamppaper cutter (or scissors)twine (for gift wrapping) Instructions 1. 2. 3. 4.
/ ScrapBusters: Two-Handed Pot Holder Today in our ScrapBusters Series, we're cooking up a great kitchen project. Hot pads are perfect for scraps because they are small, simple shapes that cry out for mixing and matching. We 'stretched' our possibilities by making a long, two-handed version. Kind of like those 'idiot mittens' you used to have as a kid; one mitten on the each end of a string running through the arms of your coat. However, we didn't think 'idiot hot pads' sounded very good. I don't know about you, but I always set down my pot holders on opposite sides of the kitchen so when I need both to pull something out of the oven or off the stove, I never seem to have two within reach. We suggest you use a thermal batting, such as Insul-Bright to insure you can handle hot pots and pans without yelping. As with yesterday's project, today's also uses the gorgeous Pretty Bird by Pillow & Maxfield for Michael Miller Fabrics. Any Sewing Machine (we recommend the Janome DC5100) Assemble the mitts Assemble the front layers Tags: