background preloader

Free Pattern to Download: The Madeleine Mini Bloomers

Free Pattern to Download: The Madeleine Mini Bloomers
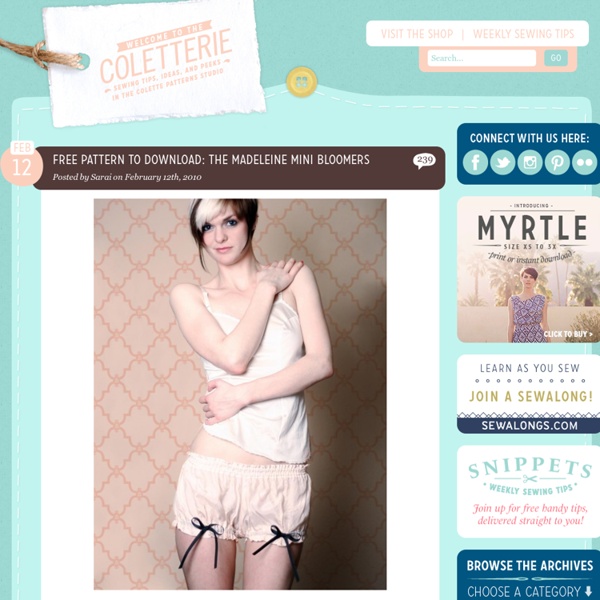
Valentine’s day is coming this weekend, and whether you love it or hate it, you must admit having something adorable to lounge around in makes any day that much sweeter. So I present to you the madeleine mini bloomers, a free sewing pattern that you can download! It takes only a yard of fabric (along with some elastic and ribbon), and an hour or two of sewing to whip up these pretties. These are no prim and proper Victorian bloomers, as you can see. The pattern is put together like any Burdastyle pattern. Download the Madeleine Mini Bloomers pattern! Enjoyed this post? Get all of our tips, tutorials, and discussions delivered to your inbox – it’s free!

Tutorial ~ Hanging Fabric Baskets Or Pockets I know I say this every time, but I am so excited about this project! The possibilities are endless! And they are so easy – I am going to have baskets hanging all around my house in a weeks time. I am using these above my sewing desk to hold all my notions and patterns. Here is the tutorial for making larger baskets with plexiglass in the bottom for great wall storage. Supplies: Fabric – how much you need depends on how big and how many you make, we’ll go over thisHeavy weight interface lining – you want it stiff enough to hold its shapeAll your sewing stuffCurtain rod or wooden dowel with brackets to hang it on Cutting out fabric: To make one basket you need two pieces identical in size. Large pocket: 12 inches wide and 20 inches long.Smaller basket: 8 inches wide and 14 inches long, one only 12 inches long.Smallest basket: 7 inches wide and 12 inches long.Scrap pieces for the part you will use to hang them from, we’ll talk about these later Now sew the corners shut like shown.

Lolita Dress Pattern 1: Tuesday, May 18, 2010 Lolita Dress Pattern 1: Posted by SewLoli at 7:42 AM 3 comments: RibbonliciousMay 20, 2010 at 11:08 AMNice tutorial ^___^ Thanks for adding me at Lolita blogs *happy* ^-^ReplyDeleteYersinia pestisMay 22, 2010 at 2:59 PMAwesomesauce. Load more... Newer PostOlder PostHome Subscribe to: Post Comments (Atom) Followers About Me SewLoli View my complete profile Blog Archive

Origami Kusudama Flower Folding Instructions - How to make an Origami Kusudama Flower Kusudama (translated as "medicine ball") were traditionally used as incense and poutpurri, from real flowers or herbs. Decorative kusudama are made by using folded paper origami units glued together. These instructions show how to make a simple kusudama flower. Twelve (12) of these flowers can be glued together to make a ball. Made this origami? You can watch our origami kusudama flower video instructions, or check out the step-by-step photos below. Origami Kusudama Flower Step 1: Start with a 6 inch x 6 inch (15cm x 15cm) square origami paper, color side down. Fold paper in half on the horizontal diagonal axis. Origami Kusudama Flower Step 2: Now fold both the right and left corners to the top. Origami Kusudama Flower Step 3: Now fold the edge BD onto the edge DE. Repeat on the left side: Origami Kusudama Flower Step 4: Place your finger in one of the outer pockets, and make a squash fold as shown in the next three photos. Repeat the squash fold on the left side: Page 1

Avant Gauche - Elegant gothic lolita The dress I made How to Make Your Own Bloomers! Would you like to make this site your homepage? It's fast and easy... Yes, Please make this my home page! Don't show this to me again. ~Bloomers~ Powered by counter.bloke.com This pattern is very generic. MAKE SURE YOU CUT ON THE GRAINLINE OR CUT ON THE FOLD!!! Step One Step Two Step Three Step Four The Shirt Skirt | Sew Like My Mom July 28, 2010 I’m so excited to post about this! When I met Dana, I fell in love with the skirt she was wearing. She made it herself (obviously) and she showed us how simply she’d shirred the waistband. The next day, during the mystery workshop at Whipstitch, we were encouraged to use thrifted tees. I’m devastatingly terrified of knits so I steered clear and made my (award winning) cotton fabric dress. I developed an idea in my head I thought just might be crazy enough to work. The Hubs thought I was a little crazy when I explained my idea to him. It’s the easiest thing in the world to do! The shirt skirt perfect for summertime. I wore the green and white one to Sofie’s birthday party. I had 2 women in Walmart stop me to tell me how comfy my skirt looked and when I told them how I made it, they demanded I call Rachael Ray immediately! The process is so easy. I do my shopping at Goodwill for 1 reason. So, get your super cheap thrifted shirt. Now, I break a rule of shirring. And that’s it!

www.neitherland.com - Gothic Lolita GothCraft index See also: clubs, journeys, gallery Gothic Lolita Bible Vols 4 & 5 online Scanned in by me, patterns will be/are there too. Only a few pages are there so far, I'll do more on weekends when I'm home. (the link was hard to find before). About Gothic Lolita This page was created August 2002. My Gothic & Lolita Bibles and translating The Gothic & Lolita bible books (magazines?) First I was going to attempt to learn japaense using some free learn japanese websites and a book on it. Then I was going to then try to match up letters/words with ones in this cool magazine Mangajin which was published (1990-1997) to teach one to speak & read japanese using pop culture. I learned in my research that Romaji is what it is called when japanese is spelled with english words, or romanized. Then I decided, crap, this is not working. Also, once I learned that Romaji to English was what I needed, I searched that on google. Resources on the web Buy Gothic & Lolita Bibles here - at funjisan.com.

Design*Sponge » Blog Archive » diy project: matt’s woven leather stool I’ve been doing a fair amount of home cleaning lately, and I think when it’s all over, I’d like to reward myself with one of these beautiful woven leather stools. Matt, the immensely talented craftsman behind Wood and Faulk, created this versatile little stool with simple tools and a few raw materials. I love the luxurious, pale leather, and Matt recommends using Danish oil to help bring out the rich tones of the oak and leather, allowing the woven seat to change color over time. I can’t wait to see more incredible creations from Matt and am so excited to try this out for myself! — Kate CLICK HERE for the full how-to after the jump! A small space necessitates smaller furniture. Materials #6 carpet or upholstery tacksstrap material, leather or upholstery webbing2 x 2 oak for legs1 x 2 oak for stringerspocket screwsDanish oil Tools pocket-screw guidedrillsawsquaresandpaperrags to apply finishtack hammer Instructions 1. 2. 3. 4. 5. 6. 7.

Lolita Tutorials ~Ruffles And Stuff~

Related: