
Pinwheel DIY from Paper Source - Style Me Pretty Living Categories Tags Vendors Season Style Colors Though you’d never be able to tell based on the snow and crisp temperatures scattered throughout North America, I’ve been told that Spring is officially here. Pinwheel DIY Cardstock Ruler 1/8″ hole punch Striped straw A brad (you can find them at any arts & crafts stores) Cut a5” square of paper and using a ruler, lightly draw two diagonal lines across the square, from corner to corner. Using scissors, cut along the lines towards the center of the square, stopping approximately ¼” short of the center. Using a 1/8” hole punch, make a hole at the center point and bottom right corner of each cut segment as shown. Flatten one end of the straw and make a hole using the 1/8” hole punch. Fold hole punched corners towards center and insert brad through each hole, ending with the center hole. Insert brad through the straw before securing the back of the brad in place. Note: the pinwheel is for decorative purposes only and does not spin Join The Conversation
salvaged barnwood headboard Lately we’ve been getting more requests for furniture DIY projects. Luckily this awesome tutorial from Sarah Torrence of 508 Restoration & Design for a salvaged barnwood headboard landed in my inbox, and was just too pretty to pass up. Due to their size and the amount of use they receive, headboards can be intimidating, even if the form is fairly straightforward. Sarah had demystified the process and given us a great starter project for anyone looking to give their bedroom a bit of that rustic, organic feel a perfect quick and easy refresh for fall. Thank you so much for sharing, Sarah! Read the full how-to after the jump! This project was born because we needed a headboard, we already had some fantastic oak barn wood and we were ready to build something that was meaningful to us. Materials Tools miter sawdrillratchet or wrenches for tightening boltsair compressor (optional) Instructions 1. 2. 3. Note: Keep in mind that actual barn wood is random and not necessarily square. 4. 5. 6. 7. 8.
Cupcake Flower Lights May 24 By Steph Hung May flowers have arrived! These lights were inspired by all the beautiful blooms I’ve been seeing around town. I wanted to bring the summer indoors, but they could make for some colourful outdoor lighting too: Making these floral garlands couldn’t be faster – all you need are cupcake papers and string lights, and you’re on your way to some simple summer lighting. Materials you will need: cupcake papers (large and small), string lights, scissors, and an exacto knife. Step 1: To make leaves – fold a small cupcake paper in half 2 times, and with the folded point at the bottom cut a leaf shape. Step 2: To make an 8-petal flower – fold a small cupcake paper in half 3 times, and with the folded point at the bottom cut around the top. Step 3: To make a 16-petal flower – fold a large cupcake paper in half 4 times, and with the folded point at the bottom cut around the top. Step 4: Cut a small X in the center of each paper. Sorry, the comment form is closed at this time.
Faceted Vase DIY + Free Template I love the modern look when paper gets folded in facets. This modern paper vase tutorial is really easy to make and you can just slip it over a glass for a fancy look. It is easy to resize the template to go over a bigger or smaller vase if you need. Materials Needed: Cardstock, Free Template, Glue, Scissors, Scoring Tool Step 1: Download Templates here and cut them out. Credits and our Talented Contributors:All photography by Kate Nicholson for Oh Happy Day Art Directed by Jordan Ferney Produced by Ashley Rose Kirschling Styling and Crafting by Chloe Fleury Assisted by Anais Profit And thank you to Lauren for modeling!
Des étagères invisibles J’avais trouvé l’idée de ces étagères invisibles sympathiques. Les livres étaient suspendus au mur comme par magie et ça me plaisait bien cette idée que tout le monde allait demander comment, mais comment donc, c’était possible. Mais à 15 euros le bout de métal permettant de créer une pile de livres, fut elle « suspendue comme par magie », ça faisait un peu cher, surtout pour faire disparaitre une bibliothèque entière. Et puis au détour d’une allée Ikéa, la solution est apparue quand mon chéri et moi sommes tombés nez à nez avec Skribent. Sur l’image ci-dessus, l’orginal à 15 euros (sans compter les frais de port) est à gauche, notre version à 4,50 euros (sans compter tous les autres trucs qu’on achète forcément chez Ikéa) est à droite. Consulter les autres DIY. Laetitia Elevée aux loisirs créatifs par une maman bricoleuse, j'ai toujours aimé jouer avec les ciseaux, les aiguilles et les crayons à dessin. You Might Also Enjoy Reading
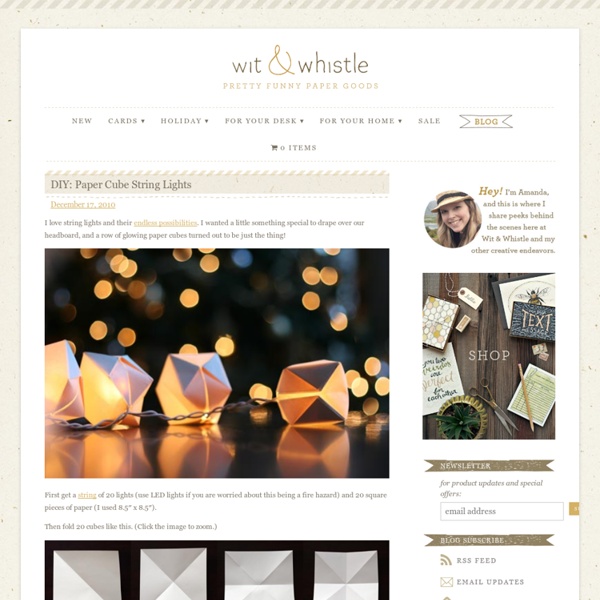
DIY Lighted Paper Pennant Garland | DIY Wedding Blog This paper garland takes a festive twist on an old favorite by creating cone shaped pennants attached to a strand of cafe lights. Strung in the trees or over outdoor tables, this is a wonderful way to light up an evening wedding. In this sample I chose to write out a couple’s names (“EVA & JACK”) but feel free to punch any wording or design that you like. -AnnaRIFLE design Supplies: 1. cafe string lights; 2. scissors (plus X-Acto knife if you have one); 3. glue (heavy duty); 4. craft paper (at least 14″x14″); 5. screw punch; 6. ruler; 7. pencil and eraser Additional items: bone folder (for scoring folds), tape Begin by printing out the template for the shape of the pennant. Trace the shape onto your desired paper and cut out. Turn the pennant over and draw your desired design or letter with pencil and then punch it out along the lines with a screw punch. Once the glue is dry gently pop the cafe bulb into the top of the pennant. Online Resources: String Lights local Target or Party Lights
DIY Pocket Book - Design Is Yay ! I’m a note-aholic. I have a collection of notebooks in different sizes, materials and thickness. Sometimes I feel guilty when I buy yet another notebook or notepad. But just like a shopaholic, I couldn’t stop. The weird thing is sometimes I don’t really use them. When I’m feeling like everything around me is so bland and boring, I like to look through my pile of notebooks and notepads. My favourite type of notebook is the pocket book. All you need is to download and print the pocketbook covers on thick carton paper (200 gsm and above preferred), plain or lined paper cut into 20.5 x 13.8 cm size for the insert and some twine or staplers. They will also make an awesome gift! Please read before you download
Make my wall Depuis le temps que j’ai envie de le faire ce DIY, cette idée me trotte dans la tête depuis des mois… Et puis un jour, je récupère du papier à la pelle (merci mes amis du creative sweat shop ) et là je me dis que je n’ai plus d’excuses, je m’exécute… c’est peut être le DIY le plus simple de tous les temps, de toute l’histoire du DIY en papier (si si je vous jure)… Quoique, cela demande juste un peu de dextérité en « découpage de cercles aux ciseaux »… mais bon si vos enfants, petits frères et même nièces s’ennuient sérieux car le centre aéré est fermé pour cause quarantaine, mettez les au boulot! Ils sont trop forts les kids de leurs 10 doigts… Voilà une fois la main d’oeuvre trouvée, il ne vous reste qu’à choisir les coloris, la meilleure partie en somme… Le directeur artistique c’est vous, et ça c’est le kiffe mais attention n’y prenez pas trop goût parce que la semaine prochaine vous allez avoir du pain du planche, et sur le clavier!
DIY Project: How to craft a twine-ball light garland Time for another DIY craft project and today I’ll be showing you exactly how you can make this twine-ball light garland yourself. It’s one of those projects that’s a little bit messy and does take quite a bit of time, but it is so much fun. Plus you have a really cool piece of decor at the end of it. Perfect for parties or around the home, you can paint it up in any colour you want to match your design scheme, and when lit, it looks so pretty, casting lots of patterned twinkly light everywhere. Mine is now taking pride of place in my office. How-to make a Twine Ball Light Garland I’ve seen twine balls used for all sorts of purposes, from chandeliers to dining table decor, so I thought I’d have a go at making a light garland using this idea. I chose to use coloured twine, alternating between pink and purple twine balls. {You will need} {Four} This is the really messy part. {Five} Leave to dry overnight. So what do you think, is this one you’ll be trying out at home? Michelle x
Wild Olive: printable: apple sticky notes A few years ago, I made some Valentine's Day sticky notes, and I've wanted to make more ever since then. Guess what? I finally did! I thought that back-to-school time was perfect for this, because they're perfect for notes in school lunches, notes to (or from!) the teacher, or just for remembering school things that need remembering. They feature the same apples from Monday's printable paper, but this time you can print them out to be yellow, green, or even red if you have red sticky notes. To print on sticky notes, you need regular paper and an inkjet printer, plus some 3x3 inch sticky notes in apple-ish colors. Print the PDF at 100% onto plain paper. I've printed lots of these for school and church projects, and never had any big print issues. You can use the same page over and over to print more notes! Another way to customize your sticky notes is with a rubber stamp, something I've always had on my list of things to make for gifts.
LE DIY TUTU via Hello, C’est Mercredi, c’est DIY ! Un peu de déco, car il y avait longtemps, j’avais aussi préparé un DIY à mettre sur la tête… ENCORE (vous allez me dire) mais ça attendra un peu… Il y a quelques temps maintenant, au détour de mes recherches d’inspirations pour notre nouvel appartement, j’étais tombée en amour pour cette image, qui avouez-le est sacrément canon. Elle arrive tout droit d’un site suédois dont j’ai oublié le nom mais si ça vous dit quelque chose, dites le moi, je ferais un petit edit. Quoiqu’il en soit, vous commencez à me connaître, moi et mon amour pour le tulle, le plumetis et tout ces jolies matières vaporeuses, alors quand j’ai vu cette suspension, mes yeux se sont transformés en coeur, et puis je suis partie à sa recherche sur les internets,telle une croisade. Pour faire ce DIY LUMIERE TUTU, Il vous faut: Un abat-jour de plafonnier classique , ils sont tous ignifugés dans le commerce (sont pas fous!)
DIY Washi Tape Notebooks and Pencils Confession time. I am addicted to washi tape. Not only are the pretty colors and patterns a pull for me, but it is also the fun projects I see that are waiting to be created with this pretty tape that have pushed me into the state of obsession. I am very lucky to have Collage, a local craft supply store in my neighborhood that has a washi tape obsession equal to mine. For those of you who don’t live in Portland, my second favorite source is Cute Tape and her online shop.