halligan’s denim cut-offs wine bag
When the time comes for your jeans to be reincarnated into your new favorite shorts, the top gets a new life but what about that sturdy bottom fabric going to waste? I have been saving the bottoms of cut off jeans for two years now, knowing that someday I would have a bright idea of how to put them to use. Denim crafts can go wrong in so many ways but my goal in this project was to cure denim crafts from their not so hip past using a little bleach and stitchery! CLICK HERE for the full how-to after the jump! Materials: - jean leg bottom - sturdy fabric of choice (for lining) - bleach (optional) - scissors - ruler - fabric pencil/marker - pins - sewing machine Optional Step: Bleach jean leg bottom to desired color. note: Make sure to wash both your liner fabric and denim before you start sewing because the fabrics may shrink unevenly. 1. and a 14.5″x15″ rectangle of liner fabric. 2. then iron down and create a crease. 3. of seam. 4. For more info on an easy French seam go here To make handle:
Sveas
leather envelope phone case
As you may know, I have a weakness for tech accessories — especially ones that you can DIY — so it should come as no surprise that when Aimee of SwellMayde offered to share this tutorial, I immediately said yes. Aimee was even kind of enough to make a leather case in the signature D*S color — bright coral! This DIY is super easy; the combination of basic materials and a printable template means even a novice crafter can produce this chic, simple phone case for themselves or as a gift in no time. Have a DIY project you’d like to share? My favorite ideas usually stem from necessity. Materials leathertopstitching threadscissors stitching awle6000 glueneedletapecell phone case pattern Instructions 1. 2. 3. 4. 5. 6. 7. You’re done!
Pyssel, gratis mönster, virka, sy, tips och idéer!
sewing 101: branch handle tote
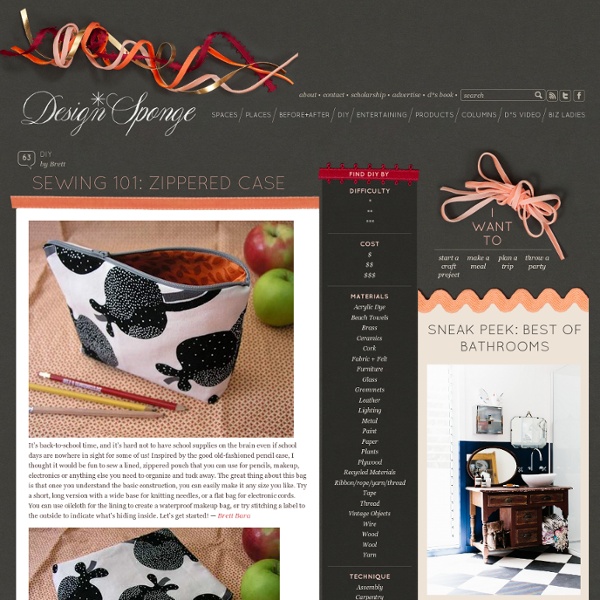
Add a little autumnal flair to your fall wardrobe with this rustic tree branch tote! This sturdy piece is great for carting daily necessities on your commute or for more outdoorsy tasks like packing a picnic or carrying camping supplies. The bag itself features a basic construction that can be adapted and used with any type of handle, so if the branches aren’t quite your thing, it’s easy to make fabric straps instead. Look for nice, straight branches that have fallen from trees in your local park or woods or, if you can’t find any, check at a floral supply shop. Let’s get sewing! — Brett Bara Read the full how-to after the jump! Materials 1 yard heavy-weight fabric, such as canvas1/2 yard coordinating fabric for color blocking2 branches, about 1″ in diameter and 17″ longsawdrilltwinelong needlesewing machineironbasic sewing supplies 1. Cut the following pieces from your fabric: Here’s a detail shot of what the bottom corners will look like with a 2″ square cut from each corner. 2. 3. 4. 5.
redoit
leather lunch tote
I don’t bring my lunch to work as often as I should. And by that, I mean never. What if I had a cool lunch tote? It might not help, but at the very least, it’s a fun project to practice your hand sewing and to make something interesting. Whether you need a lunch tote or not, this is a project you can modify for your own totable needs. See the full how-to after the jump! Before starting, print out the template on your printer using the “tile” function and tape it together to 100% scale. Materials 6–7 oz. weight stiff leatherheavy waxed thread Tools leather punches — #5 and #00leather sewing needlescontact cementrotary kniferulerstitching spacerdownloadable template Instructions 1. 2. 3. 4. 5.
:: lugnadig.nu - pysselskola ::: gör mjukisdjur av gammal strumpa
gör mjukisdjur av gammal strumpa Bloggen har flyttat. Du hittar inlägget här. Kanske gillar du: vampyrnallen vampyrnalle-bebis iphone-vampyrnalle Linkwithin Skicka med e-postBlogThis! se fler beskrivningar av annat virkat, figurer, presenter, vampyrer, virkat, återvinning Inga kommentarer: Skicka en kommentar Senaste inläggÄldre inläggStartsida Prenumerera på: Kommentarer till inlägget (Atom)
kate’s notebook lunchbag
oh i love this time of year. this month’s theme is definitely going to be back to school, because who can help but be at least a little excited about the start of fall and a new year for students everywhere. send your favorite student to school (or work) with this notebook lunchbag! this is completed in a jiffy and is very inexpensive. much like that pristine first page of a new notebook, the hardest part is deciding what to write on it. have fun! -kate CLICK HERE for the full project after the jump! materials: 1. striped canvas fabric (1 yard) 2. sewing machine 3. red and cream thread 4. black fabric marker 5. ruler 6. scissors instructions: 1. take your fabric and lay it on a flat surface. measure and cut out a large rectangle that is 34.5 x 33 (the 34.5 should be cut parallel to/along with the stripes, and the 33 should be cut perpendicular/through the stripes). this will be for a bag that is 8.5″ x 11″ (of course!) 6. you now have your bag complete!!
Owl Stuffies Tutorial
Ever since I made my son’s Halloween costume I’ve been having a lot of fun sketching and playing with the idea of making an owl stuffie. So when my mom commissioned me to make a stuffed animal as a present for a friend’s new baby I knew exactly what I wanted to make. This Pattern is to make a small owl stuffie (like the aqua one above) This pattern is not for commercial use or monetary gain Supplies 3 coordinating fabrics (one of them should be a solid color).a small amount of orange felt for the beakPolyfillScissorsFabric paint or felt for the eyesSewing machineNeedle and threadPattern below Open this image in a new tab and print at full size. The fabric that I choose for my main color came from an old pair of pants and was a heavier weight than the cotton quilting fabrics that I picked for my belly and tail colors. The next step is to join the belly wings and face pieces to make the front of the owl. Afterwards you can trim the excess wing to even up the seam.
upholstery basics: poolside roll up
It’s been heating up around Austin — 90, 95, 99 . . . 100+! The hotter it gets, the more I want to dive in, so this month on Upholstery Basics, I thought we’d whip up a poolside roll up for the upcoming months of sunbathing, daydreaming and catching up on Us Weekly (I’m not ashamed to admit it!). The best part is, it’s made of beach towels! — Amanda Read the full how-to after the jump . . . Materials 3 large beach towelspainter’s tapechalksquareyardstickmeasuring tapecompassscissorssewing machinethreadt-pins24″ of velcrocarpet paddingpolyester fiberfillcurved needle Don’t forget to check out Upholstery Basics: Tool Time to learn more about the tools we’re using today. Instructions 1. (1) 5″ tall x 30″ wide (piece that connects the neck roll and mat) (1) 20″ tall x 31″ wide (body of the neck roll) (2) 7″ diameter circles (ends of neck roll) (2) 37″ tall x 5″ wide (straps that wrap around the rolled-up mat) (2) 66″ tall x 31″ wide (mat) 2. 3. 4. 5. 6. 7. 8. 9. 10. 11. 12. 13. 14. Tips
ennui -
Om man vill ha en bukett som inte vissnar kan man göra en av pappersblommor. Använd tapetprover (går att beställa billigt på nätet) och ståltråd. Klipp och klistra. Jag tror att ni förstår principen, det är inte raketforskning direkt. Hälsa gärna på i min blogg där det bjuds på humor, stand up, muscicerande och andra rolighter :)