
Crown Hill: Friendship Ear Buds I first saw this idea on pinterest, and loved the look! Anie, of SassyBudsz, has opened an etsy shop selling friendship ear buds. Check out her shop here. SassyBudsz also has a blog and a facebook page. Check it out! This craft brought me back to making friendship bracelets on warm, sunny days at family camp. All you really need is some string, and ear buds. To get started: tie the string onto the end of the cord with a knot. Step 1: Bring the string under the ear bud cord leaving a loop on the right for your hand to fit through. Step 2: Reach through the loop, grab the ball of string, and pull it through. Step 3: Pull the string tight against the cord, as you can see in the next two pictures: It's as easy as that! Here are the multi-colored Sassy Budsz that Anie sent me in the mail.
D-I-Y: Loopy Christmas Balls | Laura Wears... DIY Wood-Grain Laptop Wrap When I was wandering through the dollar store the other day I came across this super amazing wood-grain contact paper. and was completely smitten! I knew I needed to find something to cover it with - pronto! Enter, my lapytop. This poor beast is old, makes a crazy fan-sound whenever it's on, and can't really handle doing more than one tast - but it works! So, I had plenty of photos of the entire process, but my camera is also an old and quirky beast and has taken to randomly deleting photos, which it decided to do half-way through the whole DIY process, so sorry! So, to start, go ahead and power off your laptop and take out the battery so you're free to work on it without any worries. Now, unroll your contact paper, and lay your computer on top with the grain going wichever way you want, then cut around it, leaving a large boreder on all sides (you'll trim it down later). Now, you can decide what you'd like to do about the logo on your cover.
Making stickers out of recycled paper Making stickers out of recycled paper October 25th, 2011 I recently discovered this great tutorial by Amanda Wood on how to make lovely stickers from recycled paper. The best thing about it is that the tutorial uses one of my favourite things – envelopes with funky security patterns. How could I resist! You will need: For the glue: 6 tbsp white vinegar 4 packages of unflavoured gelatin 1 tbsp flavouring such as peppermint, lemon or vanilla extract For the stickers: foam paint brush security envelopes or other papers from the recycling bin (enough glue for about 20 envelopes) paper punch (I used a 2″ scalloped circle punch in the picture) sponge for moistening stickers First of all you need to make the glue, so bring the vinegar to boil in a small pan. If you don’t want to go to all the hassle of making glue, you could always use ‘lick n stick’ glue – it’s the stuff I use for my recycled envelopes and you can get it here.
DIY Wrap Headphones | I got the idea to make these from the DIY wrap bracelets I made a little while ago. These headphones were all white before, and since I had the coloured string left over from the bracelet tutorial, I decided to try it! To start off, take the string and tie a knot with it around one of the wires. If you want, you can add beads along the way to jazz it up a bit. I thought these turned out pretty good, but I didn’t like the look of the knots all over the headphones. Let me know if you are going to try this! Like this: Like Loading...
Paper Star Lantern Tutorial Buon lunedì a tutti!! Iniziamo la settimana con un bel DIY dedicato alla Pasqua! Tra mille possibilità di decorare le uova, io ho scelto di fare dei coniglietti, da usare per vivacizzare la tavola e far giocare i bambini, o anche come segnaposto. Happy Monday everyone! Ma come vedete, almeno oggi sembra andare tutto bene!!!!! But as you can see, at least today everything seems to be going well!!!!! Vi serve: tempera acrilica rossa, cartoncini panna e rosa, pennarello nero indelebile, matita, pennello, gomma, colla stick, forbici, bicchieri di carta, colla vinilica. You will need: red acrylic paint, cardboards cream and pink, permanent black marker, pencil, brush, eraser, glue stick, scissors, paper cups, PVA glue. Il vostro coniglietto è pronto! Your bunny is ready! Vi suggerisco anche un semplice giochino da fare con i bambini!
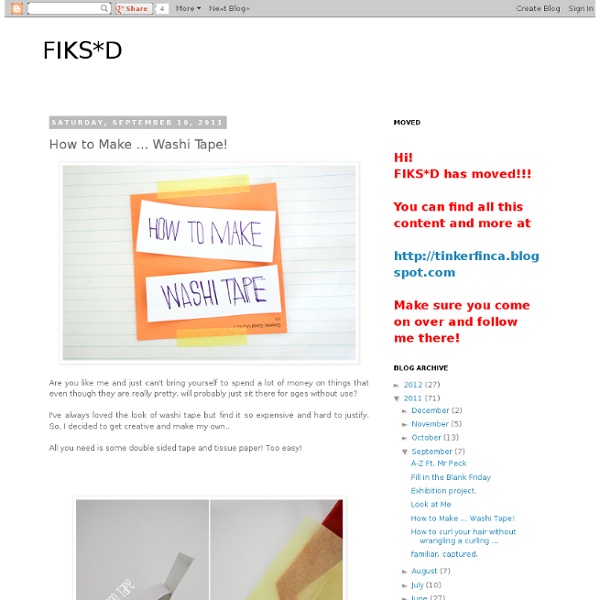
DIY Washi Tape Laptop Keyboard Look whose little old MacBook got a facelift this weekend! I spotted this idea from minifanfan on Making It Lovely last week and just had to give it my own spin. I purchased my Japanese washi tape from Le Box Boutique on Etsy. There are hundreds of washi tape sellers but I chose Le Box because they allow you to purchase tape by the foot rather than having to purchase the entire roll. They were very easy to interact with and I would definitely recommend them if you’re looking to purchase washi tape! I chose these ten patterns but only ended up using eight of them on my keyboard. I first thoroughly cleaned my keyboard with rubbing alcohol to remove any dirt or oil that might keep the tape from sticking. I originally wanted to do all the keys, including the small keys in the top row, but the tape seemed to have a harder time sticking to the small keys. This project was a bit tedious but simple – perfect for a few hours in front of the tv. What do you think? Tagged as: craft, diy, tutorial
MAGAZINE ENVELOPES 18K+ Well I got this idea from our friend Nina. She was making these super cute envelopes out of scrapbook paper and I really wanted to make some! So I came home and made some! You will need: An old magazine, scissors, an envelope, a glue stick and a Sharpie. Tear out some magazine pages that you like. Carefully pull the envelope apart. Trace the envelope on a magazine page. Cut the envelope shape out. Turn the envelope over as well as the magazine cut-out. Unfold everything and separate the magazine cut-out from the envelope. Glue the bottom flap down to the two side flaps. And you've made your own envelope! The great thing about making these envelopes our of magazine pages is that the envelopes have a character all of their own.
the DIY: FISHTAIL FRIENDSHIP (BRACELET) If you know how to do a fishtail braid to your hair, then you pretty much know how to make this bracelet. But for those of you who don't know about the fishtail and those of you who are curious about the logistics of my specific bracelet, well, read on! You will need embroidery/ friendship thread in various colors, some tape and a bead! I used 9 strands of thread in 9 different colors. I twisted this top part so it doesn't get all tangled later. Where you twisted the top part, tie it around your finger. Then tie a knot. I'm now taking one of the strands and tying it around the other, almost like a tie. Then pull the end through the loop you've created and pull into a knot. Tape the top down to keep the bracelet stable. Star by grabbing one color from the right side and pulling it to the middle. Pull the same color from the left side. Add the piece from the right side to the left group of colors. Now take the color from the left side and pull it to the middle (over all the other strands.)
Paper Onion Garland I made these map garlands as a special request for a customer and they have proved rather popular. The map colours glow in the light – all those blues and green smoosh together into something very pretty. This is the style I call ‘paper onions’. I don’t know what else to call them! These are paper hearts, strung on twine. There are eight on a string. I’d like to experiment with something other than twine though. Like this: Like Loading...
15 Amazing Ways to Tie Your Sneakers | Hourlylaff Amazing Way to Tie Your Sneakers 1. The lace is run straight across the bottom and emerges through both bottom eyelets 2. The laces then go straight up and are fed into the next set of eyelets up the shoe 3. The ends are crossed over and are fed under the vertical lace section on the opposite sides of the shoe before going straight up and into the next set of eyelets up the shoe 4. 1. 1. 1. 1. 1. 1. 1. 1. 1. 1. 1. 1. 1. 1. Ian’s Shoe Lacing Powered by ScribeFire. Books on Shoe Lacing Welcome to Hourlylaff.com.