DIY Wrap Bracelet
You should all know by now that we are all about stacking bracelets on our wrists. The more, the better. In fact . . . the most, the best! With that being said, we’ll show you how to master a version of the ever so popular wrap bracelet. It’s so simple and addicting, you’ll soon be churning out these wristlets with your eyes closed. Clearly this arm party train isn’t stopping and it’s about time you get on board! You’ll need (for a double wrapped bracelet) :* Lengths will vary depending on the size of your wrist (see comments for suggestions). Fold the length of leather cording in half to form a loop. Place the ball chain along the leather cording with the end of the chain meeting the end of the wrap. Continue wrapping while checking it for fit around the wrist. When you have reached the end of the ball chain wrap the linen cording around the leather strands 2-3 more times. Thread the hex nut through the strands and tie a second knot. Trim with scissors and your wrap bracelet is finished!!
tutorial: how to sew a simple maxi dress
The Plan. Fabric. You will be making a maxi dress so buy fabric accordingly. I stand 5′ tall (I know, I know, I am tiny) and I needed 2.5 meters of fabric with a 45-inch width. Preparation and Cutting. Sewing. Don’t forget the banana. Instructions for making the rosettes are HERE.
Gathered Clutch Tutorial
Anna of Noodlehead is sharing the most beautiful gathered pouch tutorial. What a perfect gift! Anna has plenty of gorgeous gift giving inspiration at her blog. If you love pouches you might also like these zippered pouch tutorials! Pleated Zippered Pouch Lined Zippered Pouch How To Make A Gathered Zippered Pouch Materials needed: 1/4 yard each of three coordinating fabrics (you’ll definitely have scraps leftover)8″ zipper (you can always purchase a longer zipper and shorten it, just follow the directions on the packagescraps of medium weight fusible interfacing Cutting the pieces: For the main exterior, cut two pieces, one 5.5″ tall by 9″ wide, and one 5.5″ tall by 13″ wide (this will be the gathered front) Pieces of medium weight fusible interfacing for exterior pieces of clutch: (2) 5.5″ tall by 9″ wide For the front band, cut one piece 4″ tall by 9″ wide. Take the front band piece and fold it in half the long way (right sides together) and sew together using a 1/2″ seam allowance.
Saltwater Kids: RETRO DUFFEL bag TUTORIAL
Boys, boys, boys. The silly things they say and do keep me laughing all the time. In fact, as I was working on this post my three year-old came blasting by, one arm outstretched, clutching his toothbrush, shouting (in a deep manly voice) "Oh, Mr. Plaque I am coming to get you!" Dental Superheros make my day! My favorite part of making this tutorial, by far, was the photo shoot. I am so excited to share this project with you because it is as fun as my two silly boys. The design of the RETRO DUFFEL is based on the original Duffel Bag - the manliest of all the bags in the luggage family. This is a miniature version of the typical duffel bag, perfect for an overnight stay at Grandma's, hauling gear to the big game, or for storing my all-time favorite gift - the FORT KIT! OK, lets get started! Materials: *if you have trouble finding a 16" zipper, a larger size will work fine. You will find the how-to for the handles HERE: Cut: 26” X 16 ½” - body (2) 8 ½” circle - end (2) 16 ½” X 5” - zipper lining
How to Make an Origami Heart using a Dollar Video
Here, I’ll show you how to make an origami heart out of a dollar. There are many different patterns out there and this one is sometimes called change of heart. You’ll need a dollar bill or any U.S. paper currency. For this video however I’m going to be using a piece of paper approximately twice the size of a dollar so you can see what's going on more clearly. If you have trouble pinching in the sides to form the water bomb base, you can flip this over. When you do this, it kind of looks like a kite and now we’re going to squash these triangles down.
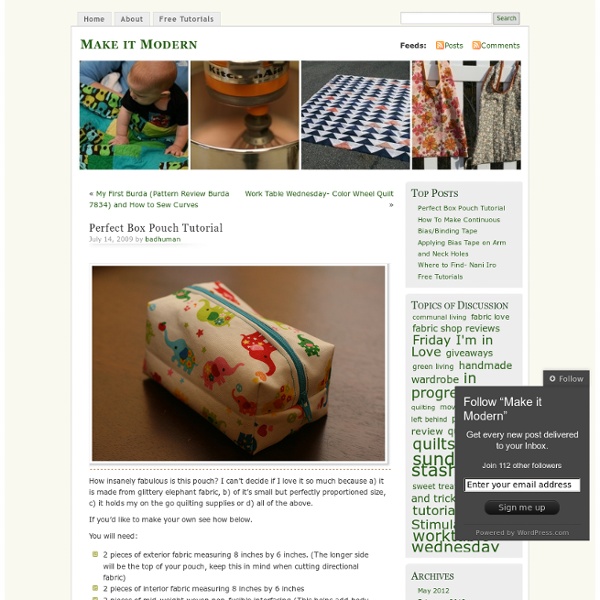
Fully lined zippered box pouch - pattern and tutorial - it's a Pretty Modern life
I love the look of a zippered box pouch...so incredibly cute. I found many tutorials on the internet, but was disappointed after making pouches following these tutorials to find that they were not fully lined; looks so much nicer when you open your pouch and there are no seams. It took me a long time to figure it out and I thought and thought and thought...then I got it♥ I don't want to keep this knowledge to myself, so here it is. I'd like to thank Jane at Projects by Jane (the only other tutorial like this that I was able to find on the internet - wish I'd found it sooner). ♥♥♥Thanks so much! The finished pouch is 3 high x 4 wide x 7 long (inches) Here's what you need: 1 twelve inch zipper 2 10x7 inch panels for the lining (my lining fabric is the green one) 2 10x7 inch panels for the exterior (my exterior fabric is the brown floral one) 2 4x3 inch pieces of complementary fabric for the pulls at the end of the zipper STEP 1. STEP 2. STEP 3. STEP 4. STEP 5. STEP 6. STEP 7. STEP 8.
Braided Headband Tutorial
It's chilly outside here today and I'm loving it! I enjoyed every minute of reaching into the closet and pulling out soft cozy blankets, snuggling up on the couch with my blanket and laptop to check my e-mail this morning... Don't get me wrong, I'm not a fan of temps below 40 degrees, but a high of 65, I'll take it! Anyway.... on with the tutorial. Here is what we are making today! What you need- Thick hair tie Six 1" strips of fabric Bulldog clip or safety pin Sewing machine (or needle and thread) Fabric tac I ripped my fabric strips so they were a bit frayed on the edges, personal choice. Tack each end of the braid just enough that it doesn't come undone . Then tack both braids together on each end, be careful not to twist the braids. Cut your hair tie so it's one strip of elastic. Sandwich your elastic ends between the ends of your braids on each end, again, careful not to twist the braids. Sew over the elastic so that it's secure. Your done! Enjoy!
DIY {doily canvas bag} & ashleyannphotography.com
Thankfully everyone seems to be making a switch from plastic to lasting when it comes to shopping bags, so here’s another fun little tutorial on customizing one to make it oh so cute. You might notice a lot of doilies in my recent diy projects. Since I was getting so many ready for A Christmas Gathering I used a lot of the same materials…monograms seems to be pretty popular now too. Canvas bag ($2.00 when on sale at Hobby Lobby), fabric paint, paper doily, Krylon Paper Finishes Adhesive Spray : Spray doily with paper spray adhesive and press down on the bag (not shown). : Gently paint over the holes – I recommend paint meant for fabric, not crafts. : Peel back doily before paint dries. Bag after doily is removed I traced on my letter and filled it in with paint. For a cook: fill it with cooking supplies For a gardner: fill it with gardening supplies For a teacher: lots of fake wood painted apples (I’m kidding)…maybe find out an activity they enjoy and do something related to that