P.S.- I made this...
V and Co how to: jersey knit bracelet
i don't know what it is about this time of year that makes me just want to have my bare feet in the sand, be watching the sun setting into the ocean, and breathing in the warm salty air of the beach...as i get older, more and more i find myself missing that place i used to go to almost every.single.day. as a teen. (my skin doesn't miss it. as a matter of fact, i now wish i listened more and DID put SPF on my face...hindsight is 20/20). my mom calls me from her walk on the beach almost every morning...*sigh*yeah, i get a little homesick around this time of the year. heck on my pinterest my "dreaming of summer" has the most pictures in it. ah yes. i miss my ocean. case in point. this bracelet, brought a flood of memories, not because i used to have one like it but because i can totally see me wearing it by the beach, not caring that it's gotten salty and wet, because i can totally make another one in like less than 5 minutes flat when i get home. *sigh* okay... *cut off excess tails!
Dare to DIY
Recycle Tutorial – Making Of T-Shirt Yarn
Another tutorial to help save our Mother Earth by turning unwanted items into something useful. This is the yarn ball I made out of an old T-shirt which I have been wearing for 10 years day-in day-out, wash-in wash-out. It finally broke down and tore at the collar and sleeves. Waste not, want not, I decided to recycle it. I have finished making the drawstring bag as shown above. {CLICK HERE to get the Recycle Tutorial – Making Of T-Shirt Yarn.} Pages: 1 2 Print / Download PDF
I Spy DIY
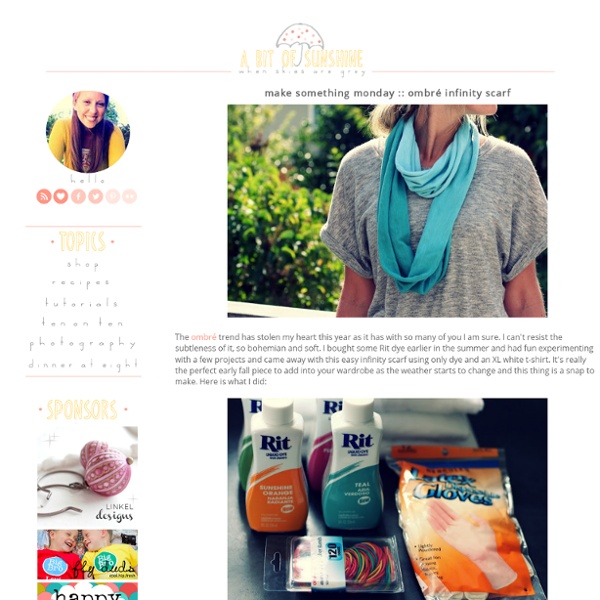
Tutorials for Recycling T-Shirts
So way way back, in June, I wrote this Studio Organization post, about starting the process of organizing my studio by cleaning out the closet full of junk. Well, it's September and...let's just say the closet is a work in progress. Some of the things that are taking up space in the closet are shirts that I never wear anymore. I realized I could repurpose them into something else! Here are some tutorials for recycling shirts: Check out these t-shirt scarves! Create cute little bows for accessories or packaging with this tutorial. Gorgeous ruffled pillow tutorial here. Looks like I have a lot of projects ahead of me to keep me from cleaning out my closet!
Sock Bun Tutorial in 5 Easy Steps!
I am not a hair person. Meaning, I can barely do my own hair in a ponytail. I also have very fine hair, so the topknots just point out the super fine strands. Lately, I’ve been seeing these hair donuts around, wondering what they could be used for, and after going to London, and having flat iron issues, I just said to heck with it and took a chance on the hair donut, and see if it a simpleton such as myself could figure it out. Low and behold, even with no instructions, figuring out the sock bun was super easy, and it took only a few seconds! You’ll need: One hair donut, two hair bands, a comb or brush, and some bobby pins. Put your hair in a ponytail Thread your ponytail through the hair donut Smooth your hair over the hair donut, distributing your hair evenly Put a second hair band over the hair donut Pin the extra hair around the bun And you’re done!
Honestly WTF
Creatively In Fashion
(studs and pearls)
because im addicted
Anthropologie Pratia Tank Top Tutorial
February 6, 2010 1:59 pm Per popular demand, here is the Pratia tank tutorial! Start off with a t-shirt or tank top. What I did was get a larger t-shirt so I could gather it at bottom like the pratia tank. I cut off the sleeves so it would be a tank. Measure your neckline and get a piece of chiffon that length and fold it in half. Pin it to the inside of your neckline with it peeking out. Since I cut the sleeves off my T, I wanted to finish the edges. Stitch it. I highly recommend interfacing where you are going to be adding the embellishments, otherwise it’s going to sag. For the flower pieces, here is the shape and dimensions I used. Fold your pieces in half and cut that petal shape out. I used the extra sleeve pieces, cream chiffon(the kind that won’t fray) and another grey jersey I had. How many do you need? Lay two petals on top of one another, as shown. I did a small ‘X’ shape to stitch them so they stay in place. Just add more, and more, and more, and more………(It’s time consuming.