
diy wednesdays: fabric envelopes we’re always making all sorts of stuff out of fabric, but can never bring ourselves to toss any scraps. this project is an easy and smart way to repurpose even the tiniest leftovers. by using one of our favorite sewing materials—fusible webbing—you can whip up a whole set of these no-sew envelopes in a flash. they’re great places to store favorite documents, photos, or business cards, and can even be used as a special gift wrap. have fun!derek & lauren ps: we’re about to embark on a bunch of exciting (and time consuming) projects, which unfortunately means we need to take a brief hiatus from our weekly diy posts here on design*sponge. we plan on contributing fun stuff every now and again, but until then you can keep track of us over at smartsandcrafts.com CLICK HERE for the full project after the jump! here’s what you’ll need: 2. layer your fabrics with fusible webbing in the center, and fuse with a hot iron. 3. trace template onto fabric and cut out.
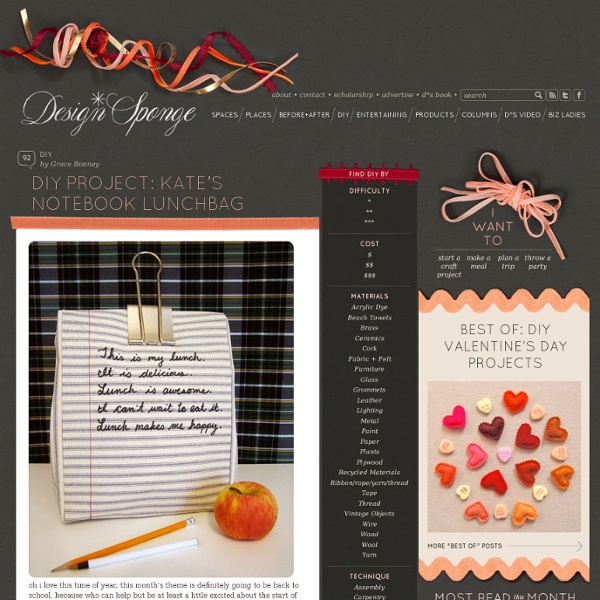
diy projects: kate’s handy lunch bag this week’s resolution is definitely one i have every year: “cook more and dine out less.” i spend quite a bit of money on lunch at work, mainly because i can’t get my act together to prepare something (the closest i got was bringing an entire loaf of bread and a jar of peanut butter-forgot the knife though). so i thought maybe if i prettied up my lunch accessories it would help inspire me. this tote is just a canvas bag slightly doctored so that it opens to become a place setting, complete with snuggled utensils! i added button closures on the sides so it’s easy to open and close, and like all canvas bags it is machine washable. for all you lucky freelancers out there, maybe your kids or office-bound friends could use a present. happy crafting! – kate click here for the step-by-step instructions or just click “read more” below. Kate’s Handy Lunch Bag What You’ll Need: 1. canvas bag 2. extra fabric for lining 3. elastic 4. needle and thread 5. sewing machine 6. scissors 7. buttons 2. 3.
diy wednesdays: woodgrain oilcloth lunchbag recently, we’ve been making an effort to a) pack ourselves delicious lunches, and b) rid our lives of wasteful, disposable plastic bags. we find it’s much easier to accomplish these things when we’ve got a cute and useful alternative. in honor of this week’s wonderful guest bloggers, we thought it would be both fun and oh-so-appropriate to whip up this faux bois oilcloth lunchbag. brown-baggin’ it has never been so fun! click here for the full project or just click “read more” below. enjoy! -derek & lauren here’s what you’ll need: -1/2 yard woodgrain oilcloth (available here) -scissors -ruler -sewing machine and thread -velcro sticky dots 1. cut the oilcloth into 3 panels. one that measures 28″ x 8″, and two that measure 12″ x 5″. 2. fold down the top and bottom short ends of the long piece and stitch it 1/4″ from the edge to create the hem at the top of the bag. create a matching hem at the top of each side panel. 4. turn bag right side out and topstitch seams.
halligan’s denim cut-offs wine bag When the time comes for your jeans to be reincarnated into your new favorite shorts, the top gets a new life but what about that sturdy bottom fabric going to waste? I have been saving the bottoms of cut off jeans for two years now, knowing that someday I would have a bright idea of how to put them to use. Denim crafts can go wrong in so many ways but my goal in this project was to cure denim crafts from their not so hip past using a little bleach and stitchery! CLICK HERE for the full how-to after the jump! Materials: - jean leg bottom - sturdy fabric of choice (for lining) - bleach (optional) - scissors - ruler - fabric pencil/marker - pins - sewing machine Optional Step: Bleach jean leg bottom to desired color. note: Make sure to wash both your liner fabric and denim before you start sewing because the fabrics may shrink unevenly. 1. and a 14.5″x15″ rectangle of liner fabric. 2. then iron down and create a crease. 3. of seam. 4. For more info on an easy French seam go here To make handle:
sewing 101: zippered case It’s back-to-school time, and it’s hard not to have school supplies on the brain even if school days are nowhere in sight for some of us! Inspired by the good old-fashioned pencil case, I thought it would be fun to sew a lined, zippered pouch that you can use for pencils, makeup, electronics or anything else you need to organize and tuck away. The great thing about this bag is that once you understand the basic construction, you can easily make it any size you like. Try a short, long version with a wide base for knitting needles, or a flat bag for electronic cords. You can use oilcloth for the lining to create a waterproof makeup bag, or try stitching a label to the outside to indicate what’s hiding inside. Let’s get started! CLICK HERE for the full how-to after the jump! Materials Instructions 1. Decide how large you want your bag to be and cut two pieces of your exterior fabric and two pieces of lining fabric to this size, plus 1″ in length and width for seam allowance. 2. 3. 4. 5. 6.
leather envelope phone case As you may know, I have a weakness for tech accessories — especially ones that you can DIY — so it should come as no surprise that when Aimee of SwellMayde offered to share this tutorial, I immediately said yes. Aimee was even kind of enough to make a leather case in the signature D*S color — bright coral! This DIY is super easy; the combination of basic materials and a printable template means even a novice crafter can produce this chic, simple phone case for themselves or as a gift in no time. Have a DIY project you’d like to share? My favorite ideas usually stem from necessity. Materials leathertopstitching threadscissors stitching awle6000 glueneedletapecell phone case pattern Instructions 1. 2. 3. 4. 5. 6. 7. You’re done!
sewing 101: branch handle tote Add a little autumnal flair to your fall wardrobe with this rustic tree branch tote! This sturdy piece is great for carting daily necessities on your commute or for more outdoorsy tasks like packing a picnic or carrying camping supplies. The bag itself features a basic construction that can be adapted and used with any type of handle, so if the branches aren’t quite your thing, it’s easy to make fabric straps instead. Look for nice, straight branches that have fallen from trees in your local park or woods or, if you can’t find any, check at a floral supply shop. Let’s get sewing! — Brett Bara Read the full how-to after the jump! Materials 1 yard heavy-weight fabric, such as canvas1/2 yard coordinating fabric for color blocking2 branches, about 1″ in diameter and 17″ longsawdrilltwinelong needlesewing machineironbasic sewing supplies 1. Cut the following pieces from your fabric: Here’s a detail shot of what the bottom corners will look like with a 2″ square cut from each corner. 2. 3. 4. 5.
leather lunch tote I don’t bring my lunch to work as often as I should. And by that, I mean never. What if I had a cool lunch tote? It might not help, but at the very least, it’s a fun project to practice your hand sewing and to make something interesting. Whether you need a lunch tote or not, this is a project you can modify for your own totable needs. See the full how-to after the jump! Before starting, print out the template on your printer using the “tile” function and tape it together to 100% scale. Materials 6–7 oz. weight stiff leatherheavy waxed thread Tools leather punches — #5 and #00leather sewing needlescontact cementrotary kniferulerstitching spacerdownloadable template Instructions 1. 2. 3. 4. 5.
upholstery basics: poolside roll up It’s been heating up around Austin — 90, 95, 99 . . . 100+! The hotter it gets, the more I want to dive in, so this month on Upholstery Basics, I thought we’d whip up a poolside roll up for the upcoming months of sunbathing, daydreaming and catching up on Us Weekly (I’m not ashamed to admit it!). The best part is, it’s made of beach towels! — Amanda Read the full how-to after the jump . . . Materials 3 large beach towelspainter’s tapechalksquareyardstickmeasuring tapecompassscissorssewing machinethreadt-pins24″ of velcrocarpet paddingpolyester fiberfillcurved needle Don’t forget to check out Upholstery Basics: Tool Time to learn more about the tools we’re using today. Instructions 1. (1) 5″ tall x 30″ wide (piece that connects the neck roll and mat) (1) 20″ tall x 31″ wide (body of the neck roll) (2) 7″ diameter circles (ends of neck roll) (2) 37″ tall x 5″ wide (straps that wrap around the rolled-up mat) (2) 66″ tall x 31″ wide (mat) 2. 3. 4. 5. 6. 7. 8. 9. 10. 11. 12. 13. 14. Tips
mesh screen beach bag Summer is here, and I am so excited to start filling up my free time with warm weather activities. When it comes to beaches, pools, picnics and the like, I am definitely a planner — I like to bring everything I could possibly want along with me so I’ll never be caught without water, sunscreen, a book, a sandwich, a spare pair of shoes or an extra towel. I’m basically a traveling general store in the summer, but I love it! When this fun project appeared in our inbox from Parisian crafter and blogger Pascale Mestdagh, I knew I had my first summer DIY on my hands; this mesh beach tote is perfect for carrying all my summer stuff. This summery beach bag DIY makes clever use of window screen mesh, which is a cheap, easy-to-use material that can be manipulated like any other fabric. I love that Pascale chose punchy orange and natural leather to contrast with the light gray tone of the mesh; it’s sophisticated and hits just the right note for summer. Read the full how-to after the jump . . . 1.
Sewing 101: Yoga Bag In keeping with January’s theme of fresh starts and healthy resolutions, what better way to get motivated to exercise than with some new exercise accessories? I find that I have a better chance of sticking with new habits if I make them as convenient as possible, so having a handy way to tote my yoga mat makes it just a little easier to get to class. This DIY yoga bag is super easy to make (it’s really just a big rectangle with handles), and I promise that even a beginner can stitch up this project in no time. Let’s get started! — Brett Bara Materials 2 yards medium-weight fabric (I used cotton duck, which is like a lightweight canvas.)2 yards webbing or any type of strap for handlessewing machineiron and ironing boardstraight pinsscissors 1. To begin, cut two pieces of fabric measuring 21″ x 27″. Trim the excess fabric away from each corner and turn the piece right-side out, gently working the fabric through the hole you left in the seam. 2. Cut two pieces of webbing about 36″ each.