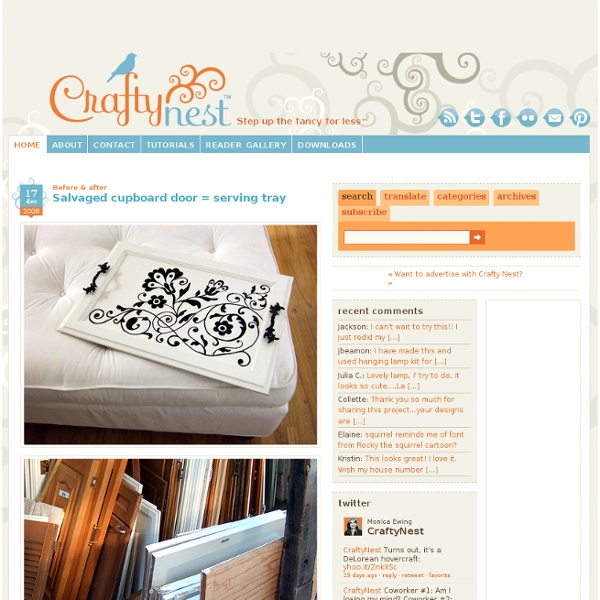
Salvaged cupboard door = serving tray
I noticed this stash of cupboard doors at my local salvage yard. The white one was the perfect size to make a serving tray. The old drawer pulls—also found at the salvage yard—made ideal handles. Their swirly shape gave me the inspiration for the pattern I painted. All it took was a little black paint. How to make a serving tray out of a salvaged cupboard door Supplies cupboard doorblack acrylic paint (I used Liquitex in Ivory Black)black spray paint (I used Rust-Oleum semi gloss)clear spray paint (I used Rust-Oleum lacquer)white house paint (I used leftover paint from my antique bookshelf makeover)4 machine screws2 drawer pulls (large enough to fit your hand)4 felt pads (I used 3/4-inch)wood fillersandpapernewspaperFloral swirl pattern Tools pencil and hi-polymer (white) eraserdrill and drill bitscrewdriversmall paintbrushesrulerpainter’s palette or paper plate 1. 2. UPDATE: You asked for the pattern, so you got it. 3. 4. 5. 6. 7. 8.
Colorful Silverware! « Spearmint Kitchen
Pin It a cute DIY project to spiff up your old silverware for spring. doesn’t everyone have a set of old silverware? i keep a set underneath the sink and it could definitely use this makeover. wouldn’t it be fun to use this for your picnics? Pin It all you need is:spray paint metal primer, spray paint, painter’s tape, and sandwich bags Pin It see the full DIY @ creativelychristy.blogspot.com via casadefirulas.blogspot.com Pin It
DIY: Hand Painted Mug
October 17th, 2011 I’ve been wanting to try porcelain paint for a while, and it’s just as amazing as I anticipated. You have to give it a try. The holidays are coming up, and hand painted coffee/cocoa mugs would make great gifts! Supplies: porcelain mug (mine is from CB2) Pebeo Porcelaine 150 outliner (available at Dick Blick) There are transparent porcelain paints that you apply with a brush and outliners which are thicker and opaque. If you want to achieve the ink-like look that I did, go with an outliner. How to: 1.
Day 63 – DIY Corona Glasses
I cannot even tell you how excited I was when I found this pin explaining how simple it is to cut glass bottles. For our first anniversary, my husband signed us up for a glassblowing class. It was awesome and we had a great time. As we were leaving, one of the artists was turning Corona bottles into drinking glasses for a friend’s wedding gift. I was wondering why these glasses weren’t one of the projects we could choose from that day. You can cut glass bottles at home using materials you probably already have on hand. glass bottles yarn nail polish remover lighter sink full of ice water sandpaper 1. 2. 3. 4. 5. 6. 7. 8. The hardest part about this project is getting the cut in the right spot. You can make more than just drinking glasses. Source: Crafty Scrappy Happy Related posts:
Anthro-Inspired Serving Tower
There are some beautiful serving pieces cropping up around blogland, using all sorts of great materials, and I’ve been wanting to do something similar. In browsing Anthro a couple of weeks ago (I know I know, I actually went in the store – but I had a good friend on speed dial in case I succumbed to anything too crazy) I came across a serving tower made from beautiful white dishes and cups, stacked on top of each other. Now because I was in an Anthro-high-price stupor, I did not take a picture of this lovely item. I wanted mine to be a bit more colorful though . . . I scoured our local thrift store and found a great selection of pretty plates and cups. In trying to decide what would be best to glue these dishes together I came across the DIY Club Challenge – which requires you to use certain projects to participate. To start I wanted the bottom plate raised just a bit, so I used an upside down dessert plate as the base. I added the glue to the base plate. Pretty easy right? And again. . .
Related:
Related: