
http://www.youtube.com/watch?v=lJ25OngOLts
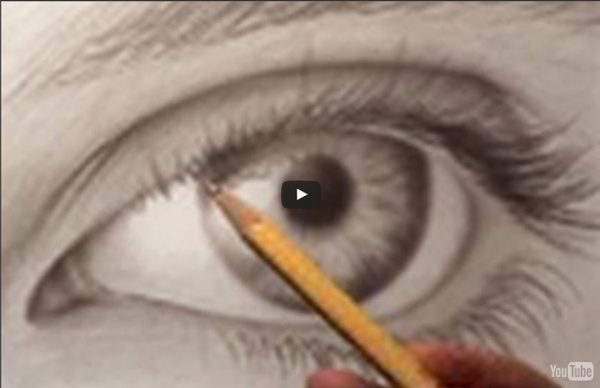
Related: Drawing & DoodlingShading Techniques With Pencil Once you have mastered the basic pencil drawing techniques from the last tutorial, these can then be used to create different shading techniques within pencil drawings. This tutorial will guide you through the process of creating different shades and a shading guide in which you will be able to refer to throughout this tutorial. A shading guide when learning to draw is a useful tool to have, as you will be able to assess which shade is appropriate for different parts of the pencil portrait before executing it. In time, as you become more familiar with the different shades you can create, you will be able to ditch the shading guide and execute shading as though it is completely natural to you. Realistic Portraits Tutorials So I was just going over the comments (I read every single one of them) and I saw a request for a tutorial on how to draw realistic wrinkles. It came from Bobbie – “shading is my hardest, and how to put wrinkles that don’t just look like lines” So, I’ve created this tutorial for you (and Bobbie ) on how to draw the wrinkles under the eye. In this video, my co-instructor Michael will go over some tips and techniques for drawing the wrinkles and then he will demonstrate it by showing you the drawing process.
How to draw eyes, step by step, people, with our FREE online drawing tutorials! It looks like you stumbled upon this category that is filled with tutorials that will teach you how to draw eyes, step by step. Everybody knows that when you want to draw the human eye, it's something that takes a lot of patience, consistency, and alignment. One thing is certain, finding tutorials that teach you how to draw an eye, can be a bit frustrating, and confusing. It leads you to ask yourself, where do I go, and how do I begin. How to Draw 3D Shapes with Shading Home » How to Draw 3D Shapes » with Shading In this lesson we will cover how you can draw 3D shapes with shading. It is all about pressing the pencil down on the paper with different strength, so that the color is stronger or lighter. If you spread these different values correctly, you get an awesome 3D effect. Shading is time consuming.
How to Draw Eyelashes Welcome back! And congratulation for making it this far into the series. Our drawing is almost complete! In this lesson, we will continue learning about drawing realistic eyes. We just have to add a few more details before we can do the final “unveiling”. And I promise you will be very happy with the end result.
2 Ways to Draw Eyes Step-by-Step Edit Article Two Methods:Realistic EyesAnime EyesCommunity Q&A This tutorial will teach you how to draw realistic eyes and anime eyes. How to make an awesome pencil sketch of any photograph To start with, you will need to go to your local art store to get the items that you don't already have. I am going to assume that you are like most people and don't have a single item except maybe a number 2 pencil. Oh, and you will need scissors and scotch tape in a few steps, but I assume that you have that stuff. Here is a list of what i recommend you get in order to successfully complete this instructable: How to Draw Eyebrows Realistically Over the past few lessons I’ve told you about Pillar #1 & #2 of portrait drawing. In this lesson, we will cover Pillar #3: Capturing The Likeness Of The Portrait. Pillar #3 is all about getting all the subtle details of your portrait right so that when some one looks at your portrait, he/she will instantly recognize who you drew. Now the shading and drawing techniques that I’ve showed you in the previous lessons will help you to make your drawing much more accurate. And that alone will capture the likeness to some degree and make your portrait more recognizable.
How to Draw Eyes & How to Draw the Face Drawing Tutorials: Drawing & How to Draw Learn Step by Step How to Draw Human Eyes Drawing Lessons Step by Step Techniques You Might Also Like Our : How to Draw Eyebrows ... How to Draw Eyelashes Tutorials Page How to Draw Realistic Eyes with Step by Step Drawing Tutorial in Easy Steps I will show you how to draw a realistic eye using pencil, charcoal, or even digital pen. The following realistic eye tutorial is broken up into more than a dozen steps, so hopefully you will be able to look at my visual illustrated steps and imitate it on your piece of paper. Good luck and have fun! Drawing Realistic Hair with Pencil Part One This will be an introduction on how i draw hair and the tools that i use. I will split this tutorial into sections because i want you to have time to practice and for you to understand the technique. In this tutorial i will explain how understanding hair and fur will help in developing realistic textures and hair. After you understand it, you will see how easy it becomes to draw hair. I don’t want to rush this topic and i want to make sure i explain it well so you can understand it and so you can start to see improvement in your drawings.
How to Draw an Eye Learn to Draw Art Lessons Art Books Charcoal Oil Lessons Wetcanvas Drawing for Beginners Female Eye by Faith Te Here is the first tutorial from Art Studio — a female eye. My method in graphite pencil drawing aims to render subjects as realistically as I can. The following is a step-by-step demonstration of how I draw eyes. Drawing the Eye - Teach Yourself to Draw Faces Step 1 - The Outline of the Eye Close observation is very important when starting the line drawing of an eye. You must pay particular attention to the difference in shape between the upper and lower eyelids. Each eye is unique and the more acute your observation, the more accurate a likeness you will achieve. Step 2 - Drawing the Iris What paper should I use for drawing with colored pencil, graphite, pen In my classes, there’s a consistent question that comes up: “What paper should I use for this drawing?” Oh, how I wish that was an easy one, for the possibilities are truly endless. There are so many varieties out there, and each one will create a different look. Here are some things to consider when selecting the paper for your project. A colored pencil work-in-progress drawing on illustration board