
Wall Art for Sienna's Room First off, let me just say, I really love photos printed onto a canvas. Really. I knew I wanted a set of them in Sienna's room, but as most of you know, we are still students so our decorating budget didn't exactly cover printing four 8"x10" photos onto a canvas. It's pretty darn expensive for just one let alone FOUR!!! I had seen a few ideas online about getting pictures printed out, then just mod-podging the picture onto the canvas, and sanding the sides a bit, which I liked, but I still really wanted that "printed on canvas" texture on the picture itself. Then, while looking around online one day, I found out that you can actually print from your computer onto tissue paper! Thus, my idea was born. What you need: Canvas (however many you are using, I used 8x10's) White tissue paper (I only needed one regular sized sheet for four pictures) Printer *with ink* :) Regular printer paper Scissors Tape Mod-Podge Brush Step1: Take a piece of printer paper. Step 2: Step 3: Step 4: Step 5: Step 6: Step 7:
How To Make Interchangeable Cupcake Stands Here’s a quick project that will let you transform a set of thrifted candlesticks into bright, happy treat stands for your next shindig. You can use any candlestick you fall in love with at the thrift store, and then, because the plates are fastened by screwing in a drawer pull, you can use interchangeable plates. And my favorite part, once you unscrew the plates, an entire set stores away easily in your cupboard. The shopping is really the best part. Here’s the list of what you’re looking for. Supplies & equipment: 1. 2. 3. 4. 5. 6. 7. 6. Method 1. 2. 3. 4. 5. That’s it. And once the party is done and the guests go home, your stands tuck away easily in your cupboard to wait for the next party.
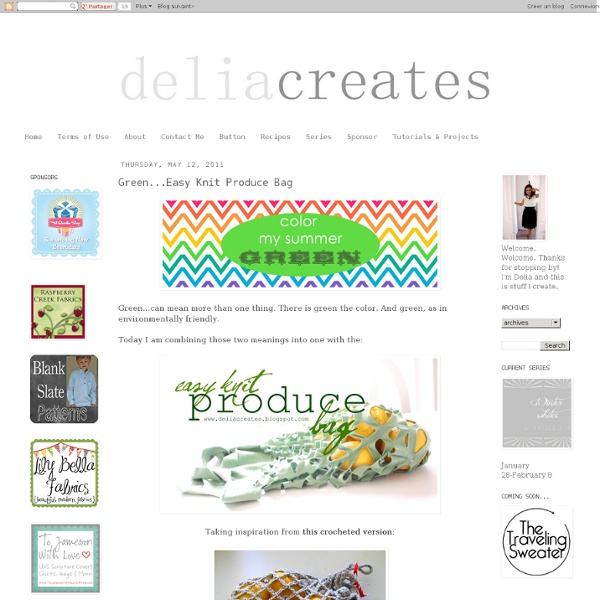
DIY: 10 Things To Do With an Old T-shirt Ten great DIY projects you can make from an old T-shirt. If you’re anything like me, you have tons of old T-shirts laying around in your drawers collecting dust. Instead of dumping them all in a collection bin, turn them into something useful. You’ll be amazed at how many things you could actually make from a humble tee. Here are ten of our favorites. Wrapped Bracelets You can never have enough bracelets, and there are so many great ones you can make yourself. Market Tote Plastic bags are slowly but surely being banned in cities around the country. Scarf If you have a sewing machine, this DIY scarf is very easy to make following this tutorial by wienerdog tricks. Knotted Headband This stylish headband is super easy to make, with nothing but a few cuts, knots, and glue. Knotted Rug I love DIY projects that look like they came straight out of a fancy design store, and this knotted flokati-style rug is a great example of that. See Also: 10 DIY Bracelets You Can Make This Weekend
A Beautiful Mess I love using cloth napkins to dress up our dinner table, and through the years I've grown even more fond of their sustainability and cost effectiveness. Though, I'm not sure how cost effective it is if you keep buying more and more cloth napkins each year! This holiday season I thought it would be fun to look at how I could dress up the napkins I already own to give them an extra festive vibe. Check out three simple ways you can give new life to your table linens. Ribbon Trimmed Napkin This look is so (no sew) simple! Supplies:-ribbon-heat bond in width of ribbon-cloth napkin (buy mine here)-iron-fabric scissors (not shown above) Step One: Trim pieces of your ribbon to be about 1.5 inches longer than the width of your napkins. Step Two: Fold down the edges of each ribbon segment about 1/4" and iron flat. Step Three: Iron the heat bond to the ribbon (pressing with hot iron for two seconds), then peel off the paper backing. Pom-Pom Trimmed Napkin This is my favorite napkin style by far!
upcycled Fliepi | Flickr - Fotosharing! AsktheExterminator.com - Tips and help from a real pest control expert V and Co how to: jersey knit bracelet i don't know what it is about this time of year that makes me just want to have my bare feet in the sand, be watching the sun setting into the ocean, and breathing in the warm salty air of the beach...as i get older, more and more i find myself missing that place i used to go to almost every.single.day. as a teen. (my skin doesn't miss it. as a matter of fact, i now wish i listened more and DID put SPF on my face...hindsight is 20/20). my mom calls me from her walk on the beach almost every morning...*sigh*yeah, i get a little homesick around this time of the year. heck on my pinterest my "dreaming of summer" has the most pictures in it. ah yes. i miss my ocean. case in point. this bracelet, brought a flood of memories, not because i used to have one like it but because i can totally see me wearing it by the beach, not caring that it's gotten salty and wet, because i can totally make another one in like less than 5 minutes flat when i get home. *sigh* okay... *cut off excess tails!
Glass Etching Have you ever done any glass etching? Well, neither had I before today. But wow. Check out my new and improved etched Trifle Bowl. The perfect bowl for desserts of all kinds…..and even a great place for fresh fruit on the counter. Glass etching is also a great way to stamp your name on your pyrex dishes, to make sure they come back to you. And how about adding a little extra detail, just because…… (Edited to Add: The font used here is called Smiley Monster and I downloaded the font for free here.) Sweet in every way. Are you wanting to make your own? (This technique permanently etches your glass. First, you’ll need a piece of vinyl with an adhesive back, like the vinyl you buy for vinyl wall decor. Then peel away the shapes, leaving the negative space all in one piece. The Silhouette code for the bird/branch is: bird_on_branch_C00044_23067 01/18/2010 Then peel the vinyl backing away. Then place your vinyl against your glass, making sure to center the image just where you’d like it. Good luck!
Introducing the DIY Sponge Manicure You’ve likely seen the ombre trend gracing your Pinterest feed in the form of hair, makeup, clothing, accessories, and even cake. But what about getting your nails involved? Well, with the help of a sponge or two, we’re pleased to bring the gorgeous gradient trend to our nails in the form of a DIY Sponge Manicure. Materials: - 3 nail polishes that work in a gradient (for ex: pink, orange, yellow) - clear base and top coat - nail polish remover - sponge paintbrush, eye shadow applicators or a kitchen sponge - pointy Q-tips After trying just about every sponge we could find, we’ve narrowed it down to three favorites: the kitchen sink sponge, the eyeshadow sponge brush, and the sponge paintbrush. First up, the Kitchen Sink Sponge. Grab a sponge from under your kitchen sink (and old one will work just fine) and cut off a small piece to use for painting. You can also use it to create this crazy neon camo look. Stamp the sponge onto your nails and stamp again for brighter colors.
Paper Flower Key Holder / Mark Montano Difficulty Rating: Beginner Tags If you need a quick 'just because' gift for someone, this is it! Here’s how: 1. 2. 3. 4. 5. 6. 7. 8. 9. 10. Supply List Wire hanger Needle nose pliers with built in wire cutter (most are made like this) Hot glue gun and glue sticks Stapler Book pages Fiskars Scissors and Pinking Shears Krylon Clear CoatSmall piece of cardboard