
45+ Exceptionally Useful Free Handwritten Fonts Should Handwritten Fonts be used in web design? For quite some time companies and governments have been working hard to make daily life things available as digital services in whatever way possible to speed processes up and cut costs. At the same time most communication takes place on digital channels by sending emails, chatting, electronic orders, paying online, doing banking online…well almost anything goes on the line today. Sending a good old snail mail letter is still possible but not that popular really. Even on vacations we are not offline and stick to digital channels, keep the blog updated with “near real time images and stories. Just ask yourself – when is the last time you send or received a postcard, a letter…? The advantages that computers give us is obvious but the complete turnaround that have happened over just a few years makes real life stuff like fx. hand written text catch most peoples attention (even though it is presented on a computer screen). Handwritten Fonts Tiza !
Willow Bark Slip Whistle | Tardigrade The Willow Bark Slip Whistle is a nice easy little project requiring only a small knife and a piece of freshly cut willow. The piece of willow should be about thumb width in diameter and about a hand span (150mm) in length (this will be plenty for the whistle and also give you a good length ‘working handle’ to carve with safely). For this example I’m using a piece of Grey Sallow as it is locally abundant in the area, but any willow will work just as well. It works best in the spring or early summer when the sap is rising in the trees. Safety first, note the comfortable sitting position with elbows resting on the knees, and a wooden chopping block for cutting onto. Step 1. Using small diagonal shaving cuts, cut the end of the stick into a whistle mouthpiece shape. Step 2. Make a vertical crosscut through the bark into the wood (make sure you make a good mark in the wood as you will need this later). Next make a slicing cut to meet the first cross cut to form a D shape. Step 3. Step 4.
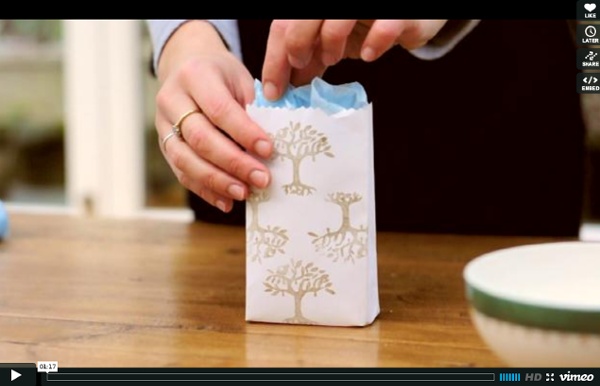
Design*Sponge » Blog Archive » welcome julia and how to make a repeat pattern hello hello. thank you Grace for having me this week! I am very excited to be here. Besides introducing you to some cool artists, giving sneak peeks and before and afters of some friends homes, and sharing my favorite new product finds, I thought it would be nice to share some of the things I have learned along the way of being a illustrator/pattern designer. One of the questions I frequently get emailed is -how do you make a repeat pattern? I thought it would be fun today to do a little tutorial showing you how simple it is even with a very complex drawing. And you don’t even need a computer! On a clean piece of paper draw a design in the middle of your paper without letting any of the drawing touch the edges- this is very important. Once you finish the middle space as much as you want you are going to cut your drawing in half- scary I know- but that’s why computers are helpful. Next you are going to cut your drawing in half again the other way- (yikes!) And here’s my finished design:
DIY Wrap Bracelet You should all know by now that we are all about stacking bracelets on our wrists. The more, the better. In fact . . . the most, the best! With that being said, we’ll show you how to master a version of the ever so popular wrap bracelet. It’s so simple and addicting, you’ll soon be churning out these wristlets with your eyes closed. You’ll need (for a double wrapped bracelet) :* Lengths will vary depending on the size of your wrist (see comments for suggestions). Fold the length of leather cording in half to form a loop. Place the ball chain along the leather cording with the end of the chain meeting the end of the wrap. Continue wrapping while checking it for fit around the wrist. When you have reached the end of the ball chain wrap the linen cording around the leather strands 2-3 more times. Thread the hex nut through the strands and tie a second knot. Trim with scissors and your wrap bracelet is finished!! The materials are listed for a double wrap bracelet. It’s a party!
A Geek's Yarn by ageeksyarn Useful and Handy Info You Must Know | Water, One, Boil, Clothes, Quickly Useful and handy information that you probably don't know Ants Problem : Ants hate cucumbers. Keep the skin of cucumbers near the place or ant hole. To get pure and clean ice : Boil water first before freezing. To make the mirror shine : Clean with spirit To remove chewing gum from clothes : Keep the cloth in the freezer for an hour. To whiten white clothes : Soak white clothes in hot water with a slice of lemon for 10 minutes To give a shine to hair : Add one teaspoon of vinegar to hair, then wash hair. To get maximum juice out of lemons : Soak lemons in hot water for one hour, and then juice them. To avoid smell of cabbage while cooking : Keep a piece of bread on the cabbage in the vessel while cooking. To rid the smell of fish from your hands : Wash your hands with a little apple vinegar. To avoid tears while cutting onions : Chew gum. To boil potatoes quickly : Skin one potato from one side only before boiling. To boil eggs quickly : Add salt to the water and boil. 1. 2. 3. 4. 5. 6. 7. 8. 9.
Ruby Slippers/Wicked Witch Bookmark - POTTERY, CERAMICS, POLYMER CLAY Hooray! My first project in the polyclay board! I was reading "Wicked: The Life and Times of the Wicked Witch of the West" and had this idea for a funny bookmark I'm sure someone else has to have had this idea before, but I couldn't find it via google, so I had to make one. The legs are formed of polyclay, but I had to paint em white after baking because they turned brown in the oven :/ Oh well... I could have made a more awesome bookmark part of the bookmark, but it was late last night, and I couldn't be bothered... Hi ho, the witch is dead! Thanks for looking
Water Balloon Luminaries A fun and easy project with a beautiful payoff. Learn how to make these Balloon Luminaries. You will need: High-Melt Paraffin Wax (IGI 1260)Party BalloonsDouble BoilerCookie Sheet Instructions: 1. 2. 3. 4. 5. 6. 7. 8. 9. 10. Here is an example of these luminaries when using dye. Tea Light Lamps (an Easy Last-Second Gift) With a paper band, mark and measure the upper and lower diameters, and the height of the glass. Add 5mm to each length. In your favorite drawing software (e.g. OpenOffice Draw), create a trapeze of measured sizes to mark the borders, and import a picture of your choice. Size it to fit into the trapeze. Personally, since I only had tracing paper on hand, and after some trials, I choose some black/white Japaneses patterns: tracing paper prints best with a laser printer (with inkjet, it will form a roll when still wet).
Free Doll Making Projects and Doll Patterns at AllCrafts Online Since 2000 FreeCrafts Free Holiday Crafts Sewing & Quilting Crochet & Knitting More AllCrafts Free Doll Making Projects and Doll Patterns I love making dolls! Cloth Dolls Angel Kitty Baby Bows Batty (PDF) Big Girl Bluebell Doll Annie Doll Pin Baby Spool Doll Pins Bear/Bunny/Mouse Angel Pin Black Apple Doll Blume Christmas Cat Pillow Country Angel Doll Cupid Doll Dishtowel Angel Doll Theme Craft Party Doll Wigging Elf Doll Dolly Donations Drive Enlarging Doll Patterns (PDF) Fancy Nancy Doll Fish Freya Doll Gingerbread Man Handkerchief Doll How to Draw a Doll Face Life-sized baby doll Mermaid and Merman Mermaid Doll Mini Baby Mannequin Mini Mermaid Japanesque Miniature Valalisa Molly Monkey Molly Scarecrow Peaches Ballerina Angel Peaches Ballerina Doll Penguin Doll Poseable Guardian Angel Prim Polly Doll Resizable Rag Doll Pattern Santa Doll Santa Claus and Angel Dolls Sara the VIP Heirloom Doll Surf Side Suz Tea Bag Doll Vanessa Serger Doll Pattern Wee Bunny (PDF) Wide-Eyed Wendy Cloth Doll Pattern Wizard of Oz Dolls Yarn Doll Wigs
untitled this perfect-for-summer project comes from brenna berger at paper + ink. she documents her amazingly clever custom invitation designs on her blog, so when it comes to paper it’s no surprise that she’s full of ideas. i love the simple, modern feel of these, and the fact that they cost next to nothing to make. on an semi-related note, i recently decided to have a movie marathon of all corporate “must make it big in nyc” movies from the eighties (wall street, secret of my success, working girl…you get the drift), but now i am definitely not going to start it until i have some paper and a thumbtack ready:) thanks, brenna! -kate CLICK HERE for the full how-to after the jump! materials: 1. paper (preferably cotton) 2. thumbtack 3. pony bead and hot glue (optional) 4. scrap cardboard (at least as big as your paper) 5. tape 6. image of choice (some options are available here) 5. cut to size and you are done!
How to Make a Bird out of a Plastic Straw (with pictures) Edit Article Normal Straw MethodLong Straw Method Edited by TOHGIN minako, Wyvernbait, Meta Knight, Lois Wade and 17 others This project is a fun and easy example of plastic straw art. Ad Steps Method 1 of 2: Normal Straw Method 1 Cut the straw. 19 Display the bird on a glass by putting the rim between the two legs. Method 2 of 2: Long Straw Method This method is the same basic steps as the one above, however the images show what the bird would look like with the use of a long straw. 1Cut the straw. 19Display the bird on a glass by putting the rim between the two legs. Tips Illustration. Try not to cut your fingers.Wash your hands before starting.
Paint chip greeting cards | Chica and Jo Like most of you, I’m sure, I tend to go through a lot of paint chips when trying to decide on a color to paint a room. And when the project is done, I toss the paint chips into a box I keep in my craft room. They are the perfect “I’ll use these one day” items, right? Well I stumbled upon the box a few days ago and realized just how many I’d collected over the years. Oh the memories this pile brings back! No matter how I got this collection, I knew it was time to finally do something with them. Can you believe those were made from plain white cardstock and boring old paint chips? First I cut some ordinary 8.5″ x 11″ white cardstock in half crosswise, then folded it. For the square mosaic design, I grabbed a bunch of smoky blue paint chips and cut them into 1 inch squares. For the green card, I cut all my green paint chips into strips of random widths. For the orange card, I took the same strip idea but turned it on an angle. I spent a lot of time on the final card.
How to Make an Impression: Extraordinary Thank-You Notes January 10th, 2011 399Email 409 users recommend These days, sending any thank-you note will get you noticed, but sending this thank-you note may very well get you hired! Jeff Rudell Try to keep your designs loose and unfussy. A handmade vellum envelope is a wonderfully mysterious way to wrap your note for delivery. Photo: Jeff Rudell One holiday, many years ago, I hand-made ornaments for everyone on my Christmas list. I couldn't fault my friends, of course. My tactic was a bit off the mark, perhaps, but my idea was sound. The great thing about paper is that while it may be temporary, it can also be a tremendously effective medium for memory-making. While I'll probably never tinker with Christmas again, I still try to put this temporary nature of paper to good use as often as possible. Granted, not every note merits the time and energy required for this project. View 4 member project galleries