Butter Sugar Scrub Cube
Solid Sugar Scrub Cubes have become the new trend and are now taking the place of traditional sugar scrubs. One of the main reasons is that these scrubs are in a solid form so there’s no separation and less mess. It also means it’s less likely that you will transfer water into your sugar scrub during usage since you are simply removing one or two cubes at a time for use and then resealing the container before use.
Paper Flowers – Anyone Can Do That
Japanese Kusudama, this tutorial is featured on Craftuts Anyone can do that, I assure you. The proof: I can, just take a quick look at my result below. And, believe me, I am neither meticulous nor particularly patient.
Wooden photo frame
Here is a simple yet stylish photo frame that can accomodate quite many photos at once. The idea is very simple. Fasten twines on the empty frame and hang photos using clothes pins on them. You can use a frame you bought or a frame you made by yourself. To make it you just need to find some wood strips, sand them, paint or stain them and fasten together with the staples and nails.
Video on How to Make a Kusudama With the Carambola Flower by Carmen Sprung
This Kusudama can be considered modular origami, and it is based on a beautiful flower model, folded from a pentagon and originally created by Carmen Sprung (Germany). She calls it “carambola” perhaps because of its resemblance to a cross section of a carambola –also known as star fruit. On her website, Happy Folding, Sara Adams (Germany) presents a video showing how to make a pentagon and how to fold the origami carambola. The folding process, as Sara demonstrates, is both easy and pleasing.
7 ways to get rid of dark circles/ANY type of scar/Stretch Marks.
These 7 ways I am sharing, are the MOST EFFECTIVE ways that makes those ridiculous scars disappear, no matter what type they are (acne scars, tissue scars etc). Make sure you are NOT allergic to any of the ingredients I am going to mention. 1st Solution: (For dark circles and scars) You Need: 1/2 tsp Turmeric 1 tsp yogurt (at least 10% fat) 4-5 drops Lemon Juice Directions:
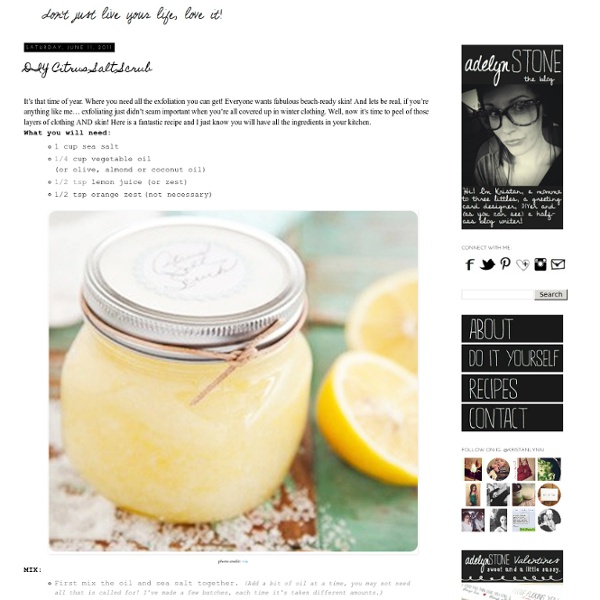
Homemade Sugar Scrub
Winter skin has been an issue for me, for as long as I can remember. All summer long I swim, garden and hike around in the Southern California sun. Occasionally I will leave my skin outdoors for too long, turning it bright pink (never the deep, creamy brown my mom and sister have) but it always bounces right back to my soft, milk-white and freckly skin.
Do-it-Yourself DIY String Wedding Lanterns Yarn Chandeliers - StumbleUpon
Jessica of Wednesday Inc shows us how to make those gorgeous twine chandeliers from the inspiration shoot she shared with us this morning. Using balloons, glue and twine, you can also make these lanterns for your wedding – and then bring it home and use it as your very own mid century lampshade. What you will need are: balloons, glue, yarn, tray for glue, corn starch 1/2 cup of Corn starch, 1/4 cup of Warm water, clear fast drying spray paint, hanging lamp cord or fishing line (depending on your desired final product), and a lighting kit if you’re looking for a fully functional lantern. Jessica recommends using a sharpie to mark on the inflated balloon how much room you need to leave for the lighting cord. She also recommends coating the balloon with vaseline prior to wrapping the yarn coated with glue so it doesn’t stick on the balloon once it’s dry.
Button Pictures
This is a really COLORFUL & creative way to display your child’s initial. Super easy for sewers & crafters who have lots of extra buttons laying around. Gosh I LOVE buttons… Supplies needed: - Printer (to print out your letter) or a large letter stencil - Scissors - Cardstock (large enough to fit your frame) - Pen or Pencil - Adhesive, Scotch Tape Runner allows you to reposition buttons - Paper Piercer - Buttons and Brads - Frame without glass or shadowbox (this one is from IKEA) Click here for step-by-step directions to the entire project.
Cathey with an E: What the Hex?
I'm not a crafty person... but occasionally I pretend to be. When I saw this post ages ago on the ModCloth blog via Honestly... WTF, I thought I had finally found a DIY project that I could actually do! I can braid, and that's pretty much the only skill needed for this. With some twine from my kitchen and a cheap bag of silver hex nuts from Home Depot, I was ready to go! No, this isn't mine.