
Creamy Macaroni and Cheese A creamy macaroni and cheese recipe that will satisfy both young and old made with Kerrygold cheese and butter from grass-fed cows. This mac and cheese reheats beautifully the next day with just a bit of milk or cream stirred in. Ole pointed out a few weeks ago that our children were growing up with a different food experience than either one of us had. The secret to this mac and cheese is in the farmhouse cheese that goes into the sauce. While the pasta cooks, get ready for the sauce by shredding the cheese. Once the noodles are ready and drained, melt two tablespoons of butter over medium-high heat and then whisk in flour and cook for a minute. Stir in the Dijon, black pepper and a pinch of salt and stir in the sautéed shallots. We served the macaroni alongside a steak salad for Kiera’s 11th birthday dinner, and the next day the kids enjoyed leftovers for lunch with giant smiles on their faces. Kerrygold did not compensate me for this post. Copyright © Food for My Family.
Bacon Cups I had an occasion calling for bacon themed food and my mind immediately turned towards the famed bacon mat. I needed something a little more single-serving though, so I decided to attempt bacon cups. In the bacon mat instructions there is mention of draping the mat over an overturned metal bowl and cooking it so that it would turn out in as a bowl shape. I decided to try using the backs of various muffin and mini cake pans, I ran out of bacon before I got to try as many as I would have liked so I’ll have to try more at a later date. Any excuse for more bacon. I set the oven at 400 degrees and carefully formed foil over the back of the muffin pan. This all took three hours and my house filled with smoke, but it was worth it. For cup shapes I used the back of this Wilton King-Size Muffin Pan. For the first try I used two layers of bacon on the sides and wove it like a basket, or at least like I imagine a basket would be woven: It held its structure very well though:
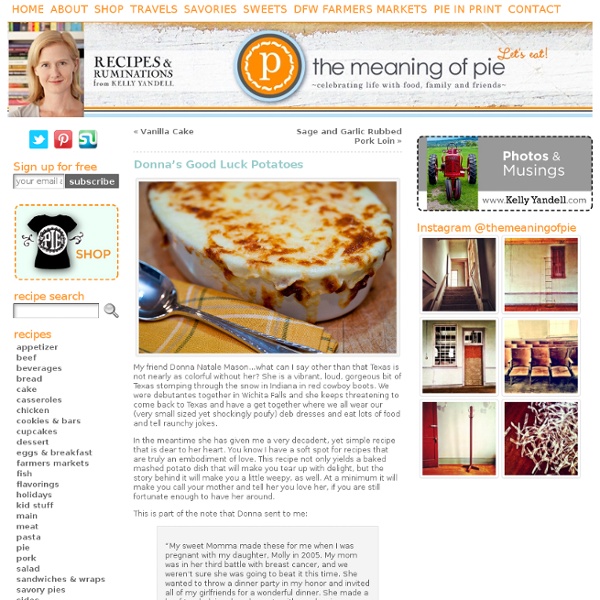
Hash-brown casserole | The Wanna be Country Girl This hash-brown casserole is the perfect side dish. I served it last night with my chicken pot pie to a crowd. It’s cheesy comfort food at its best. The parmesan gives it a tangy flavor, and best of all it’s really easy to fix. Its got five ingredients you mix together and pop it in the oven. Start out by adding 1 – 32 ounce bag of hash-browns to a large mixing bowl. Next add 2 – 10 3/4 ounce cans of cream of potato soup. Followed by 16 ounces of sour cream. Now comes the cheesy part. And 1 cup of fresh grated parmesan cheese. Next add a good-sized pinch of salt and pepper, and that’s it. Put the mixture into a buttered Pyrex. Run this wonderful concoction into a pre-heated oven at 350′ for 1 hour See…..brown and crunchy. You may wonder why I’ve taken such a close-up picture. It’s because I almost forgot to take a photo at all. Enjoy! the wanna be country girl – Caroline
Butter Chicken Note: By popular demand, we’re featuring this recipe again. Great reports across the board! I originally loved the looks of this recipe, submitted by Tasty Kitchen member lillieknits, because I knew I had almost all the ingredients in my kitchen (important, since I don’t live around the corner from a grocery store)…and because the sauce contained both tomatoes and cream. Yum. But after I made it…oh, boy. You need these spices…AND ground coriander, which I didn’t have in my pantry. Chop up several cloves of garlic. And throw everything in a mixing bowl! After marinating the chicken, dice up a whole onion. Heat 1/4 cup (1/2 stick) butter in a large skillet. Let the onions cook for several minutes… …Until they’re golden brown and translucent. Next, Add the chicken breasts to the pan. Cook the chicken for a couple of minutes, then flip it to the other side. Pour in the tomato sauce… And the diced tomatoes. Right before serving, pour in the cream. Come on. And that’s it! Here’s the printable recipe:
Smoky Chipotle Parmesan French Fries | cooking on the weekends I truly appreciate your visiting my site! If this looks delicious to you, please subscribe for my occasional emails with more great recipes, to the right of this post. You can also follow what I’m cooking on Facebook, Google+, Pinterest and Twitter. One of my absolute favorite flavors in the world (right up there with Nutella and mangoes) is Chipotle Peppers in Adobo Sauce. Spicy, smoky, and oh-so-yummy! This french fry recipe is so flavorful that you really don’t need to dip them in anything. Smoky Chipotle Parmesan French Fries Recipe 3-1/2 tablespoons olive oil 1 tablespoon finely chopped chipotle peppers in adobo sauce 2 tablespoons finely grated Parmesan cheese 1 teaspoon smoked paprika 1/2 teaspoon lemon juice 1-1/2 teaspoons sea salt 1-1/3 -pounds Idaho Russet Potatoes Preheat the oven to 425 degrees F. Notes Exactly what are chipotle peppers in adobo sauce? Like avocados and french fries?
Ratatouille The boyfriend and I saw Ratatouille last week. Besides it being a cook/animation lover’s wet dream, it inspired a discussion afterward about Pixar movies in general. We surmised that they rule. See, where most current animation relies on pop culture references and kitschy radio tunes, Pixar concentrates on story and character. In honor of Pixar’s most recent winnah, I whipped up this Ratatouille dish from the February 1995 issue of Bon Appetit (via Epicurious). (Note that the cheese is optional, and leaving it out cuts the cost almost in half.) Ratatouille on the Run 6 servings (Bon Appetit says ½ c per serving, but mine came out to about 1 c per serving) Adapted from Bon Appetit/Epicurious. 1) Heat oil in big Dutch oven over medium heat. 2) Take cover off pot and reduce for about 10 minutes, stirring occasionally. 3) Preheat oven to 350°F. Approximate Calories, Fat, and Price Per Serving 165.3 calories, 9.5 g fat, $1.67
Parmesan Roasted Potatoes (Gourmet, Unbound) As soon as I got word of Gourmet, Unbound, I began searching on Epicurious for the “perfect” recipe for this December. I was determined to find a good one, since it was the first official month of Gourmet, Unbound. I stumbled across this recipe for Peppermint Patties from the December 2007 issue, and I knew they sounded perfect. I imagined how beautiful they would look drizzled with chocolate and sprinkled with some crushed peppermint candies. I knew they would look beautiful in glass dishes on my table for Thanksgiving… and my guests would love them! Ok, so you probably figured out by the title of my post that my dreams of beautiful homemade peppermint patties did not work out quite as I had intended. Instead, I found myself searching at the last minute for another recipe… one that was quick, easy, and could be served with pork tenderloin. Overall, I was really happy with how the dish turned out. Parmesan Roasted Potatoes (Recipe from Gourmet, December 2000)
Lasagna Timpano I went to see tUnE-yArDs on Monday night with some friends, and as always we wanted to cook a meal that somehow related to the show we were heading to. Sometimes this is hard to do, but other times it seems to come naturally. Finding culinary inspiration in Merrill's lyrics seemed like it would be tough, but my sister knew what she wanted to make without hesitation. "How about something layered, because of all the vocal and instrument layering in the music?" From there we worked together to come up with this deep, colorful, and multi-flavored lasagna version of a timpano. Start by making a lasagna crust. Finally got it together. Now it's easy, just start building the layers! Alfredo sauce with some salami goes first. After 3 alfredo layers, I switched to pesto. A cheese only layer, just for fun. Tomato sauce is last. It's important to press things down as you go. In my opinion, it can't be lasagna without at least a little ricotta! I painted on some alfredo at the end as a glue. All sealed up.
Don't Make Dad Settle for Boring Potatoes: Hasselback Potatoes | The Family Kitchen Dad’s going to remember exactly why he loves steak and potatoes when you serve him these. And you (along with the kids, fingers crossed!) will love them, too. Because of the way they are baked, a nice crunchy crust forms on the bottom. So see you later, french fries! Looking for something fantastic to serve these with? Hasselback Potatoes medium sized potatoes (about 1 per person) 1 clove fresh garlic, very thinly sliced butter coarse salt (sea or kosher) pepper sour cream (optional) dill (optional) fresh chives (optional) 1. 2. 3. 3. 20 Salads Hearty Enough for Tonight’s Dinner10 Ways to Eat Breakfast for Pizza10 Recipes Everyone Should Know How to Make30 Crazy, Wacky, and Useless Kitchen Gadgets25 Healthiest Foods for Under $1