
s Homemade Soap Recipe by Robert Wayne Atkins Grandpappy's Homemade Soap Recipe Copyright © 2007,2008 by Robert Wayne Atkins, P.E. All rights reserved and all rights protected under international copyright law. Click Here for a Microsoft WORD printer friendly copy of this article. Introduction During hard times sooner or later everyone runs out of soap. To make soap you only need three things: rainwater,cold ashes from any hardwood fire, andanimal fat from almost any type of animal, such as a cow, pig, goat, sheep, bear, beaver, raccoon, opossum, groundhog, etc. Soap is not difficult to make and it does not require any special equipment. Soap is a "perfect consumer product" for the following five reasons: Soap is a legal product.Everyone everywhere uses soap.Soap is completely used up in a short period of time.When people run out of soap they want to buy more.Soap is relatively low in price so almost everyone can afford it. There are three major differences between homemade soap and commercial quality soap: Basic Soap Making Equipment
Willow Bark Slip Whistle | Tardigrade The Willow Bark Slip Whistle is a nice easy little project requiring only a small knife and a piece of freshly cut willow. The piece of willow should be about thumb width in diameter and about a hand span (150mm) in length (this will be plenty for the whistle and also give you a good length ‘working handle’ to carve with safely). For this example I’m using a piece of Grey Sallow as it is locally abundant in the area, but any willow will work just as well. Safety first, note the comfortable sitting position with elbows resting on the knees, and a wooden chopping block for cutting onto. Step 1. Using small diagonal shaving cuts, cut the end of the stick into a whistle mouthpiece shape. Step 2. Make a vertical crosscut through the bark into the wood (make sure you make a good mark in the wood as you will need this later). Next make a slicing cut to meet the first cross cut to form a D shape. The completed D shape. Step 3. Cut fully through the bark all the way around the stick. Step 4.
How to negotiate better than 99% of people In college, I had the opportunity to teach a “Student-Initiated Course,” or basically a course on whatever I wanted. So I got together with two of my friends and we put together a course on religious studies. Now, Stanford gave us incredible flexibility to teach essentially whatever we wanted…but the student instructors never got letter grades — it was always Pass/No Pass (everybody always passed), issued by the sponsoring professor. Until we came along. You see, I was never the smartest person in any school I attended. We would basically write our own ticket! One of my co-instructors was amazed that I convinced the sponsoring professor to agree. But my other co-instructor hesitated. To give you some context, this guy was a PhD student in Computer Science at Stanford and had previously attended IIT, one of the most competitive technical universities in the world. “Dude,” I said, “what’s your problem? “No, Ramit,” he said, “I don’t know about this. “What the hell?” I just stared at him. 1. 2.
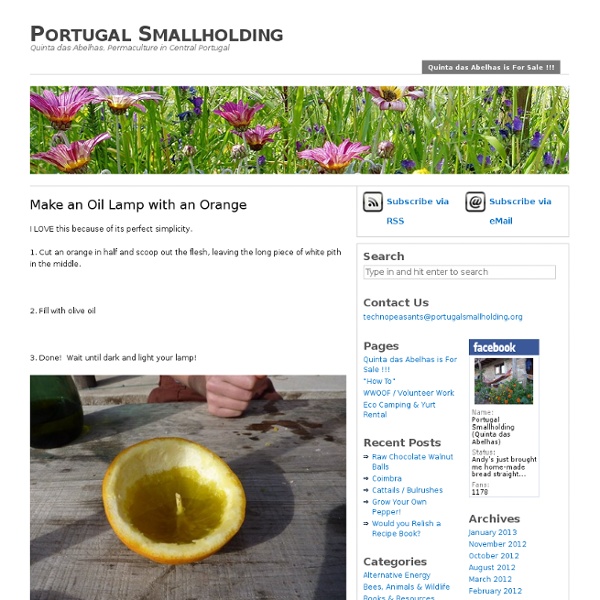
Water Balloon Luminaries A fun and easy project with a beautiful payoff. Learn how to make these Balloon Luminaries. You will need: High-Melt Paraffin Wax (IGI 1260)Party BalloonsDouble BoilerCookie Sheet Instructions: 1. 2. 3. 4. 5. 6. 7. 8. 9. 10. Here is an example of these luminaries when using dye. How to eat wild stuff and not get poisoned (how-to) Let's play pretend for a moment. Are you with me? Let's pretend you can't go down to the supermarket for food to eat. In fact, let's pretend that there is not a supermarket for one hundred miles in any direction, and you don't have any food with you. Does this seem unlikely? What this guide is:This is a guide to wild things that are 100% safe to eat. What this guide is not:This is NOT a guide to figuring out if something may or may not be safe to eat. BerriesThis is very easy to make 100% foolproof. Unless you are completely sure, do not eat non-aggregate berries - berries that are shaped like blueberries or gooseberries. Green StuffMost "green stuff" is not outright toxic, but can definitely cause you some distress. Note: You should use caution when eating any plant, particularly plants found in the water - they can harbor any creepy crawly that may have been living in the water, including giardia cryptosporidium among others. CrittersNever eat wild critters raw!
DIY Wrap Bracelet You should all know by now that we are all about stacking bracelets on our wrists. The more, the better. In fact . . . the most, the best! You’ll need (for a double wrapped bracelet) :* Lengths will vary depending on the size of your wrist (see comments for suggestions). Fold the length of leather cording in half to form a loop. Place the ball chain along the leather cording with the end of the chain meeting the end of the wrap. Continue wrapping while checking it for fit around the wrist. When you have reached the end of the ball chain wrap the linen cording around the leather strands 2-3 more times. Thread the hex nut through the strands and tie a second knot. Trim with scissors and your wrap bracelet is finished!! The materials are listed for a double wrap bracelet. It’s a party! (tutorial adapted from Ornamentea; top image via Jak & Jil, rest of image by Honestly…WTF)
Barcode Yourself by Scott Blake Barcode Yourself is a complete, interactive experience in the series of barcode art, created using the personalized data of participants. Enter an individual's gender, weight, height, age and location, and the barcode is formed using real-world data. The individualized barcode can then be printed, mapped, scanned, even depicted on a t-shirt or coffee mug. Uber-geeks can even test out their barcodes on their next grocery run. It is in scanning a barcode that the project reveals its humor, like a banner that reads: Disclaimer! It is here, within the confines of an American obsession with "worth," in which the fun begins. The data entered into Barcode Yourself takes a topsy-turvy twist to its personalized end numbers, with the exception of the hard-data that correlates with "location," which tallies up in the Gross Domestic Product of each country. With the complexity of mocking self-identity, Barcode Yourself lays out a fresh absurdity in the modern world of consumerism. More info in FAQ.
photo lampshades PINTEREST UPDATE: This is a post from 2010. I do not take custom orders, only the tutorial is available. The lamps have held up wonderfully. As many of you requested, Marie is sharing a little tutorial here on how she made her lampshades. Marie is happy to do custom orders for those that prefer buying over making! * LAMPSHADE – Hobby Lobby carries self-adhesive shades & nightlights, Target has some smaller lamps for $19 that would be perfect for this project, I’ve found some lamps & shades on Craigslist. * GLUE – I used a hot glue gun for the first lamp. * VELLUM – I buy this in packs of 20 (I think) in the scrapbooking section of Hobby Lobby. * CRAFT KNIFE OR SCISSORS, PENCIL & RULER – to trim the vellum, I used a ruler and pencil to mark the cut lines & then used a craft knife and self-healing mat to cut the vellum. * PHOTOS – I used a free program called Picasa to make the photo collage (I believe this program is made by Google, check their page of programs if you are interested).
Constrictor knot History[edit] First called "constrictor knot" in Clifford Ashley's 1944 work The Ashley Book of Knots, this knot likely dates back much further.[5] Although Ashley seemed to imply that he had invented the constrictor knot over 25 years before publishing The Ashley Book of Knots,[1] research indicates that he was not its originator.[6] Ashley's publication of the knot did bring it to wider attention.[7] Although the description is not entirely without ambiguity, the constrictor knot is thought to have appeared under the name "gunner's knot" in the 1866 work The Book of Knots,[8][9] written under the pseudonym Tom Bowling.[10] in relation to the clove hitch, which he illustrated and called the "builder's knot". He wrote, "The Gunner's knot (of which we do not give a diagram) only differs from the builder's knot, by the ends of the cords being simply knotted before being brought from under the loop which crosses them. Tying[edit] The method shown below is the most basic way to tie the knot.
Useful and Handy Info You Must Know | Water, One, Boil, Clothes, Quickly Useful and handy information that you probably don't know Ants Problem : Ants hate cucumbers. Keep the skin of cucumbers near the place or ant hole. To get pure and clean ice : Boil water first before freezing. To make the mirror shine : Clean with spirit To remove chewing gum from clothes : Keep the cloth in the freezer for an hour. To whiten white clothes : Soak white clothes in hot water with a slice of lemon for 10 minutes To give a shine to hair : Add one teaspoon of vinegar to hair, then wash hair. To get maximum juice out of lemons : Soak lemons in hot water for one hour, and then juice them. To avoid smell of cabbage while cooking : Keep a piece of bread on the cabbage in the vessel while cooking. To rid the smell of fish from your hands : Wash your hands with a little apple vinegar. To avoid tears while cutting onions : Chew gum. To boil potatoes quickly : Skin one potato from one side only before boiling. To boil eggs quickly : Add salt to the water and boil. 1. 2. 3. 4. 5. 6. 7. 8. 9.
Ikea Science Fiction by Susana Polo | 11:53 am, May 9th, 2011 I could make some joke here about how Ikea directions always make me feel like I’m expected to build something that’s bigger on the inside, but I actually have never had that much trouble following Ikea directions THERE I SAID IT. Seriously, if you’ve ever put together some Lego sets, you already have all the experience you need. No, the problem I always seem to have is with the furniture where you have to pick up extra parts that aren’t expressly mentioned all over the boxes of the parts you already have, and I find that I’ve left a vital element of a bed, like the bits that hold up the mattress, at the warehouse. And then I sleep on the couch. (via College Humor.)
Plastic Cup Lamp Now that my university is closed for winter holidays, I finally have more free time to do all the crafty things I’ve been wanting to. One of these is a lamp made from plastic cups I’ve seen at taf, the art foundation, in the Monastiraki region in the center of Athens. When I first saw it at taf, I was amazed; I looked closely and I couldn’t believe my eyes! The object itself is so peculiar, modern and alien-like it could be in any design exhibition. Disclaimer: There have been some concerns about the safety of this construction (see the comment of user “when” below for example). I only needed a couple of things: 200-250 large plastic cups (recyclable, at least )600-700 staplesa staplera lamp socket, lamp cord and plug – mine came from a broken IKEA lamp! That’s all you will need. Start stapling the cups together as shown. Staple again and again and again… Until your lamp goes from this… …to this! The alien lamp is ready! You might also like:
Free Doll Making Projects and Doll Patterns at AllCrafts Online Since 2000 FreeCrafts Free Holiday Crafts Sewing & Quilting Crochet & Knitting More AllCrafts Free Doll Making Projects and Doll Patterns I love making dolls! Cloth Dolls Angel Kitty Baby Bows Batty (PDF) Big Girl Bluebell Doll Annie Doll Pin Baby Spool Doll Pins Bear/Bunny/Mouse Angel Pin Black Apple Doll Blume Christmas Cat Pillow Country Angel Doll Cupid Doll Dishtowel Angel Doll Theme Craft Party Doll Wigging Elf Doll Dolly Donations Drive Enlarging Doll Patterns (PDF) Fancy Nancy Doll Fish Freya Doll Gingerbread Man Handkerchief Doll How to Draw a Doll Face Life-sized baby doll Mermaid and Merman Mermaid Doll Mini Baby Mannequin Mini Mermaid Japanesque Miniature Valalisa Molly Monkey Molly Scarecrow Peaches Ballerina Angel Peaches Ballerina Doll Penguin Doll Poseable Guardian Angel Prim Polly Doll Resizable Rag Doll Pattern Santa Doll Santa Claus and Angel Dolls Sara the VIP Heirloom Doll Surf Side Suz Tea Bag Doll Vanessa Serger Doll Pattern Wee Bunny (PDF) Wide-Eyed Wendy Cloth Doll Pattern Wizard of Oz Dolls Yarn Doll Wigs