Make your own Magnetic Paper Dolls (and a fabric cover for your metal base)
Thank you for such kindness and sympathy towards my last post. My grandmother will be greatly missed. And we’re all doing perfectly well. She’s one happy lady right now. :) I have been a little set back with holiday prep, due to my trip to CA. Anyway, I was walking through some store, some day (haha…..I can’t remember specifically because I’ve seen them several places), and a set of magnetic dress up dolls caught my eye. So while at Hobby Lobby, I saw a little book of paper dolls (over by the coloring books) and decided that $4 (plus a bit more for the other supplies) was way better than $30…..if I just took the time to make them myself. And before I explain any further…….my original plan was to find some cute boy paper dolls and make one of these for my little guy too. Anyway, the book of paper dolls worked perfectly for this project. And I don’t want my little lady to lose any of her pieces……so I made a little fabric cover. My little girl loves to imagine. She’ll love this. Supplies:
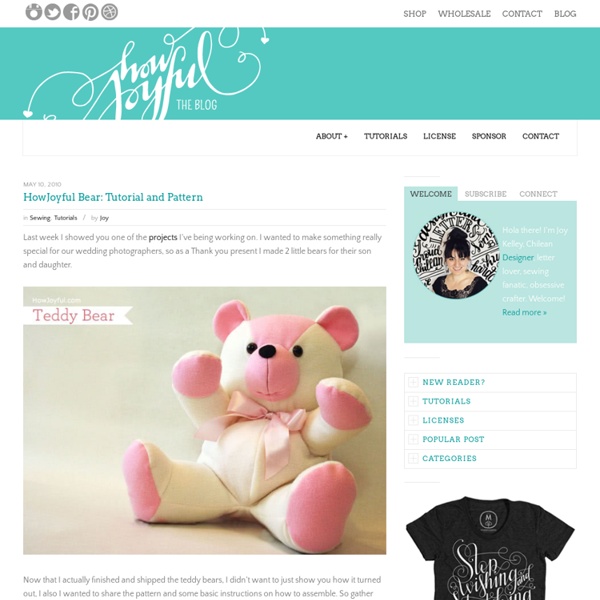
Teddy Bear Sewing Patterns
Making a handmade teddy bear is easier than you might expect. Source Whether you're creating a special handmade gift or simply indulging your own passion for cute and cuddly stuffed animals, there are a number of teddy bear sewing patterns available to help you with your project. A Brief History of the Teddy Bear The name "teddy bear" was given in honor of Theodore (Teddy) Roosevelt, the 26th president of the United States. Quality hand finishing and natural fibers were key components in the creation of the earliest teddy bears. Finding Teddy Bear Sewing Patterns The Internet is a wonderful tool for crafters interested in learning how to make their own high quality teddy bears. Personalizing Your Bear One of the most exciting aspects of making your own bear using teddy bear sewing patterns is that you can personalize your project to fit your own unique sense of style. You may also want to draw inspiration from some of the famous teddy bear characters throughout history. Post a comment
Joyful braided bracelet tutorial
So I wrote this post 2 weeks ago but I’ve been trying to think of a way to make tutorials easier for me and for you, that’s why I had it on hold. And this weekend the idea came to me! I made a techniques and parts-of-tutorials-I-use-often page, so that way I can refer to them instead of making that part of the tutorial each time. YAY! I love bracelets and I am always looking for bright colors and unique looking bracelets, so last time I visited Joann’s I bought 6/8″ ribbon ends and lobster clasps to make fabric bracelets. I also wanted to share that this tutorial is for very light-weight fabrics, since I didn’t have much of it, I could not just roll 4 big pieces and make the braid, instead I made little straps and run pieces of cord on the inside to give them volume. First I cut 2″ wide of my fabric. After that I folded the traps with the wrong side of the fabric facing out and sewed them, you can see the details of how to turn the straps inside out here
wooden tangram tutorial
July 22nd, 2010 I’m sure you know what a tangram is but didn’t know it was called a tangram (when I looked it up, I think I might have typed, “that clever triangle-y puzzle thing”). If you’ve never even seen one, well then: it’s sort of a puzzle and sort of a game that involves five triangles, one square, and one parallelogram. The objective is to figure out how to make a given shape, which is shown only in silhouette, using the pieces and not overlapping any. My kids and I had a blast just playing around with the shapes and seeing what we could make. Materials: balsa wood (or sturdy cardboard, foam core, or actual wood wood, but you will need different tools for cutting the wood)a sharp pencilrulerexact-o knifefine grit sandpaperpaint brush and paint (optional) Directions: 1. 2. 3. 6. 7. You can even make a little cute box for your new tangram set to go in.
Polymer Clay Workshop | Tutorials and Innovations in Polymer Clay
Felt Poppy tutorial and pattern
Today we are going to keep with the spring celebration with another felt flower tutorial, this time poppy flowers, they might not look exactly like Poppies but to me that was the real flower they resemble the most =] I’ve made these kinds of flowers for a very long time but I never really named them, so there you go. These ones are super easy to make, just like the Camelias. Actually these ones require less sewing and if you want they can involve no sewing at all by using hot glue. I made mine in different purple shades with yellow bead centers, after our wedding I was sick of Purple (because I worked on so many Purple projects) but now I am loving Purple again =] YAY! Download the pattern (You will find 8 different sizes for you to play with! **The download on the left is a PDF format file, so you will need to have Abobe Reader installed on your PC or MAC. Making these are super easy. * This tutorial is provided for personal, use only.
Homemade playdough
Making playdough is so much more fun than buying it. Making it is half the fun in playing with it! I found this awesome easy recipe at Homemade Mamas. 1 cup flour 1/2 cup salt 2 Tbsp. oil 2 tsp. cream of tartar 1 cup water food coloring Mix all of the ingredients together in pot (nonstick if you have it). Cook over medium high heat, stirring frequently until it forms a ball. Turn out onto counter, let cool, then knead a few times. A few things to keep in mind: Make sure you mix all the ingredients before you put it over heat. I added the food coloring after the playdough was cooked and removed from the pan.
Upcycled Clothing/ Memory Animals
What is this? Stuffed animals made from articles of clothing can be done to create a memory animal from outgrown baby clothing, to remember a departed loved one, to find a new use for a loved but outdated clothing item, to repurpose/ extend the life of a cherished security blanket, or to just simply use a discarded garment because the fabric is interesting. Age appropriateness: Due to the upcycled nature of the clothing and the possible use of buttons, snaps, or other materials that cannot be safety tested, many memory animals are meant as an heirloom item for adults (13 +) only. Animals that could be made without any items or materials that would need 3rd party safety testing would be appropriate for children. How does it work? The process is quicker and easier for me if I am trusted with most aesthetic choices, however I would certainly incorporate any requests that are possible to fulfill. What fabrics work best? How much will it cost?