
T-Shirt Bracelets | Family Chic SATURDAY, JUNE 4, 2011 | Comments: 45 Brightly colored t-shirts that are too small for my daughters now, have found new life as bracelets. For this project you will need some old t-shirts and a bunch of bangle bracelets. Try using old bangles that you already own, check thrift stores or pick up some up for a few dollars at Target, Walmart – or even the sale bins at Old Navy. Cut t-shirt in 1/2" to 1" wide strips. Loosely tie one end of the t-shirt strip to the bangle and start wrapping fabric around bracelet – the tighter the better. Wrap fabric all the way around until you meet the first knot – untie the knot and tie both ends together to close. I found this technique worked well for us – but you could also use a glue gun to secure ends. We made a ton of these bracelets this morning – my daughters really enjoyed it.
Tutoriel ~ ~ chemise à volants I have been a big fan of Down East Basics and Shade for a few years now. I wear Wonder tees from Down East all the time. They are comfortable, modest (hide everything I need to hide and when I bend over it doesn't flash people) and since it is not baggy, I wear it under a cardigan all the time. There is only thing I was hoping for... Then, one day I was at a Down East store, and going through their sales rack and found this... I couldn't believe my eyes, yes, I know, it was a $1!!! 1. 2. 3. 4. 5. 6. You can stop here. 7. 8. 9. 10. That is what I did today. Except, Rachel kept telling people, "There is an American flag hiding!"
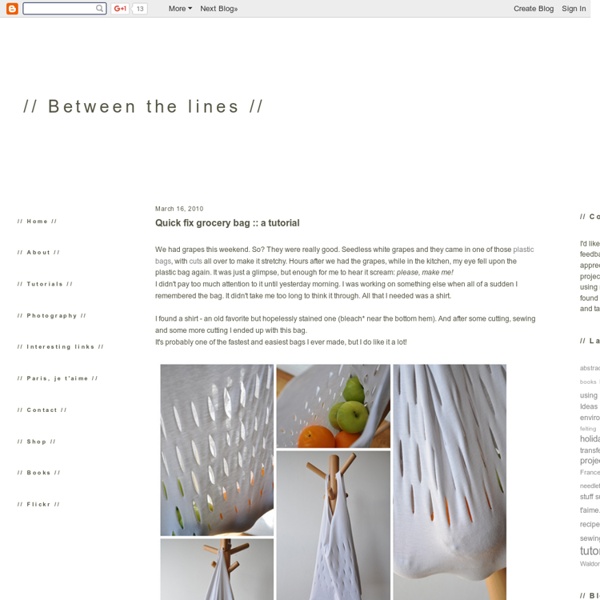
Teepees for secrets and dreams Sometimes I wish I had a place to hide and dream and let my imagination run wild - a place like a teepee! Should I buy one...? 1. Indoor Play teeepee here - $215 2. 3. 4. Plain indoor play teepee here - $175 ...Or make one? {Free PDF teepee pattern here} Little teepee tutorial here And last but not least, cats can have fun, too! DIY Reusable Farmer's Market Bags from Child-sized T-shirts When the weather is still cool and Spring is right around the corner, I allow myself to daydream (just a little) about summer. I don’t dwell on the humidity or the bad hair/makeup…and focus on Saturday mornings, when the farmer’s markets roll into town. This post contains affiliate links for your crafting convenience. Like so many other eco/cost-conscious shoppers, I love to bring my own tote bag(s) to carry my bounty home. AND, I have the most amazing reusable fruit/vegetable produce bags…just not enough of them to carry everything I purchase from the farmer’s markets. So my goal for this summer? I went to my local thrift store and found a couple of fun kiddie shirts- a Paris Barbie shirt and this charming aqua shirt from Georgia. Project parts! From T-Shirts to Bags After washing my cheap-o shirts, I proceeded to cut off the neck and sleeves- essentially making a wide-necked tank top. Let’s do this… Fold up… Then some simple stitching… And stitch across to make a triangle. The Big Reveal
Creative Kismet & Blog Archive & little guiding stars Since the new year has started I’ve been trying to think of ways to be more kind to my self. Especially when that nasty gremlins try to creep in and stump me. I remembered this origami star video on You Tube and had to get them involved in my plan. I thought it would be fun to make a whole bunch with kind words and “you are….” phrases inside. I used 12 x 12 inch scrapbook paper and cut 1/2 x 12″ strips, then followed the video HERE*. *UPDATE! Be Sociable, Share! Avec une chemise de l’Homme « ★ By Xilaa ★ Pour inaugurer ce nouvel espace, je profite de l’occasion pour vous présenter ma dernière pêche dans l’armoire de Monsieur … J’avais déjà lorgné sur cette chemise depuis quelques temps, mais il semblait trop l’apprécier pour la subtiliser ;-) Voilà qui est fait … j’avoue que j’en ai même profité pour choisir mon prochain ouvrage … mais là … silence … je patiente un peu ! Sait-on jamais ! Une encolure froncée, des ourlets roulottés et je me suis régalée en ajoutant mes petits boutons mignons en forme de coeur ! Je regrette juste de ne pas en avoir eu assez pour les placer sur les manches … il va falloir que j’y retourne ! J’en profite pour vous souhaitez la bienvenue dans ce nouvel espace ! Like this: J'aime chargement… Tagué: Couture, reconstructing clothes
T-Shirt Hand Warmers London is cold this time of year, which means my kids are too. So when it takes me fifteen minutes to prep them for playing outside, I want them to play longer than I spent preparing them for the cold. Most often their gloves fall off or get wet, sending their freezing hands inside within five minutes of stepping out. A handful of hand warmers seem to hold the kids over for a while longer, and are inexpensive and easy to make when using items on hand. Scrap t-shirt material Needle and thread Rice or beans Cut scrap t-shirts into any shape. Heat the warmers in the microwave.
Stackable Scrap Bucket Pattern All posts may contain affiliate links. It is no secret that I love my scraps. Well today, I am going to share a fun project that will not only use your scraps but help you store them going forward. This baby made its debut at Sew South last weekend and I was so excited to see all the variations everyone created. This project is for all levels. Skill Level- 1 1/2 Button Supplies: 1/2 yard of main fabric1/2 yard of heavy weight fusible (Pellon TP971F)1/2 yard of lining fabric1 yard 3/8″ cotton rope4 extra-large eyeletsscrap bucket pattern Tools: basic sewing suppliessewing machinehammertapemarking tool *Use 3/8″ seam allowance for all seams. Basic Instructions: Print out pattern pieces and tape together to create the base of bucket. There are so many possibilities with this scrap bucket pattern. Additional Tips: When sewing the side to the base, I like to place my left hand in-between the layers and help smooth out the fullness. We have these buckets all over the house. Hello!
Koala Bear Amigurumi | Free Pattern &Tutorial at CraftPassion.com I found a Koala Amigurumi Pattern in the Woman’s Day website and I have some off-white and gray organic cotton yarns on hand, so I made a pair of these small little stuffed koalas for my kids in reverse color. Some ideas to make it differently: 1. This adorable little koala is about 3-5″ tall only (depend on your yarn and the matching hook size), install a key ring on it’s head and turn it into a key chain, hang it to the bag’s zipper. 2. If we sew the limbs closer to the center of the body and insert 4 small strong magnets to the tip of each limb, you can make it “huggy” and hug on a tree branch or at the edge of your curtain or your pencil, ruler etc… 3. 4. Follow the crochet pattern at the above pattern link to crochet all the parts of the koala, which consist of: 1 head (stuff firmly and complete) 1 body 1 nose 2 ears 4 limbs Remember to leave a long yarn end (about 6-8″) for every part so that you will have enough yarn to sew. Lastly, stuff and sew the limbs to the body.
Tee-soi Itse Valas You can find the tutorial in English here. ETA in February 2012: Hi! Nice of you to stop by! There will eventually be an English translation of this tutorial, so please have some patience:) In the meanwhile, I'm sorry to put up this disclaimer: It's OK to link back to this post, but it is not OK to copy all the photos and the tutorial, or translate it to another another language. Ja mainittakoon sama myös suomeksi: valaitten ompelu omaan käyttöön tai lahjaksi on OK, mutta kaupallinen käyttö ja kopiointi on kielletty. Denimvalaan ohjeesta tuli useampikin kysely, mikä ilahdutti kovin ja kauhistutti vielä enemmän – en nimittäin tule kovin hyvin juttuun ohjeitten kanssa. Valaaseen tarvitaan laje vanhoista farkuista, pikkutiplu sinistä puuvillaa silmiä varten, täytevanua, ompelukone, lankaa ja hiukan kärsivällisyyttä. Aloitetaan leikkaamalla farkunlahkeista valaan selkäpalat (2 kpl), vatsapuoli (2 kpl), pyrstö (2 kpl) ja evät (4 kpl). Vatsapuolen muodon voi kopioida selkäpalasta. Tadaa!
T-shirt headband (2) I should just rename my blog “Things Kitty Can do with a Tshirt” Anyway, I was walking through target the other day (wanting to buy every single dress I saw!) and glimpsed this headband. Obviously the first thing I thought was “Oh shoot…I can do that” (you know you're a crafter when you refuse to purchase anything you think you can make...even if you cant) Ready for a great no-sew tutorial….AND my very first Vlog? A big tshirt is best (one without any seams on the sides of the tshirt) Cut 6 strips (by cutting the bottm hem off the shirt, and cutting strips off the shirt working form the bottom), Cut them about an inch wide, and stretch them all the way out. Loosely knot the 6 together, leaving about 3 inches extra at the top. Spread out your strands, and get ready to watch my first Vlog! A few things I've learned from this video 1. 2. Anyway, so you've gotten that woven. You've got a woven rope right? You know it starts to "roll" when you stretch out your shirt??
notes from Terry Ann: Fat Sack Pretty AND practical. MATERIALS: You'll need 1 yd. of fabric and matching thread. I used August Fields by Amy Butler. It's a decorator weight fabric in a scrumptious color. Cut one 19" x 36" for the bag and two 4" x 36" for the handles. Cut one 12-1/2" x 19" for the bag bottom. Fold and press one edge of each handle under 1/4". Fold and press the other edge under 1-1/4". Fold it in half and press. Stitch close to the edges of the handles. Fold and press a crease to mark the center of 19" x 36" bag rectangle as shown. Press a double 1" hem on each end. Pin the handle in place as shown. Stitch the handles in place, stitching on top of the previous stitching along the edges of the handles and across the handle even with the hem stitching line. Press a crease to mark the center of the 12-1/2" x 19" bag bottom. Pin the bottom section on top of the bag, matching center creases. Place pins as shown, 4" on each side of the center crease at the bottom of the bag. Repeat with the other side of the bag.
Gift Ideas for poor creative souls (6) You know how it goes, a friend calls you and invites you to dinner at the last minute. OMG! What gift can you take?! I thought this was a wonderful idea. Supplies: Patterned paper-one 12 x 12" sheet. These directions will give you one flower. 1. 4. 5. Tip: For single sided paper. 6. Note: Florist tape is stretchy, just play with it and pull gently but firmly as you move down the stem. 7. Note, you will have to play around with the height of the petals, and where on the petal you start your tape. 8. 9. 10. 11. 12. For tutorials on how to market yourself online, go here.