
DIY On finit la semaine avec un petit DIY facile et accessible, un petit dessous de plat en trapilho au tricot (et en plus ça rime ^.^) ! Vous allez voir c’est tout simple et agréable à faire. Déjà on tricote avec des grosses aiguilles de 15 du coup ça va très vite, c’est très facile pour se repérer lorsque l’on débute le tricot (comme moi ;)) et pas de soucis de laine qui s’effiloche avec le jersey. Si vous n’avez pas de trapilho c’est pas grave, vous pouvez même faire sans ! Le trapilho peut se faire à la maison avec des vieux tee-shirts, on recycle et on se fabrique nos propres bobines (j’en ai des noires et vertes kaki mais j’ai acheté la rose que vous voyez sur les photos), vous avez un super tuto sur le blog d’Etsy et plein de vidéos sur le net. Pour exemple voila le style de grosse bobine que l’on trouve en mercerie, la mienne n’est pas une Zpaghetti, je crois que c’est une marque de ma région (si je retrouve le nom je le rajouterai). J’allais oublier !
Cape Coat DIY I bought this coat a couple of years ago in a thrift store, and even though I really like the fabric and color, the coat just didn't seem to fit me right. But I just never wanted to get rid of it, because it is so pretty :) So I decided to see what else I could make of it. I stared at it for a (very) long time, and then realized that it could easily be turned into a cape coat. I googled a lot of cape coats, and in the end decided to just give it try! I am very happy with how it turned out, and love that I can still wear my precious coat but just in a different way! I made a DIY of it for you, I hope that it makes enough sense. 1. 2. 3. 4. 5. 6. All done!
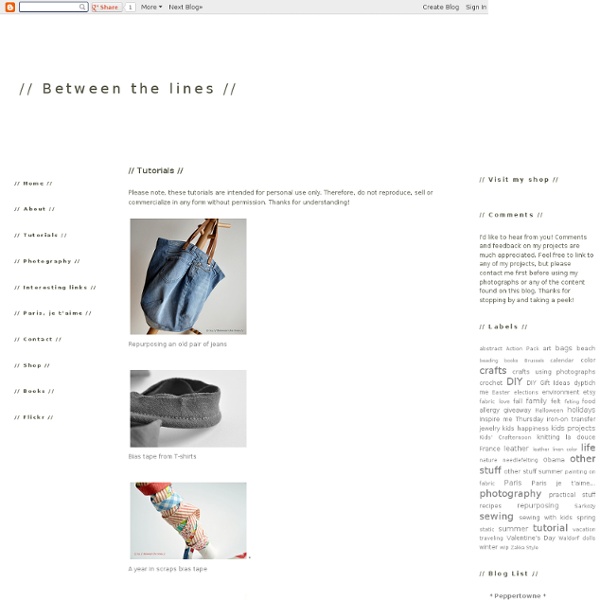
Tutoriels Tutorials Maternity/Baby Shower Refashions Accessories For the Home Rainbow Socks Do you love color as much as we do? Then you'll want to make a pair of your very own Tulip One-Step Tie Dye socks (or leggings as some may call them). We are so ecstatic how these tie dye socks turned out. They were created by superstar designer Lauri Eaton. So fun and truly statement making for your wardrobe! – Paper Towels Before you begin: Prepare your work area and wet your socks and squeeze out any excess water. Lauri started off making the blue, green, and purple socks. Section the socks into three sections using the zip ties. Fill your tie dye bottles with water and shake well. This is what the dyed socks looked like before Lauri covered them to set. For the rainbow tie dye socks, Lauri folded them in half, then dyed them in rainbow color order. We love how the socks turned out and now want to make more! Love tie dye? This linky list is now closed.
Fait à la main / Marina Swan ЦВЕТЫ В ГЛИЦЕРИНЕ!!!Глицерин позволяет сохранить цветок почти что, в первозданном виде, растения даже остаются гибкими и лишь слегка меняют цвет. Единственное «но» - слишком молодая листва консервированию с помощью глицерина не поддается.Цветы необходимо определенным образом подготовить: сделать косой срез стебля, удалить нижние листья, снять кожицу или кору и расщепить стебель приблизительно на 6 см, чтобы раствор лучше проникал в цветок. Глицерин разводится водой в соотношении 1 часть глицерина: 2 части воды. Полученная жидкость наливается в банку, вазу, любой другой сосуд на высоту примерно около 20 см.
4 astuces pour assortir et coordonner des tissus crédit photo collection Bailey de Maude Asbury Quand on coud, ce qui est sympa, c’est de s’amuser avec les tissus et notamment avec les coloris et les imprimés. Et quand on trouve des assortiments d’imprimés parfaits, on peut réaliser de bien jolies choses! Voici donc 3 astuces pour trouver des assortiments réussis : Le long de la lisière du tissu, se trouvent une série de points colorés : ce sont les couleurs utilisées dans le tissu. Et vous, avez vous des astuces pour assortir des tissus? Stepping Thru Crazy: Recycled Craft: Plastic Bag Beads I've really been getting into making recycled crafts lately... and when I saw this, I knew I had to try it. Here's how I made myself a plastic-bag bead bracelet: I used: a plastic bagMod Podge (or any other glue)tapeplastic strawnail polishold t-shirt Start with a plastic bag. Cut the handles and the bottom off (save these and toss them into one of those plastic recycling bins at the grocery store). Flatten the bag out, and cut it in half so that you've got two big "sheets" of plastic. Again, put one half aside. Fold the bottom up and smooth it out. Add more glue if you need to and fold the top edge down to the bottom edge. Now fold it in half 'hot dog' style, and glue it in place. Cut the strip in half (I guess now hamburger style), put aside one strip half, and grab a straw and some tape. Smear some more Mod Podge on the plastic, and roll it up on the straw as tightly as you can. Let the glue dry for at least a few hours. When they're dry, snip the straw off where it meets the plastic.
Membre à la une: Dame de Pic | membre Dame de Pic est une styliste douée aux multiples passions ! Découvrez qui se cache derrière ce pseudo en lisant son interview! 1. Peux tu te présenter? 2. 3. 4. 5. 6. J’ai plein de projets de couture que je voudrais réaliser, notamment mélanger du textile et du métal sur un même vêtement. 7. 8. PS: si vous souhaitez vous-aussi vous dévoiler sur Petit Citron, contactez-moi et je vous envoie le questionnaire ! V et Co.: tutoriels well first off, THANK YOU so much for the warm acceptance and love of my upcoming book. :) i'm excited. and i'm excited to see some of you in houston in october. make sure to say hello. i'll be the one with big DOE eyes trying to hide the fact that i'm about to puke. OKAY.so you all saw my first "sewing with ruffle fabric" when i made my skirt (which i think i'm going to be sporting at the Sewing Summit Conference when i'll be trying not to puke in front of people while i talk about "setting up the shot" ) well this time around i made a cute little tote... **all seam allowances are 1/2" unless otherwise instructed. -on the wrong side of the liner fabric, iron on the interfacing as per instructions that come with the interfacing. -cut out two straps by cutting them from your strap fabric at 6" x 24" (i used the width and length of my cutting ruler, it makes for a really great strap size) -lastly fold in half again, and press with an iron. -turn inside out. -top stitch around the top of bag.
Dame de Pic V et Co.: tutoriels Well, with warmer weather flirting with us and promising that it's going to come and stay here for longer than just one day with a high of 65 degrees, and with the arrival of color me happy finally making it to stores, here's a fun little project for you to spruce up your outside parties and celebrations. I know what you're thinking...uhhh Vanessa, theres like a whole army of tutorials on how to make fabric banners... YEAH I KNOW PEOPLE, but listen...I'm using a new pre-cut that Moda introduced last fall. This pre-cut is available in many fabric lines, look for it! Okay, ready to get started? 2 - 4: 2"xWOF strips of fabric. With right sides together I placed two strips just as I show in the picture, making sure there is at least 1/4" over lap of each strip. Sew diagonally starting where the edges meet at the top (if you need to, draw a line diagonally from one side of where the edges meet to the opposite side of where the edges meet and sew on the drawn line ) Making the Pendants: