background preloader

Rose and Feather Hair Clip Tutorial

Rose and Feather Hair Clip Tutorial
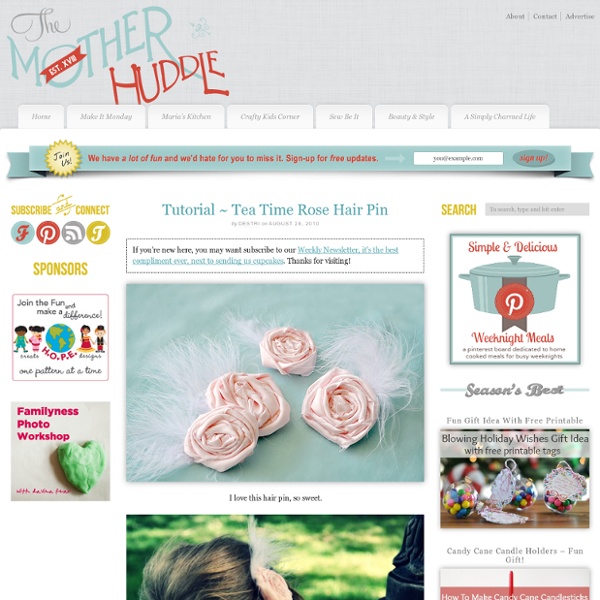
I love this hair pin, so sweet. Fit for tea time, no? Or maybe stopping to smell the flowers… or the blue spruces…whatever suits your fancy. One things for sure, it will surely upgrade any ponytail. You have no doubt seen these everywhere, they are so easy to make. Supplies: fabric at least 25 inches long and 1½ inches wide for one flowerfeathershair clip,hot glue gun The bigger flowers I made were made with 32″ x 1½” pieces of silk, but for the smaller flower that my little one is using I used a 24 inch long piece. Start by folding the strip of fabric in half. Now run a thin strip of glue around one side. Working fast, twist the strip and pull around the hot glue. Now we have a rose. From a piece of scrap fabric cut a circle just smaller than the flower then drizzle hot glue on the back… And press the piece on. Depending on what hair clip you decide to use, you may need to add a little fabric. Using hot glue, open the clip and glue the fabric to the inside… It should look like this. And so cute!

down and dirty screenprinting for under 10$ For this project, we will need some tools and supplies that are easily available, and a few that might require the tiniest bit of searching.... Recycling is key here. Most of the supplies required can be found as trash, including the ink. What isn't direct waste can be recycled from thrift stores or garage sales. Tools:Staple Gun (almost any size will do)X-acto Knife, or Utility knife (you could use a plain razor blade in a pinch)Heat Gun or a Hair DryerScissorsPlastic Putty KnifeSmall Container for mixing Materials:'Spray AdhesiveStaplesAny old picture frame as long as it is bigger than your image.

How to wrap a gift: Use tissue paper for a... Photo by Roberto Caruso I’m giving away trade secrets here. You know those beautiful floral looking decorations you sometimes see in magazines hovering over a festive table? Or in a kid’s room, re-invented as a mobile? They’re little more than a few sheets of tissue paper and take about ten minutes of your time to create. Here’s a step-by-step guide on how to create your own pretty decoration: 1. 2. 3. 4. 5. 6. At this point, you can either tie it onto the top of a gift for a big impression. Or try hanging it from a ribbon over a Mother’s Day brunch table.

A Bath Pouf. That, Um, Looks Like a Rose.... Have you ever had an idea, and you thought "That's awesome! It'll be so fantastic!!" and then you make it, and you realize that it's really kind of kooky? I was trying to think of something to do with these old towels I had. It's a bath pouf. But, I thought I would post it anyway, on the odd chance that someone might want to make one. And if not, please enjoy a laugh at my expense :o) What you do, is cut about 1.5 inches off one side of towel (to get that finished edge), and two circles out of the middle. Gently pull the bottom thread to gather your strip, pretty tightly.Sew it onto one of the circles in a spiral shape, starting on the outside. Cut a 1.5"x6" strip, and finish the edges with a tight zig-zag stitch. Then pin the two circles together, with your 7" strip laid across the bottom.Sew a tight zig-zag around the two circles, sewing right over each side of the strip on the bottom. Trim the edges of your handle to match the circle edges! There. Maybe it would be cute in a gift basket?

Art From Everyday Objects: Paperclips + String So today I thought it would be a fun challenge to work with paperclips. You can’t get much more mundane than a paperclip! After much thought, I came up with paperclip earrings. If you have paperclips and some pretty cotton string, you can create these beauties. Here is a diagram to show you where to open the paperclip to create this triangular shape. You are basically unbending the clip at all three of the curves. Once you’ve got the triangular shape, you need to glue the ends together. Fig 1: Winding the string around // Fig 2: Starting to wrap the string around the earring, secured with Liquid Stitch Once you’ve wound all the way round and secured with glue, you can then take another length of string and wind around the width of the “earring” creating horizontal stripes or you can create a more messy look by creating a “net” design (see below). Then just clamp on a pair of earring hooks. Let me know if you have any questions or I didn’t explain something well enough.

Red Velvet Rice Krispies Treats Hearts for Valentine’s Day You may have noticed I share a lot of Rice Krispies Treats, especially around the holiday. Can you blame me though? They’re sweet, gooey and oh-so-good! And these red velvet treats are to die for! If you’re making these to just eat, no need to get fancy but if you’re making them for a special occasion like Valentine’s Day, you’ll want to check out Wilton’s selection of cookie cutters. In a small jelly roll pan you can press the treats thin enough to cut with the heart shaped cutters. With a piping bag (or plastic sandwich bag) you can frost these with pretty designs in a cream cheese frosting that makes them even sweeter. Share ‘em, eat ‘em, whatever you do, don’t leave them unattended and expect to find anything left but crumbs left over. Red Velvet Rice Krispies Treats Hearts Author: Cat Davis Type: Dessert Serves: 8 Ingredients Instructions As a Wilton Mom Brand Ambassador I was provided with the cookie cutters featured in this recipe.

Tattered Angels | Creators of Glimmer Mist and Scrapbooking Supplies It’s the moment we have ALL been waiting for–Tattered Angels is proud to release our newest addition to the TA family, Tattered Tangles, a collection of papers that inspires coloring inside of the lines and thinking outside of the box. When we were thinking about our newest line under the Tattered Angels brand, we had two objectives in mind: 1. Create a line that served as a starting place, but was open enough to let one’s creativity run free 2. Complete with (6) 12″ x 12″ papers and (6) Tattered Tangles packs (sizes vary), the papers were designed to work with any color palette. To give you better insight into this new line of papers, we sat down with TA designer JoAnne Doshier to hear her thoughts on the making of Tattered Tangles. Q: What was your inspiration for creating Tattered Tangles. A: When creating, it’s often helpful to have a place to start. Q: How did you decide on the themes included in the Tattered Tangles line? Q: What kind of paper is Tattered Tangles printed on?

painting on ceramic and porcelain I have a file box full of tear sheets of projects I’d like to try. In January 2006 (yes, that was nearly 5 years ago) I pulled out an article from Martha Stewart Living on Dot-Painted China. The minute I saw it, I knew I wanted to try it. I’ve meant to do if for quite a while now but I was stuck at finding the paint. I know craft paints, but I just never seemed to find the time or remember to look for paint for china. I’ve gone to a few of those paint your own pottery places and honestly am usually disappointed with the results. Supplies: China, Ceramic, Porcelain….it needs to be able to go in the oven and cook at 350. Pebeo Paints: Porcelaine 150 1.2 paint pen – for larger dots Porcelaine 150 0.7 paint pen – for smaller dots Porcelaine 150 paint (comes in a small little round container) Porcelaine 150 outliner (comes in a small tube with fine point end) There is also a little set that that has applicator bottles and fine point end you can attach to the bottle. Have a Great Weekend!!

Kodachrome Curtains - Updated! Now with lampy goodness! So, it's been a while since I've made anything Craftster-worthy, but my husband and I busted out the Dremel tool a few days ago and we made this: It's a pair of curtains made out of old Kodachrome slides! I'm really interested in photography, and will buy old cameras in antique and thrift stores in order to develop film that's inside of it. From time to time, I'll find collections of old slides and will buy those, too. Last fall, driving back from vacation, we stopped at an antique store outside of Kansas City and I found a box of a ton of old slides, mostly Kodachrome, from the 50s and 60s. I hate the idea that these pictures would just be resigned to the garbage or something, and wanted to display them (besides just scanning them in and putting them on Flickr - here's a link to my old found negative/slide collection, though, if you want to check that out: ). Then I connected them all together with chainmail rings.

Wire & Paper

Related: