
Singapore Fashion Blog: DIY Fashion tutorial | Ann demeulemeester Epine thorn necklace | Monoxious This DIY is an user request, we thought we’d take up the challenge. It was a pain in the ass trying to source the proper leather in Singapore so we had to end up ordering online. I’m pretty sure our readers overseas have better leather sources than us. You will need: Leather: preferably lambskin or kid leather cause it’s softer. Mark a length of “vine” on the leather. Start marking the thorns along the length of the vine. Rinse, repeat. Use the black craft wire (or black jump rings) to attach the two vines together. You will end up with the leather pieces looking like this. And there you have it! We have also decided to take it a little further and did something a little more challenging because we are masochistic like that with the same method of wrapping and twisting. If you would like to try this out, you will need extra materials like a thin metallic hairband and also a thinner and more malleable craft wire (possibly more leather as well). (All photos taken using my new Fujifilm X100)
DIY Bow Tie A couple of weeks ago, we celebrated FNO by DIYing bow ties and neckties from scraps of denim at Madewell – because honestly, who isn’t borrowing a bit of inspiration from the boys this season? Today we’ll be showing you, who may have missed the event, how to DIY a bow tie with luxurious, Dolce & Gabbana-inspired velvet. Before you know it, you’ll be well suited and ready to channel your inner Marlene Dietrich! You’ll need:a 6″ x 3.5″ piece of velveta 0.75″ x 2.5″ piece of velveta 1″ pin backa glue guna rulera pen Start by drawing a vertical line and a horizontal line, dividing the rectangle into 4 equal quarters. Pinch the intersecting lines and pick up the velvet. Flip the piece over, while still pinching the backside, and place a drop of hot glue in the center. Place another drop of glue on the front side and fold the fabric closed. Turn the bow on its backside and glue the tip of the velvet strip to the center. Glue a pin back to the back of the bow. Your velvet bow tie is finished!
37 Ways to Tie a Scarf | by Scarves Hello there! Welcome to The Knot Library. Are you ready to knot, twist, tie, tuck, loop, braid, fold, and fluff with Scarves Dot Net? We compiled over 50 (and counting!) How to Use Scarves.net How does The Knot Library work, you ask? On the left-hand side of your screen, simply find the type of scarf you want to learn more about. If you would like to see all of Scarves Dot Net’s knots in one spot, check out The Master List. Need more help? DIY Turband DIY Gretchen Jones Necklace A couple of months ago, while visiting New York, we met the lovely Gretchen Jones and were fortunate enough to spend an entire day crafting in her über charming Brooklyn apartment. Not only is she […] DIY Woven Chain Bracelet Chain link bracelets, with colorful threads woven through them, have been popping up here and there.
DIY Fashion Tutorial: Ann Demeulemeester S/S 2010 Zipper Headdress Monoxious | Monoxious Greetings patient ones~!! I know we’ve been neglecting the DIY section although we KNOW everyone enjoys it. We just couldn’t really find the time to make a decent post cause we had stuff to do. *shifty eyes* BUT FEAR NOT~!! We’ll teach you how to make your own Ann Demeulemeester zipper headdress, and an accurate one at that down to the number of zippers and darts because we are -that- anal. This DIY is a little more high-level than the rest that we have done so please read through every single line of instructions carefullly. You will need: Pleather or leather if you can afford it (or have access to it) approx half a meter would be more than sufficient.7 Open-end zippers with metal teeth. We drafted a pattern piece like so. The darts are there to contour the headband so it sits nicely on the head instead of sticking out awkwardly. The side is well, the side. Transfer the pattern onto the fabric. With help of the markings that you have made on the fabric, sew the darts up.
DIY Bleach Tie Dye Last summer, we were obsessed with shibori indigo tie dying. No, really . . . we just about dyed anything white in sight. So when Free People asked us to include a DIY in their guest blogger series, we knew a new tie dye project was absolutely in order. To make a grid-like pattern, fold the shirt like an accordion and bind it between two pieces of wood or other flat shaped objects. Before you start bleaching, make sure you are wearing gloves and working outdoors or in a well ventilated area. The rusty brown color will slowly fade into a beautiful lighter shade as it begins to set. Your reverse bleach tie dye shirt is ready to wear! (top image from here, rest of images by HonestlyWTF)
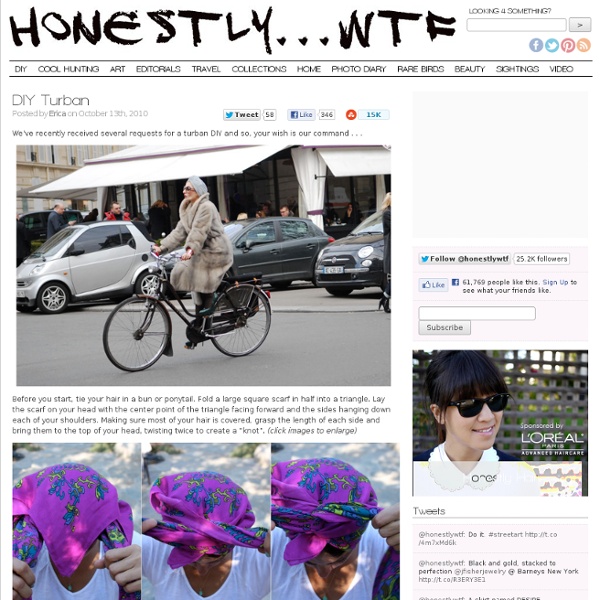
Head Scarf Tutorial After many requests, I finally made a tutorial on how to tie a simple head scarf. It's really, really easy. I did this without looking in the mirror, so that should tell you how easy it is. Let's get started! Start with a large, square scarf. I like my vintage silk scarves because they're soft and not bulky. Fold one corner to the other to form a triangle. Fold the corner down to about the middle, and then fold over again (but not all the way to the edge, because you want it to be a little thicker). Put the scarf around your head with the ends in the front, making sure the wrong side of the scarf (the part where you can see the folds) is against your head. Tie it in a loose knot at the front. Tuck the ends behind/underneath the scarf. Done!
DIY Fishtail Hat Band We were instantly inspired by this gorgeous rainbow fishtail braid in Free People‘s September catalog and decided to recreate it, adding our own little twist: making the braid into a wearable hat accessory. Who said braids were limited to summer and hair? Cut about 40 strands of yarn about 3 feet long, knot at one end leaving a several inches of slack, and divide into two sections. Pull 4 strands of yard from the outside of the left section and add it to the right side. Transform your hat with your new fishtail braid by securing it with a piece of yarn, safety pin or elastic band! (all images by Honestly…WTF)
Turquoise Blue Crop Top Diy Shirts | "DIY: Crop Top from an Old Cotton Tee!" by Stereoskyline I’ve been making crop tops for a while, and this is my technique. It’s a great way to recycle your old oversized cotton tees that you may never want to wear again. 1. Cut off the sleeves at a curve as pictured (or cut them completely off if you want a cropped tank top) 2. 3. 4. 5. Congrats! (I’m sorry I haven’t been posting outfits lately. DIY Shibori Today marks HonestlyWTF’s four year anniversary. Four years! To celebrate, we’re revisiting the very first tutorial we ever featured on the site: shibori tie dye. Lauren and I first discovered shibori after discovering an old photo on the web. The idea of recreating an ancient Japanese dyeing technique inspired us to spend an entire weekend experimenting with our favorite deep blue, indigo. After dyeing just about every white article of clothing in sight, our blue stained fingers excitedly uploaded the tutorial – we couldn’t wait to share it with our 30 readers. You’ll need:an indigo dye kitnatural fiber clothing or fabric2 5 gallon bucketsrubber glovessmall wood squaresrubber bandstwinea PVC pipea long wooden sticka drop clothrubber glovesscissors When choosing fabric or clothing, it’s important that made of natural fibers. Itajime shibori is known as the shape-resist technique. Fold it again in the other direction – again, like an accordion. Wrap the twine around the fabric.
Headband Refashion Our headband had a flower that was starting to look a little tired and worn so we made it new again! This braided ribbon could embellish many things— a hair clip would be cute too! These headbands would make great handmade gifts for little girls to make each other! Woven Ribbon Headband Gather a headband and about 4 1/2 yards of ribbon. You can use any with — I chose 1/4 inch. Begin by finding the middle of the ribbon. Now bring the bottom ribbon up and make a loop and send it through the beginning loop that you just made by crossing the ribbon. Pull the right side snug. Now repeat for the other side, picking up the right side, making a loop and sending it up through the loop just made on the other side. Pull the left side snug. Pull right side snug. Continue braiding until you have a piece long enough to cover the headband. Bring the other side over and then trim. Hot glue ribbon to headband. Finished!