Sew a Bib, Blanket, and Burp Cloth
These baby items were made out of one of the blanket bundles from Raspberry Creek Fabrics and Trims. With just two yards of vibrant, soft flannel, I was able to make a blanket, bib, and burp cloth. For my most recent post on Making the World Cuter, I made another one of these baby bundle sets. This one was for a friend's little girl. Using a blanket bundle containing Robert Kaufman’s Pretty Paisley Retro Flower Flannel and Riley Blake’s Farm Fresh Brown Polka Dot Flannel--which coordinate beautifully together--I was able to make this baby bundle set...
x-stitch lunch bag
School is starting and that means lots of new things: a new teacher, new clothes, and new school supplies. We thought we'd add to all the excitement by making a new re-usable, totally washable lunch bag! Materials To make one 10-inch tall by 5-inch wide by 3-inch deep lunch bag: Making the Panels Cut two 13-inch by 9 1/2-inch panels of the fabric. Using the water soluble marker, mark a 2-inch tall by 3 1/2-inch wide rectangle in the middle of one of the panels- 5-inches from the top and 3-inches from either side of the panel. Iron on the embroidery pattern pieces you want to use inside this marked rectangle. Embroider over the marked pattern with a small back stitch. Spray the rectangle marking with water to make it disappear and iron the panels. Hem each of the panels by folding the tops over 1/4-inch two times towards the fabric's wrong side. Sewing the Bag Pin the panels right sides together around their three raw sides and sew them with a 1/2-inch seam allowance. Finishing
How Not to Be a Hoarder
I don't own a TV, so I haven't actually seen the A&E series Hoarders. But having lived with a recovering one, I understand the tendency. Many of my friends have commented that they envy my minimal style. Closets:5. Paper:7. Electronics:9. Kid Stuff:10. Finally, avoid impulse buys that contribute to debt and clutter. (Image: Leela Cyd Ross/Laura's Mid-Century Melrose Place)
Wet Bag Tutorial
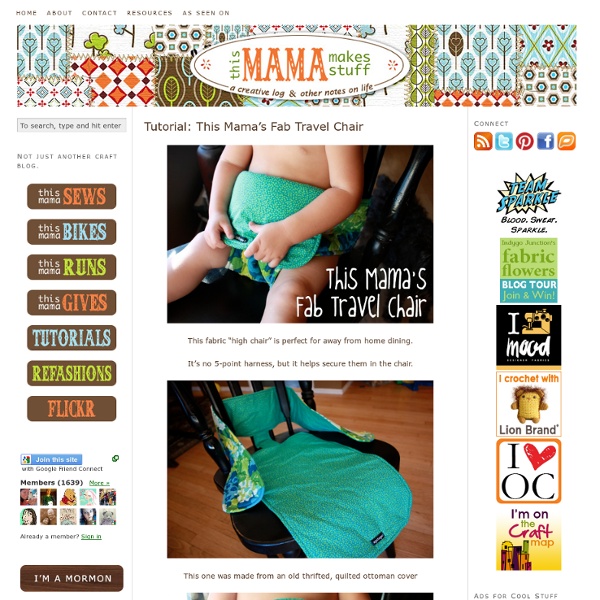
When it comes to giving baby gifts, I have made a ton of different things to give away: bibs, leather shoes, clothes, car seat covers, soother (pacifier) straps, and the list goes on and on. I really love sewing for babies! Lately, I have tried to focus my sewing attention, and make just one type of gift for new mums and babies. Something fast, useful, and not too expensive to make. Now, I use cloth diapers with my baby, so obviously I need a wet bag for on-the-go diaper changes. Like I said, a wet bag makes the perfect gift, for someone else or for yourself. *Update: a kind reader pointed out my error in listing the necessary yardage. Wet Bag Tutorial What you'll need:1/4 yard of fabric (pretty much anything will work, although I wouldn't use felt, leather, or knit)1/4 yard of *PUL fabric*12" zipperPolyester thread *A word about PUL fabric. Instructions: 1. 2. 3. 4. 5. 6. 7. 8. The wet bag in the pictures was made from a vintage table cloth that I found thrifting a few months ago.
24 Survival Tips For Living Alone
Stuffed Fabric Turtles (with pattern pieces)
We were shopping around, down in Florida, after we went to the zoo several weeks ago (yes, in Jacksonville…..some of you asked)……..and we stopped by a Pottery Barn Kids store. I’m a window shopper. Well, and an inspiration-seeker shopper. I love walking around and daring myself to find something I want to make. Want to go shopping with me? I might drive you crazy. Then you and my husband will have something in common. While we were there…..we saw some cute little stuffed turtles. So I snapped a picture with my phone, and I decided to try and figure it out at home. So, here’s my version…..a bit different, but just as sweet. They are soft and plump and are perfect for little hands. …..and the tail may be my favorite part. After making one, you better let your turtle explore outside. Would you like to make your own? Turtle pattern pieces found here. Cut out all of your turtle pieces, in whatever fabric and color choices you want. Then sew each piece closed, about a 1/4 inch from the end. Enjoy.
Making a picnic dress
Several people have asked me how to make my Picnic Dress. It’s a bit too complicated for the step by step instruction on how to draft a pattern I gave for the draped t-shirt, but I hope this will be enough detail for anyone who is familiar with how dresses are made. You will need 4 yards of 45″ fabric and an 18″ zipper. These are the pieces of the pattern. Mark out the measurements listed and the distances between them. If you’re not used to making your own sleeves, trace both the arm hole and the top of the sleeve off a pattern you’ve used before and like. To make the curve of the skirt even, use your tape measure like an enormous protractor. To gather the top, mark out a distance ¾ of the difference between bust and underbust measurement on one side. After gathering both the lining and the top layer of the bodice, sew them together along the neckline. Sew the edge of the facing to the neckline on each back piece. Sew the front and back together at the shoulders.
12 DIY Baby Shower Gift Ideas and My Hardest Pregnancy Moment...
<div class="greet_block wpgb_cornered wpgb_shadowed"><div class="greet_text"><div class="greet_image"><img class="enable-pib-img-under" src=" alt="WP Greet Box icon" data-recalc-dims="1"/></div>Thanks for coming by! I try to feature a new creative tutorial every day -- and I'd love to have you follow along: <a href=" rel="nofollow"><strong>subscribe to my email updates</strong></a> or <a href=" rel="nofollow">come follow along on Facebook</a>.<div style="clear:both"></div></div></div> Being a mom is the hardest thing I have ever done, but also the most rewarding experience. Today I’m sharing an essay about the most difficult moment of my daughter’s birth for ABC News and the UN Foundation’s Million Moms Challenge. So I was put on bedrest. Go to Million Moms Challenge to read my essay, and to share your own birth stories. xoxo
death week News, Videos, Reviews and Gossip - io9
SExpand Totally agree, it's wonderful! I can't believe anybody fell for the rest of these, especially the obvious cotton ball ones. Not surprised to see that composition wasn't any better then than it is now. What always confuses me about how people managed to be hoodwinked by this isn't the bad overlaying, terrible compositions or even the obvious cotton wool but...surely they recognised the picture of their loved one as looking more than suspiciously like same one they'd had to loan photographer for "seance purposes" (or whatever-not-at-all-dodgy reason they cooked up for needing it)? Grief is a powerful thing I guess.
Tutorial: How To Make Your Own Labels the Easy and Cheap Way!
***This tutorial has been upgraded! Check out my latest post HERE to save yourself a couple steps*** I reaaaaally want to order some labels for myself. So I decided to make my own. Materials: Iron on Transfer Paper (I just used the t shirt kind) Printer Scissors Iron Ribbon, twill tape or whatever you like best. 1.) 2.) 3.) 4.)