
How to Turn Old Magazines into a Bookshelf The magazines you’ve read through can be turned into extra storage space for the home in a few easy steps. Magazines can be thick, but individually, the floppy, thin pages seem like the last material you would use to build a sturdy bookshelf. To everyone’s surprise, Sean Miller did the unthinkable and crafted a bookshelf from 80 National Geographic magazines and was named one of 23 finalists in Inhabitat’s Spring Greening Contest . Sean Miller's award-winning design. Image via Inhabitat When magazines start piling up, it’s hard to part with them. Gather all of the magazines you’re willing to reuse. Give this DIY magazine bookshelf a try and increase your home’s vertical storage space.
DIY Fabric Garland My niece’s first birthday is quickly approaching and I’ve decided to try out a few projects for her upcoming party. First up is a fabric garland to decorate the walls and ceiling. I couldn’t wait to share this latest project because it turned out to be so easy and super fun to do! I wish I had a birthday party to celebrate every month just so I’d have an excuse to make these. More pics and step-by-step instructions after the break! Materials Needed: Sewing Machine Fabric Pellon / Interfacing Iron Rotary Pinking Cutter Scissors Satin Ribbon Coordinating Thread Instructions: 1. 2. 3. This would make a great gift after the party or a whimsical touch to a child’s room or baby shower, the possibilities are endless… Happy crafting! *Tip: I only made my flags single-sided but this could easily be done with fabric on each side.
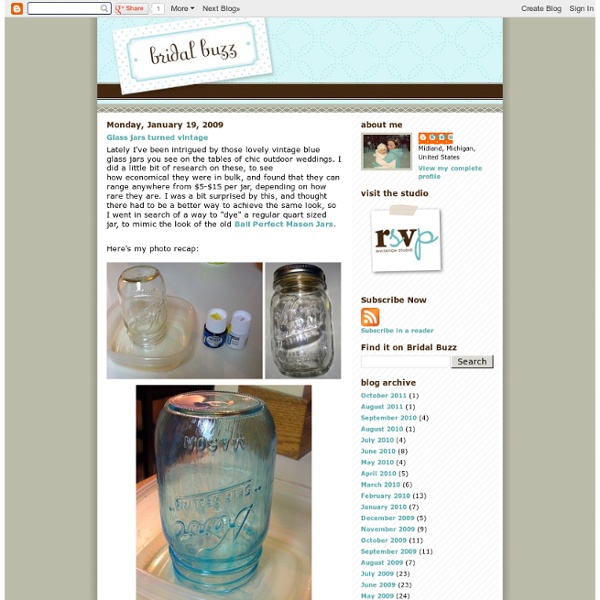
Painted Mason Jars Yes, they are everywhere. Yes, I have posted on them before. And yes, I am still smitten! I should note...I'm a little obsessed with how the matte black came out and have more outside drying as I type this. Then, in my Pinterest crazed obsession, I found this little DIY image. This led me to trying my own version with a milk jar, fabric marker and glue gun.... She's not perfect, but I love that about her. For all you DIYers with questions on how to or the materials used for this project...I did a follow up post that can be found here. 15 Pretty Patchwork Project Ideas | shamsandcoverups.com When I hear the word patchwork the first thing I usually think of is the stack of quilts that my grandmother used to pile on the bed for me in the winter to keep warm. But, here are some beautiful and interesting patchwork project ideas you can use every day or incorporate them into your home décor without using a quilt. Selvedge and patchwork dresser. Cozy reading chair. Hexagon patchwork pillow. Scrappy patchwork mug rug helps keep coffee rings off the table. Pretty patchworks in hoops look great hanging on the wall as art. Patchwork curtains are colorful and help create privacy in the bathroom. Patchwork purses! Patchwork covered bulletin board keeps your notes in order. Patchwork skirt goes with everything. Patchwork Fabric Baskets are great for storage. Notebook with patchwork slip cover. Patchwork circle would look great on a quilt or as an area rug. Tea Cozy adds color to your kitchen. Comfy patchwork pet bed. Patchwork porch bench for relaxing at home.
Mod Podge Photos {On Canvas} This is what your finished product can look like! Darling of course, and the perfect gift for those Grandmas and Grandpas, or even yourself! Mod Podge Photo Tutorial: Part I What you will need: Pre-stretched canvas Cute paper pre-cut to fit the sides of your canvas Cute photo's Wax Paper towel Acrylic/Craft Paint Step 1: Apply a thin coat of mod podge to your entire canvas, sides included. Step 2: Have your strips ready? Once Mod Podge is Dry, you will re-paint an additional thin layer on one side of your canvas. I wanted to make sure that my edges would stick, and stick well. Step 3: Place your strip of paper along the edge of your canvas. Your edges don't have to meet up exactly together. You can cover the exposed canvas with paint in a few more steps. Step 4: Photo Application If you didn't already tear off a large piece of wax paper, DO IT NOW! I also pre-cut my photo 1/8 inch on each size so that there was no edge overlap. Step 5: Turn the photo over and smooth it onto your canvas. Voila! Done!
D.I.Y. Oversized Fabric Garland Chandelier Make a statement piece in your home out of supplies you already have on hand! I designed my oversized fabric garland chandelier to fit over our table but you could also use it in a corner that needs a little more excitement, above a reading nook in a child's bedroom, or as the backdrop for your next holiday party. You'll need: 1 wire cooling rack, 2-3 yards of fabric in different shades, 1 strand of twinkle lights, 1 white extension cord, lace, chenille, embroidery thread, a needle, two hooks that screw into a wall, a drill. 1. cut strips of fabric in varying widths (1/2" - 2") for depth. 2. create texture with strips by stitching loosely through them with embroidery thread and then bunching them up before tying a knot. Spread them out evenly along your thread and leave enough string at the end to tie it to the cooling rack. 3. 5. 7. 9. Drill a pilot hole in your ceiling and hang a strong hook where you'd like to hang your chandelier.
Decorate Jar Lids Today’s projects are ones that use up old bits of paper scraps I can’t bear to throw away. I save these pieces of paper (gift wrap, envelope liners, art papers, origami papers, etc.) and then wonder what can I do with them? I have covered pencils and jar lids to brighten them up a bit here. The jars are ones I have salvaged from the recycling bin and the pencils are just plain ones you can buy at a dollar store. The pencils would make a lovely gift especially if given in a matching box or pencil bag. CLICK HERE for the full instructions for both the jar lids and covered pencils projects after the jump! Materials paper scraps Mod Podge in matte finish pencil scissors medium craft brush jars with screw lids plain wood pencils unsharpened Instructions for jars 1. 2. 3. Instructions for pencils 1.
Simple Bow Tie Top I'm so happy about how this turned out. This is one of those projects that's been on my to do list forever and now that I finally got it done, I wish I had done it a long time ago. This is such a simple project. One of the easiest I've ever made. Materials: 5/6 + yard knit & 1/3 yard silk, cotton, etc. My knit is 60" wide and my dusty pink silk (faux) is 45" wide. Your fabric doesn't have to be exactly as wide as mine, just keep in mind that if you buy a fabric that is less wide you may need to purchase more to compensate. Cut two large squares to the dimensions of 30" x 30" If you bought 5/6 yd of 60" fabric all you have to do is cut along the fold line. **Edit- 30" length gives you a long top. Make a casing at the top of each square. Sew down with a zig zag stitch (so it can stretch). Start working on your sash. I made a mistake when I made my sash and cut where I shouldn't have. Cut right down the middle of your fabric so that you have two 45" by 6" strips. Cut off extra fabric Voila.
How to cut glass I posted a picture about 1 week ago on Instagram, Facebook and Twitter of me cutting glass using just string. I got LOT’S of requests for a tutorial on how I DID THIS! So here it is. FINALLY! You will be able to learn how to cut glass. I want to warn you. It’s best to triple your yarn because it will burn longer! Soak it GOOD! I like to tie my yarn where I want my glass to “cut” then quickly pour polish remover over the string again. Get a big bowl with ice and water ready. VERY IMPORTANT! Slowly turn your bottle. You can’t let the flame go OUT then dunk it in the ice water. YAY!!! I reallly hope you enjoyed this tutorial because I had ALOT of requests for it! © Copyright jaderbombllc, All rights Reserved.
Resolution Subway Art – Tutorial This was my submission from the SYTYC “New Year’s” Challenge….I finally won a challenge! That puts Dana and I into the final two this coming week! I haven’t made resolutions for the past few new years because I usually forget about them after a few weeks. This year as a family we came up with a short list of things we wanted to focus on everyday and I made the list into a large piece of art. I love that this large 3 foot high wood piece is reminiscent of an early 20th century subway sign. It is durable enough to hang in an outside eating area: It is simple enough to rest on a side table: And it is bold enough to display on a mantle as the focus of a room: Here is how I made it: Step 1: I bought a ready cut 2′ x 4′ piece of wood from my hardware store and had them shorten it to 2′ x 3.’ Step 2: I also bought long wood molding strips that were 1/2″ wide and 1 1/2″ deep. Step 9: I printed out my resolutions on regular sized paper. Visit the following tutorial too!
Enamel-painted Vases January 11, 2011 | Be Inspired | Projects | The Sweetest | Comments Enamel painted vases – I’m in love! If you like to paint, I have a really fun project to share today! Supplies: Three different sized vases from the Dollar Store (here,here and here), dishwasher safe PermEnamel paint in Mediterranean Blue and White (or whatever color you prefer), PermEnamel Surface Conditioner from Michaels Arts and Crafts store, paper towels, paint brush and a mixing bowl. Directions: 1. 2. 3. 4. 5. 6. 7. Remember these beautiful enamel-painted vases are only for DECOR. The last picture really doesn’t do the lobby nearly enough justice… to the left there is a wall full of chopped wood and it looks amazing! Photo credit: Zan Passante, EDK
African Babies Don't Cry: TUTORIAL : How to Make Rainbow Coloured Rice (Without Alcohol) for a Toddler Activity Sensory Bin I previously mentioned that I have been longing to make Jesse coloured rice to play with after seeing so many pretty pictures of it on Pinterest. I looked up a couple of recipe's and noticed they all used rubbing alcohol (surgical spirits) as the liquid to spread the colour over the rice. I don't really like the idea of my child playing with something covered in alcohol, besides the fact that it stinks, so I made up my own recipe, with great success! I used vinegar instead, and my colours came out just as, if not more vibrant. Here is the recipe for my (almost natural) recipe for making rainbow coloured rice. Now for the how-to... Click here for a two page PDF version of this tutorial for easy printing. First, gather your supplies: You will need:A large quantity of cheap rice, 'sweepings' would work well as it is not going to be consumed. Seal your bag and shake the rice around letting the colouring completely dye the rice. I was so impressed with the colours.