
Dreamcatcher With Paper Feathers While I was away on our camping trip last week my clever friend Marichelle shared these fabulous results from her recent handmade dreamcatcher obsession over on her blog. I’m smitten I tell you! Smit-ten! A quick google search yielded several additional DIY Dreamcatcher results that I love…so I thought I’d post a mini roundup for you all, in case you too feel like being bitten by the dreamcatcher bug. xo Ez DIY Dreamcatcher by Jena of Modish | Dreamcatcher How-to from Lune Vintage Blog | DIY: Natural Dreamcatcher from Foam Magazine | Dreamcatchers from Odette New York Blog (via Lifeflix)
Bedroom Sparkle recently I posted a project idea on the drawing board for making a change to our bedroom look, that for me, had grown generic. In this personal space, I wanted to feature something unique to us by highlighting objects we most love. I replaced the curtain panels previously behind the headboard with a wall hanging made from strands of beads, seashells and chandelier prisms, wrapped around a driftwood branch. for us, this wall hanging is a celebration of both found and reclaimed treasures. The seashells and driftwood are collected pieces and the chandelier prisms are from a lighting fixture that was in my childhood home. Additional buttons, beads and fragments of jewelry make it even more personal.. This is what the room looked like a week ago. This was a fairly simple project, but time consuming because of the scale. Driftwood can be brittle, so drilling through the wood compromises its stability further. It’s truly the focal point of this room. Sharing with Like this: Like Loading...
Heart Sun Catcher Now that Christmas is over, I can share this new tutorial! I made the sun catcher in the picture as a present for my mum, so I couldn’t post until now in case she saw! This is slightly fiddly to put together – one of those projects that could do with an extra hand or two – but the method is relatively simple! You’ll need: Beading wire (I used .012 diameter) Jewellery wire (I used approx 2mm wire) Lots of small beads and/or crystal chip beads Large clear bead/charm for the centre Ribbon 1 split ring Jump rings Crimps Tools: Tape measure Wire cutters Flat-nosed pliers Round-nosed pliers 1. 2. 3. 4. 5. 6. 7. 8. 9. 10. 11. 12. 13. 14. 15. Of course, this method isn't limited to hearts, other shapes would look great too! Will be linking up at the parties listed below.
Beach Wind Chimes I love my wind chimes. I not only have several decorating the inside and outside of our house, but my neighbor across the street has one in her front bucket window, so I blow kisses to it all the time. As much as I love seeing them and love making them, I hate taking photos of them. I make my chimes from beads, beach findings collected over the course of months and pottery shards from the glazedOver studio. And here’s another photo which calls for a closer look. Do you see the brown fabric of the bag that my husband was chivalrous enough to hold for me?
Rain Chain We recently featured a DIY rain chain, and since I found out about rain chains, I have been slightly obsessed. Basically, a rain chain is a decorative chain that you can use in place of an unsightly downspout on your home. When it rains, the rain chain makes a pleasing water feature using the rain runoff from your roof. [the inspiration chain from Elderberry Street] Project Materials: 2 spools of floral wire, $1 each5-10 coils of thick decorative floral wire, $1 each1 bag of decorative river rocks, $1Paper clips, on handPencil, on handWire cutters, on hand or $1Needle-nosed pliers, on hand or about $3 Total cost: $8 and up Note about Supplies: Wire: You can find the thin, green floral wire, the thick decorative wire, and wire cutters in the floral section of the dollar store. in the jewelry-making section of your local craft store for about $5. How much wire you need depends the final length of rain chain, on your wrapping technique, and how sparing you are with the wire. Make a Rain Chain
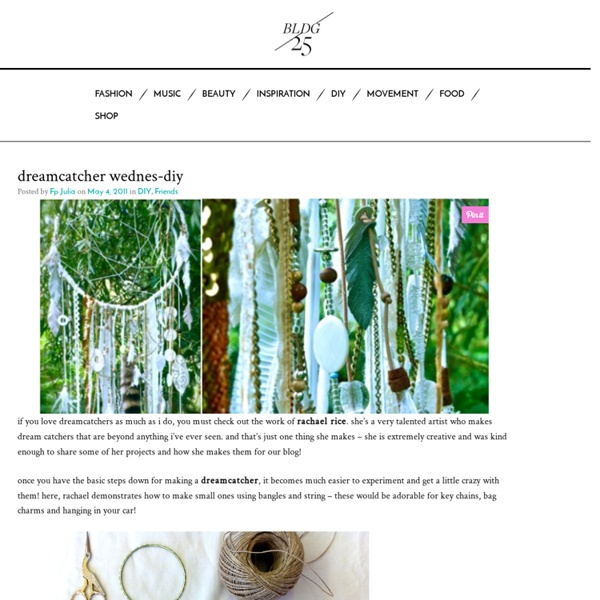
Desktop Dreamcatchers We’re always looking for fun ways to decorate our desk spaces at work, and these mini dream catchers do just that! I was inspired to make them after seeing these incredible beauties that our store display team made for our Costa Mesa store: Brigette happened to have some leftover fabric from her reupholstered chair that I was able to cut little pieces of, and it worked perfectly. This is also a great project to use old crochet or vintage doilies for! The only other thing you need are twigs from a twig wreath, which I got at A.C. Using a needle and thread, sew the crochet doily to the twig wreath using each point of the doily, and wrapping the thread around the twigs so you’re simultaneously holding the twigs together as well. For the pieces hanging down from the dream catcher, I used thin strips of fabric and attached them to the twigs with a needle and thread. The result is a very shabby-chic dream catcher, don’t you think? It fits in nicely at Brigette’s desk :) Photos by Julia.
Twig Dreamcatcher I'm back with the how-to to make my little dreamcatcher from yesterday. Ok, here we go! What you'll need to get started: a few pliable twigs/vines to form the dreamcatcher itself4-6 feet of thin strong string- I used embroidery flossa bead (for the "spider" in the dreamcatcher) a page of cardstock or poster board for the "feathers"paint, or colorful decorating medium of choice! Step one: start to form your hoop! Step two: start stitching! You'll start to go around in a circle adding stitches on each "round". Step three: make the feathers! Then I cut out general feather shapes from the board. Step four: The last step is to hang your pretty dream bird feathers from your pretty hoop! Then put a thin line of glue on the back side of the stem, over the string you've already wrapped, and wrap the string once more, down to the end of the feather. Then, cut the remaining string that's now coming off the end of the feather to the length you'd like for it to hang from your dreamcatcher.
Dreamcatcher Vieilles Je vous ai préparé un petit tuto spécial déco pour s’occuper les doigts ce week end ! Ça vous tente ? Il faut : ▲ 2 tambours à broder de tailles différentes ▲ Du fil de coton DMC de deux couleurs (ici il m’a fallu 1 échevettes de mint et 2 de rose) ▲ Un petit napperon ▲ Une aiguille à canevas ▲ Les plumes à télécharger ici (clic-droit puis « Enregistrer l’image sous » ) Le pas-à-pas : {1} On commence par un nœud sur le plus petit cercle { 2 } On fait une boucle comme sur la photo ( en respectant bien le dessus / dessous !) { 3 } On répète l’opération tout le long du cercle (il faut penser à bien espacer car plus les nœuds sont rapprochés, plus le tissage sera serré !) { 4 } Une fois revenu au début, on va répéter l’opération mais cette fois ci en passant la boucle dans le tissage que nous venons de créer { 5 } Et ainsi de suite ! { 6 } Jusqu’à la fin ! { 7 } On referme, comme pour repriser un tissu { 8 } Afin de cacher le tour en bois, on va enrouler le fil de coton tout le long Tadaaam !
Dreamcatchers I’m really diggin the whole hippy thing. And while Craig is quick to correct me on the fact that dream catchers are not hippy-ish, I still think of them that way. Natural, care free, simple. All things I relate to those old hippies. hah. The point of a dream catcher is to weed out bad dreams. This is not a traditional Native- American dream catcher. What I used: Embroidery Hoop Yarn (or twine, hemp… whatever you have on hand) Beads Feathers Thread Felt Hot Glue Gun Want to make one too?? Grab your embroidery hoop, leave it as is, or wrap it up like I did. Take your webbing yarn and form a loop at the top, this will be where you dreamcatcher hangs from. The webbing is the same stitch through out. Pull tight and repeat. For your second (and every other row), use the same stitch, but instead of going over the hoop, go through the string: Keep going until the hole in the middle is to your liking. Now you can tie extra string where ever you’d like, some tie it to the actual hoop. His view:
Dreamcatcher Eagle Spirit Presented by… There are a lot of stories about the dream catcher, many of which accompany the dream catchers that we can buy in the stores. The most common thread among all of the dream catcher stories, is that the dream catcher should be hung in the room in which we sleep: above the bed, on the door, on a window, or as we choose. The other constant is that the dream catcher is to catch our dreams. There are many dream catcher beliefs, some of which are opposite in nature. We can hang dream catchers any where that we feel is right for us. Making a Dream Catcher takes some time to perfect. We should not expect our first Dream Catcher to be perfect. We can expect to: We need: Method. Natural Dreamcatcher Jessica Seaton's workshop is organized chaos– bones, feathers, beads and string wait patiently on a wooden table for her sculptor's touch. It's here that she crafts the hand made dreamcatchers elegantly scattered across the back wall of her Santa Monica store, Beau + Aero (which she runs with partner Baelyn Elspeth). "Dream catchers are a sacred part of Native American culture that I always like to pay homage to and set an intention with my creation," Jessica says. What You'll Need:-Freshly cut pliable branch -String -Scissors -Feathers How to Make it:1. 2. 3. 4. 5. 6. See more FOAM DIYs HERE!
Rainbow Suncatcher This is the project that won runner-up in The Color my Summer Contest. Wanna make one, too? Here's how: Ever feel bad about throwing away plastic cups? Which ones are the right ones? First, start with clean cups. At the top of the cup, I used a hole punch to put two holes directly across from each other. I used jelly roll pans and an oven at 120 degrees celsius (250 degrees farenheit.) You don't have to space them out much-- they don't really spread as they melt. Once cooled (which only takes a second), I used gold yarn to string them up with an outer circular layer and an inner one. For the top of the chandelier, I used a clock box from Ikea, spray painted yellow. Since it was octagonal, I decided that it would be easiest to have 8 strings of discs for the outer ring and 8 (staggered in between the original 8) for the inner ring. . The outer ring has 5 discs (one of each color) and the inner ring has 7 discs, so that they would hang down a little more. Then, hang by a window and enjoy!