
Tutorials for Recycling Books We rode bikes around our neighborhood this weekend and stopped at all the garage sales we found along the way. I love doing this because it's like exercise and shopping in one! Plus, my bike basket is perfect for holding whatever treasures I find. Pourquoi les femmes aiment-elles autant les bijoux ? – Le Blog Manapur.com Lors d’un précédent article, intitulé « Plage privée rime avec été », je vous ai parlé de ma rencontre avec Henri. Il nous a posé une magnifique question : « Pourquoi les femmes aiment-elles tant les bijoux ? » Les filles, pourquoi aimons-nous autant les bijoux ? Vous, vous êtes déjà posées cette question. J’ai posé cette même question à un ami joaillier, mon ami Pierre. Waouh, ça fait loin n’est-ce pas ? Alors d’un coup, je me dis, Lucie était-elle, une Fashion victime ? J’ai rencontré mes amies hier soir et je leur ai posé cette question. Non, pas si Lucie est une fashion victime. Émilie Émilie, mon acolyte, qui travaille dans la pub perçoit le bijou comme un élément de la communication indirecte. Tiffany Quant à Tiffany, elle assimile souvent le bijou comme une appartenance familiale. Sylvie Pour Sylvie, le bijou est le témoin du passé. Jenny Jenny, la plus extravertie de toutes aborde les choses autrement. Lou Mayanne Mayanne, notre BCBG est plutôt diamant or blanc. Bisous, bisous, Abby
- StumbleUpon I’m getting a little tired of the winter weather and will take just about any opportunity to daydream about the sunny warm days ahead. These Moroccan-inspired lanterns by Ohdeedoh contributor and DIY expert Katie Steuernagle are the perfect antidote to the winter blues; I love the glow of the rich jewel tones and the intricate gold designs. If you have any old sauce jars lying around, this is the perfect way to make good use of them and get yourself psyched for spring— it will be here before we know it! —Kate CLICK HERE for the full how-to after the jump! Materials old glass jars (spaghetti jars, jam jars or any plain glass jar will work)gold dimensional puff paintglass paint (Delta or Pebeo Vitrea glass paint are great options)paintbrushwire (optional, for hanging lanterns) Instructions 1. 2. 3. 4.
Fonctions des bijoux Les bijoux précieux ont de tout temps représenté une fonction précise, qu’elle soit religieuse, sociale, utilitaire ou symbolique. Retrouvez l’histoire des bijoux au travers de leur fonction et voyagez grâce à une sélection de bijoux ethniques africains et d’asie et de bijoux en argent originaux et authentiques. Voilà comment apprendre à distinguer les différentes fonctionnalités, identitaires des bijoux et mieux comprendre pourquoi on porte des bijoux depuis la nuit des temps dans de très nombreuses civilisations.Usage et fonctionnalités des bijoux expliqués facilement aux amateurs de bijouterie fantaisie ou de luxe. Fonction des bijoux spécifiques Les fonctions des bijoux, bijoux ethnique par exemple sont très variables selon les époques et les cultures, mais aussi selon les croyances et les pays. Fonction sociale le bijoux va être signifiant d’un statut social pour son porteur, par exemple l’alliance qui signifie que le porteur de la bague est marié. Fonction identitaire
Using Up That Sweater So I had some leftover sweater material from the pumpkins I made. The sweater did not felt like I thought it would when I washed it because it wasn’t all wool. But it still was really soft so I thought why not a pillow. I had a bed pillow I wasn’t using so I just cut it down and used it as the insert. Then I cut the body of the sweater from armhole to armhole. I had already cut the sleeves off since that is what the pumpkins are made out of. Then just a straight stitch across the top with my machine and stuff the insert inside. I became addicted to making these cute little flowers. I had a gray sweater as well (which felted better) so I decided to combine the two colors. I cut out some leaves and then outlined them with my sewing machine. It wasn’t showing up enough so I hand stitched them on top with some embroidery floss. I whip stitched the bottom by hand as well. And I managed to hot glue them on without any injuries! Not too bad. It’s a great size for my bed. Plus I love the texture it adds.
L’impact de Covid-19 sur le marché des bijoux fantaisie générera des revenus records d’ici 2027 – monblogapple Le rapport complet sur le marché des bijoux fantaisie effectue une analyse de marché approfondie pour fournir quelques startups aux nouveaux acteurs commerciaux du marché afin de les aider à établir leur entreprise et à augmenter le portefeuille de produits. Les réalisations antérieures et les avancées innovantes déterminent la croissance de l’ensemble du marché. Les nouvelles technologies ainsi que les innovations sont discutées ici pour permettre aux joueurs de saisir l’opportunité du marché en s’efforçant d’intégrer la nouvelle technologie pour obtenir un avantage absolu sur les autres. Certaines des projections et stratégies clés suivies par les acteurs sont également mentionnées ici pour obtenir une perspective commerciale puissante. Demandez un exemplaire de ce rapport sur Vente de fin d’année Dépêchez-vous pour 30% de réduction Obtenez 30 de rabais sur ce rapport chez diamant
t-shirt pom poms | Craftaholics Anonymous™ Learn how to turn old t-shirts into pom poms! T-shirt Pom Poms are so much more durable than tissue paper ones. And I think they look loads better! got an old tee or two {or 20!} that you don’t wear anymore? turn them into *pretty little pom poms! Supplies t-shirts, 1 per pom pomscissorscardboard use round objects to trace circles onto cardboard to make 2 templates like those shown above. i used a roll of tape and my camera lens cap…. the diameter of the outer circle is 6.5″ and the diameter of the inner circle is 2.5″. you can play around with different template sizes to get different sized pom poms. cut your t-shirt into 1/2″ strips. i only used from the arm pits down on each shirt. . take one strip and one template and place strips as shown close to the inner circle. sandwich the strip by putting the other template on top. take a fabric strip and place on cardboard with the end even with the outer edge. continue winding the strips around the template until you reach the other side.
La bijouterie : un marché qui se renouvelle en 2021 La bijouterie : une envie de luxe en 2021 Après les attentats terroristes, les manifestations des gilets jaunes et les confinements liés à la pandémie de COVID-19, les bijouteries de luxe ont perdu beaucoup de clientèle à Paris. En ce début d'année 2021, les touristes étrangers manquent à l'appel. C'est pourquoi les grandes marques de bijoux développent de plus en plus leur propre réseau de vente sur Internet. D'autre part, les marques se renouvellent en imposant des nouveaux noms sur le devant de la scène. La bijouterie : une envie de mode en 2021 La tendance à venir de la joaillerie est portée par les jeunes créateurs. La bijouterie : comment résister à la tempête en 2021 ? Dans un marché à forte concurrence, le secteur de la bijouterie fantaisie semble déjà connaître quelques turbulences.
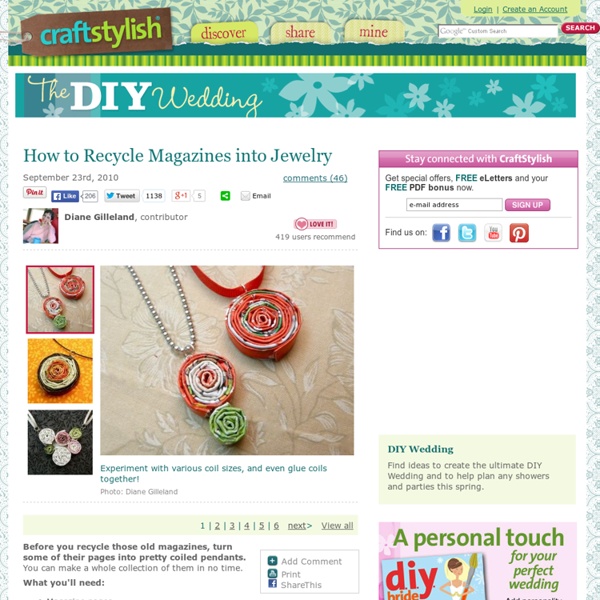
Corkboard Journals Here's another DIY project from our sweet friend, Sasha - from the The Gilded Bee. Be sure to check out her awesome shop full of handmade packaging lovelies. Thanks for being here with us Sasha! I'm delighted to share my book tutorial with you today: Supplies you’ll need to make this project: • One—8.5 x 5.5 sheet of cardstock • One---1/2 x 3 inch piece of cardstock or paper • Two---2 5/8 x 3 1/8 inch pieces of cardboard, chipboard or matboard (not corrugated) • Hot glue gun and glue sticks • 25---3 x 5 inch ruled or blank index cards • Two---3 x 5 inch sheets cardstock • 2 rubber bands • Pencil • ¼ inch wide Ribbon: One-6 inch piece, plus two-1 inch pieces To make the page block: * 1. * 2. * 3. * 4. * 5. * 6. To make the cover: * 1. Make a little mark at the center of each side of your paper (4.25 inches on center). On each side of those center marks, draw three lines paralleling each other (6 lines total): 5/16”, 5/8”, 13/16” inch from the center mark. * 3. * 4. * 5. * 6. * 8. * 9. * 10.
Analyse SWOT du marché des bijoux fantaisie des facteurs clés pour augmenter la valeur du TCAC – AFRIQUE QUI GAGNE Le Global Bijouterie d’imitation Market 2021 publié par Global Market Vision adopte une approche globale pour étudier les tendances clés influençant la croissance de ce secteur. Le rapport sur le marché Bijouterie d’imitation considère les principaux facteurs responsables de la croissance de l’industrie Bijouterie d’imitation, en plus des principaux obstacles et défis. Dans le segment initial du rapport, la définition du marché, l’aperçu du marché, la description du produit, la portée du produit, la caractérisation du produit et la spécification du produit ont été discutés. Notre rapport vous aidera à trouver ce que vous cherchez. Acteurs clés du marché mondial Bijouterie d’imitation Ce rapport sur le marché mondial Bijouterie d’imitation contient une liste de certaines des principales entreprises du marché. Les meilleurs joueurs analysés dans le rapport sont : Segmentation globale du marché Bijouterie d’imitation : Segmentation du marché par type de produit : Diamant, Cristal, Autre