background preloader

How to make a paper flower
How to make a paper flower
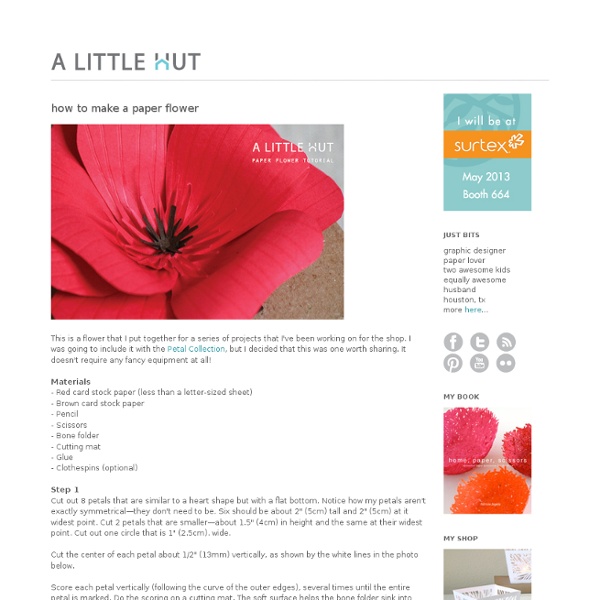
This is a flower that I put together for a series of projects that I've been working on for the shop. I was going to include it with the Petal Collection, but I decided that this was one worth sharing. It doesn't require any fancy equipment at all! Materials - Red card stock paper (less than a letter-sized sheet) - Brown card stock paper - Pencil - Scissors - Bone folder - Cutting mat - Glue - Clothespins (optional) Step 1 Cut out 8 petals that are similar to a heart shape but with a flat bottom. Cut the center of each petal about 1/2" (13mm) vertically, as shown by the white lines in the photo below. Score each petal vertically (following the curve of the outer edges), several times until the entire petal is marked. Slightly overlap and glue the two bottom tabs that are formed by the split petal base. Glue 3 large petals to the circle base. Step 4 Cut out 2 brown star shapes and 2 larger red star shapes. The final step is to fold the edges of the flower petals outward. Easy right?

Creative upcycle and downcycle ideas Feb I don’t often post about miniatures but this one is so cute! And the best part is the main material for the tiny chocolates in this mini candy box is made from the original wrappers the full size chocolates are … There is a whole bunch of cute Valentine card ideas over at Buttons and Paint that you can make with recycled paint swatches or just about any paper This idea for making little Valentine treat bags filled with Legos is just darling. pop on over to the blog Kojo Designs for the free Lego Valentine Printable. If you have windows you can now look at them as canvases for your doodles, art and a great way to add a little bit of holiday cheer as I have done for Valentine’s Day. This idea is soooooo cute! Pallets are such a great resource for recycled wood. If you happen to be in need of a bench and have a spare coffee table (or score one at a yard sale or curbside) pop on over to the blog Measured and Slow for a great tutorial on how … Jan This post had me at the first idea!

Quick fix grocery bag We had grapes this weekend. So? They were really good. Seedless white grapes and they came in one of those plastic bags, with cuts all over to make it stretchy. I found a shirt - an old favorite but hopelessly stained one (bleach* near the bottom hem). In case you want to give this super fast and easy grocery bag a try as well, keep on reading as I wrote down some instructions for you. What you need: - an old T-shirt- scissors- matching thread- a button- a piece of ribbon- sewing machine Instructions: 1. 2. 3. 4. 5. 6. 7. 8. 9. 10. Take one sleeve and cut to size, such that the folded bag fits inside the sleeve (make sure to add seam allowance). As with all of my tutorials, please note, this tutorial is intended for personal use only. * the bleach stains ended up the in hem and one of the boxed corners!!

El blosss d'Andaira joyce’s spring/fall bedspread over the next few months, in addition to our regular diy wednesday column, i’ll be posting the full instructions for all of our 2008 diy contest finalists (as well as a few dozen that weren’t finalists but definitely deserved to be celebrated). i’m going to go down the line in order of votes- and our next highest finalist was joyce and her incredible reversible spring/fall bedspread. joyce was kind enough to write up detailed instructions for completing a piece like hers. in addition, there’s a great link in the instructions to a few embroidery video tutorials- perfect for anyone who’s new to the art. click here for the full post and joyce’s instructions, or just click “read more” below. [thanks, joyce!] Reversible Spring/Fall Bedspread Step-By-Step Instructions What you’ll need: –cotton canvas weight fabric for spring base (approx 55″x 67″)* –cotton canvas weight fabric for fall base (approx 55″x 67″)* –cotton poplin weight fabric for spring inner rectangle (approx 33″ x 43″)** –scissors 1.

VÍSTETE QUE VIENEN CURVAS Petal Pillow Tutorial Today we’re going to make a Petal Pillow. Its very easy, cost me under ten bucks, and took about half an hour to make. Plus it will add lots of summer color (is it summer yet?) to your house. First you’ll need: -a little over a 1/2 yard of fabric….19 inches to be exact. - 1/4 yard felt. - a large and small cup (or other circles) for tracing, a large bowl for tracing, a pen, scissors, and cardstock to make your template. Trace the rims of your cups onto your cardstock and cut out. Pin the templates to your felt and cut out circles. Cut out roughly 30 large circles, and 20 small circles. Now cut your circles in half. Now your going to cut your fabric into three pieces. 1 large square 19 inches x 19 in. , 1 rectangle 19 in. x 15 in. , and 1 rectangle 19 in. x 12 in. On the right side of the 19 in. by 19 in. square, trace a bowl or large plate marking a large circle in the middle. Line up the edge of a large petal along the line you just traced. Sew around the edges with a 1/2" inch inseam.

vídeo tutoriales, consejos y trucos sobre maquillaje, moda, belleza, nutrición, salud y recetas de cocina. ¿Qué es el edelweiss? El edelweiss o flor de las nieves, es una pequeña flor característica de los Alpes. Está cubierta de una fina pelusa, es de color blanco casi brillante, y tienen el centro dorado o amarillo. El término edelweiss es de origen germánico y en castellano se pronuncia "edelvais". Significa "blanco noble" o "blanco puro" (edel=noble o puro, weiss=blanco).Esta flor emblemática fue esquilmada durante años, habiendo desaparecido de muchos lugares, por lo que está prohibida su recolección en algunas zonas. En la actualidad, en España se encuentra sólamente en el Pirineo, y raramente, en las montañas del norte de León.El edelweiss se esconde bajo la apariencia de una sola flor, pero en realidad es un conjunto de diminutas florecillas que han evolucionado y crecen agrupadas para sobrevivir. ¿Dónde comprar el broche que llevas en el video? Es un broche artesanal de Little Chic Things. ¿Dónde comprar en anillo que lllevas en el video? Es un anillo artesanal de Baby Kitty Shakira.

a little luxe coverlet how-to - wise craft Here is a project I've been wanting to do for a long time. Since first seeing and falling in love with the original version at my friend Sam's home. A really simple faux fur throw (absolutely no patchwork in this project). One of the reasons I haven't already made is because I do not like 95% of the faux fur I see for sale. So much of it feels gnarly and looks costumey, not so appealing for this type of project. The fur that Sam used is perfect for a project like this, but there was none like it to be found in my search. Until Ian and I happened upon this faux chinchilla last week. Keep in mind, this project is pretty much halfway the minute you've purchased the fur and backing fabric. Luxe Faux Chinchilla Coverlet Materials: Faux fur of your choice, 60" wide, 2 yds. Cotton Flannel for backing, 44" wide, 3 yards. Thread to match fur Scissors Rotary Cutter and cutting mat are a bonus to have Pins Disappearing marker To Make: 1. 2. 3. 4. 5. 6.

YouKioske.com - Revistas, Periodicos, Comics, Libros. Simple Leather iPod Touch/iPhone Case Can you keep a secret? Santa’s been shopping at the Apple store. So I thought I’d help out with a few handmade stocking stuffers- iPod Touch cases. (My daughters are forbidden to look at my blog until after Christmas, so Shhh!) I searched online for a template, and when I couldn’t find any, I made one myself. The template (below in outline) is for using with heavy material such as repurposed purse leather like I use. Although I haven’t tried it, I imagine heavy wool felt would work very nice. Begin by trimming out the leather pieces based on the free PDF template pattern (Click on template for download.) With your sewing machine on it’s slowest speed (I used the up down button on mine to go extra slow on the curves,) stitch the top area of the short front piece. If you are adding a loop, stitch that to the longer back piece before joining front and back pieces. Here is the case I made for Sarah using her Vintage Monogram and free digital ornate book cover image. UPDATE: Winners chosen!

Chiffons et Gourmandises de Cobaltines Make your own Inked Image Hair Sticks August 7th, 2008 in gallery Email 3 users recommend For my hair sticks, I usually use squared sticks, then carve/cut, to make the shapes & look that I want. But, for this project, I took a simpler approach with dowel rods. Cut them to size, 6 inches. LM Hairsticks Here is a close up of the image stamped onto the sticks. The tip to remember is to lay the stamp with the ink side up. Seal the wood with your choice of glaze. Cut them to size, 6 inches. Each picture describes a step in the process for how to make this pair. These are handmade hairsticks stamped with archival ink, painted with watercolors, and sealed with beeswax. Pattern or design used: My own design - Inked Image Hair Sticksposted in: gallery, trendy, handmade, hair accessory, wood, ink, hair, sticks, hairsticks, rug hookers, goldenrod, watercolors Stay connected with CraftStylish

DIY ~ Stamp-carving tutorial by Ishtar Olivera Stamp-carving is one of those crafts that, whenever I see it, I think ‘I must try that!’. I had to share this tutorial by Ishtar Olivera, because how cute are the stamps she carves? We featured a really lovely stamp-carving tutorial in Issue 2 of *bespoke* – I thought the same thing back then, but this has reminded me to give it a go! Then I could make pretty things like this… {Memi the Rainbow} {Hug Fish and Orange} {Creatiate} {Extase} {Enchanting Stamps}

Related: