The Keisha Bag Tutorial ***The Keisha Bag Tutorial*** Large Purse, Grocery Tote, Book Bag (It was late when I put this together. This pattern is a Copyright of Jana Nielson , Lola...again!!! For this project you will need: *1 yard Main fabric*1 yard Accent Fabric*fusible interfacing of your choice. From Main Fabric Cut:-Outside body-2@ 14"x 15"-Sides-2 @ 5"x 15"-Bag bottom-1@ 5"x 14"-Back pocket- 2@ 10"x 14"-Handles- 2@ 6"x 22"-tabs- 2 @ 2"x 5"-inside pocket-1 @ 6.5"x 10" From Accent fabric cut:-Lining body-2 @ 14"x 15"-Lining Sides- 2@ 5"x 15"-Lining bottom-1 @ 5"x 14"-Handle accent- 2@ 2.5"x 22"-Back pocket accent- 1@ 3"x 14"-Front ties- 2@ 6"x 22" From Fusible interfacing cut:-Purse body- 4 @ 14" x 15"-Purse side- 4 @ 5" x 15"-Purse Bottom- 2 @ 5"x 14" Before you begin sewing:-Cut out all pieces. We'll start with the back pocket. Stitch across top with a 1/2" seam allowance. Press sandwich open. Now set this piece aside. beginning with the Tabs (like belt loops). Fold tabs in half and press a crease into them.
the library tote tutorial Here's a fun tote bag project I thunk up (yes, thunk) the other day. Of course there are tons of ways to make a tote bag, but I thought this one was fun and gives you a lot of options no less! | The Library Tote Tutorial | Whether you like things scrappy or streamlined, this bag is ready to go when you are. Take it to the library or to the park, it's big enough for all the essentials. Ready to make one (or a few?!) Materials: 1/2 yard exterior fabric 1/2 yard lining (if you choose to use any) 1/2 yard for straps, or cotton webbing or a handle type you prefer bias tape - handmade or store bought thread, sewing machine water soluble pen {1/2" seam allowances throughout, unless indicated differently} Cut and prepare pieces: Cut two pieces from the main pattern piece out of the exterior fabric. Cut two pocket pieces. Cut strap pieces: cut two pieces 6" tall by 24-27" long, depending on how long you want your handles to be. Make Straps: Take the long strap pieces, fold in half the long ways, and press.
Making reversible bag from top of straps to bottom of bag: 50 cm / 20 inchesheight: 28 cm / 11 incheswidth: 40 cm / 16 inches I don’t know because I used leftover fabric for my bag. You can print the pattern and place it on your fabric to make an approximation. It is only one piece of pattern. Fort similar bag, you can check Charlie bag by Burdastyle ($1.99). It is a bit bigger and has squared bottom. Please go to the bottom of this post to download the PDF pattern and tutorial. Disclaimer: You may use the finished products for both personal and commercial use (craft shops or markets only – no mass production). 1. 2. If you use my pattern, sew the darts before sewing the bottom and sides of bag. 3. 4. 5. Pull out each of the remaining straps. 6. 7. 8. 9. 10. A reversible bag! Thank you for reading and I hope this post is useful for you! Click to download:
How To Sew A Reversible Tote Bag With Adjustable Strap | craftpassion.com Having a reversible tote bag is like having 2 bags in one, now with the adjustable strap, you can have even more styling with it. Be it full length till your hip and sling across your chest, or shorten it till just below your armpit, inside out or outside in, style it with your mood and base on your outfit. I made this bag with one of my favorite fabrics. It is actually a lightweight upholstery material normally use as curtain or drape. The silver flower printing caught my eyes and I can’t go home without taking a few yards with me. For all my favorite fabrics, I will make sure I sew something good out of them. Let’s get to the tutorial and pattern on how to sew this reversible tote bag with adjustable strap after this jump…. Difficulty: Intermediate SkillTime required: 2-4 hoursMaterial: 1. Download the pdf pattern. Fold fabric as indicate in the drawing, place and pin the tote pattern on top of the fabric. Make a snip on the seam allowance 1″ below seam (b). Get all updates via email:
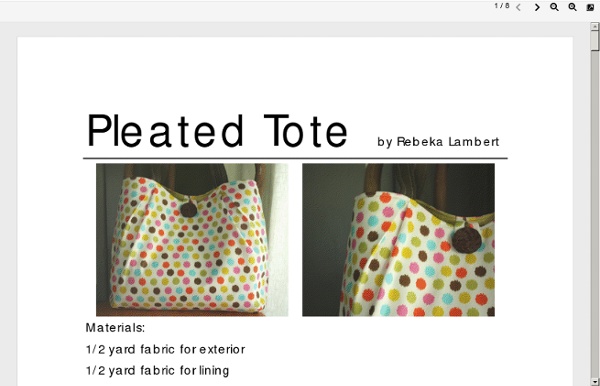
Pleated tote (beach bag) tutorial Before we went away, I decided that a new bag for the beach was a must – something big and roomy to hold books, magazines, sunscreen, hats, and all that other good stuff. So I made this big pleated tote, and it worked perfectly. This is a picture of it in action: And here’s a little tutorial in case you want to make one for yourself – doesn’t have to be for the beach either, it could come in handy for schlepping all kinds of things around town. Here’s what you need: two pieces of your main fabric cut in shape A four pieces of the top shape (B) in a contrasting fabric two pieces of a lining fabric in shape C one piece of the long rectangle for the strap in the contrasting fabric two pieces of the top shapes (B) and one of the strap in a medium weight interfacing 1) Along the longest (22″) edge of the main fabric pieces, mark along the top at the following intervals: 3″ – 4″ – 6″ – 7″ – 9″ – 10″ – 12″ – 13″ – 15″ – 16″ – 18″ – 19″ 13) And voila, this is what it should look like.
Wallet-to-Tote On the Go ~ Tutorial Lorraine from ikat bag is a favorite around here… She has tons of fun tutorials on her blog and she’s joined us before with this wonderful Back to School Pencil Case tutorial. Today Lorraine shares a tutorial for a new summer essential, the On the Go Wallet-to-Tote! Construction includes three main parts: Assembling the Wallet, Assembling the Outer Bag and Making the Lining. The tote zips into a convenient wallet in this unique and handy design. From Lorraine: Hello, Everyone. These little bags have been around for as long as I can remember, and I thought they’d be a useful addition to the arsenal of summer gear I stash in my car and/or purse. I have three little girls, aged 3,4 and 6, and we’ve found that summer always takes us on adventures we hadn’t planned for– detours to farmer’s markets, dancing in the rain or treasure hunting en route to the park. We always appreciate an extra bag or two for our loot (and wet clothes)! Part One: Assemble the Wallet:You will need: Fold it up… Bags
Sling Bag Tutorial - Part 1 I tend to have a short attention span when it comes to projects, that's why I like making a variety of things. My Etsy shop has an assortment of stuff in it for that very reason...I don't want to make the same style of the same product over and over! Bags are one of my favorite things to make when I feel like changing up the pace a little. I whipped up a few of these hobo/sling bags to put in the shop. The fun thing about these totes are they are reversible! Fun! It will look like this when you open it up. We are going to be very thrifty with our use of fabric, and use the cut out pieces from the straps as the pockets. Measure down from the top straight edge, nine inches. Trim off the rounded bottom. Cut a strip of narrow elastic, 8 inches long. Your pocket should now look like this. Do that to all four pockets. Now sew just the outer edges of the bags together. With RIGHT sides together, stuff one bag into the other. Sew the two bags together. Stuff one of the bags into the other.
Tutorial: Fabric Bucket/Basket | The Stitchin' Chicken It’s been a long week! I meant to post this sooner, but other things kept getting in the way. Better late than never? Anyhow, please read through the entire tutorial before you start. I will have a few tips at the end, that may help you to make decisions on the materials that you use. This bucket/basket (I will refer to it as a bucket as we go through) is approximately 8″ wide x 6″ deep x 6″tall. Materials: Approx. 1/2 yd each – fabric for outside and fabric for liner Batting – 1/2 yd in length (please see notes at the end) Matching thread for assembly (you can use a contrasting thread for final top stitching if you choose) graph paper (or your choice of material to draw a pattern out on – see notes at the end) ruler pencil pins walking foot for machine (not required, but it makes it a lot easier to sew with the batting) First I am going to show you how to draw out a pattern. Pattern Drawn Out I start out drawing out what will be the base of the bucket first. Side Ends Batting, lining & outside
Runaround Bag Pattern In this pattern you’ll find:step-by-step instructions with full color photos and professional illustrations for making one Runaround Bagfull size print-at-home pattern piecestwo interior pocket optionsmagnetic snap optionincludes License to Sell!!! By purchasing this pattern, I also give you (the purchaser of this pattern) the rights to sell finished Runaround bags (on a home based scale). Additional information regarding the license to sell is included in the pattern. Materials needed: 3/4 yard exterior3/4 yard interior1/2" double fold bias tape (store bought or handmade)14mm magnetic snap (optional)8” zipper (optional)1 1/2 yards fusible woven interfacingthreadwater soluble pen Approx. This is an 14 page PDF pattern with full size print-at-home pattern pieces and includes detailed step-by-step instructions with professional illustrations and full color photographs.
sac(s) de piscine le retour ! - on va voir si je m'y tiens! pour emma, la copine d'adèle. pour capucine, ma filleule. toile cirée petit pan, toile enduite à pois eurodif (rayon nappe !) (un clic dessus pour mieux voir) Bag-Making Basics: A Reversible Tote & Zipper How To Class on Craftsy! When you're looking for a quick, fun project that won't break the bank or tax your nerves, turn to Kristin Link's Bag-Making Basics: Reversible Tote & Zipper Pouch . In this absolutely free class, the founder of the popular website Sew,Mama,Sew! guides you through the process of creating two handy and attractive bags that make great gifts - if you can bear to give them away! Even beginning sewists will feel at ease following Kristin's precise and simple directions - yet the finished product will look entirely professional. These cute and handy bags will garner praise when you carry them and raves when you gift them. What You'll Learn Creating a flat boxed bottom for your tote Making handles and a pocket in contrasting colors Applying interfacing to fabric for reinforcement Kristin's clever trick for easily inserting a zipper in your pouch How to line your bag and finish the edges for a polished look What You'll Make What You'll Need
Travel Accessories: Plenty of Pockets Tote When you're on the road, doesn't it always seems to be the ordinary, everyday things you are suddenly in desperate need of: gum, nail clippers, your headphones? I get a little panicky, certain I've left behind the most obvious items... as if perhaps I'm on an arctic expedition and won't see civilization for weeks. But the opportunity for replenishment doesn't matter; I want my stuff close at hand. We offer a full set of pattern downloads below for the tote body as well as all the pockets. We recommend using a twin needle to do the decorative stitching on this project. Our tote uses a heavy, solid-color duck for the exterior, a fabric that is readily available at numerous outlets, including this pretty 7 oz. duck in brown from Fabric. com. The finished size of the tote is approximately 12½" tall x 11½" wide with 2" deep sides and base. Sew the 1½" button to the center top of the tote front opposite the button loop. Contributors Storage Solutions Related Articles
The Olivia Bag Tutorial | Dixie Mango ** Don’t forget to enter this weeks giveaway! It ends Thursday night.** Who doesn’t need a new bag… or 10!? Ready to make your own?? I used a canvas weight material for the outside and a quilting cotton weight for the inside. First you will need to create a pattern piece using the diagram below. So, this is what ya need: Using the pattern piece for the body, cut: 2 main fabric, 2 interior fabric, 2 fusible fleece, 2 duck cloth From the interior fabric, cut: 1 pocket piece 8″ x 4 1/2″, 1 strap piece 3 1/2″ x 41″ From the main fabric, cut: 1 pocket piece 8″ x 4 1/2″, 2 zipper pocket pieces 9″ x 5 1/2″, 1 strap piece 3 1/2″ x 41″ From medium weight fusible interfacing, cut: 1 piece 2 1/2″ x 9″ From the fusible fleece, cut: 1 strap piece 2 1/2″ x 41 7″ zipper (optional) magnetic snaps (optional) strap pieces are not in this picture Seam allowances are 1/2″ unless otherwise stated Sew down each long side and across the bottom. Trim the triangle leaving a 1/2″ seam. Do the same to the other corner.
Coudre facilement un sac shopping pour une petite fille ! (ou pour une grande !) + tuto « version sans couture !!! » Dimanche dernier, c’était Pâques et Lily, ma petite nièce, a pu emmener ses chocolats dans des petits sacs roses réalisés pour l’occasion (et surtout pour ME faire PLAISIR !!!) : Un cousu en 1 heure et un collé en 2 minutes : choisissez votre version ! La version "couture" - 1 heure de travail ! Je me suis inspirée d'un sac shopping publicitaire (pas trop beau mais il aura au moins servi à ça !) Après avoir déambulé dans les rayons "roses" du marchand de tissu (ça change !) J'ai découpé comme ça : Les côtés : - tissu (le même ou 2 différents pour l'intérieur et l'extérieur) : 4 rectangles de 10 cm par 8 cm (avec 1 cm en plus pour coudre) - toile ridigifiante : 2 rectangles de 10 cm par 8 cm Le fond : - tissu : 2 rectangles de 22 cm par 8 cm (avec 1 cm pour coudre) - toile ridigifiante : 2 rectangles de 22 cm par 8 cm (j'en ai mis 2 pour que le fond se tienne bien) Le devant et le derrière : - tissu : 4 formes comme ci-dessus (pour un "endroit" j'ai customisé en appliquant des motifs) Et les anses ?