40 nouveaux Tutoriels de qualité gratuits pour Illustrator
Adobe Illustrator est un logiciel de création vectorielle facile à prendre en main mais extrêmement complet. Au fil du temps, sa palette d’outils et de fonctionnalités n’a cessé de grandir. En maîtriser tous les aspects demande un long apprentissage mais cette longue liste de tutoriels devrait vous aider à couvrir tout ce qu’il faut savoir pour devenir un pro du vectoriel ! Après la dernière sélection de 30 tutoriels de qualité pour Photoshop, voici 40 tutoriels pour Illustrator. A vous les illustrations, personnages, infographies, interface, effets de textes ou encore design d’icônes. Illustration Créer un oeil détaillé sur Illustrator Vectoriser des lèvres pulpeuses Créer une parodie d’Angry Birds énervés Tutoriel pour réaliser une illustration de femme chic en niveaux de gris Comment réaliser un livre magique avec Illustrator Créer un masque à gaz qui ne manque pas de style Comment faire une méduse rapidement sous Illustrator Créer un ours stylisé comme une gravure Design d’icônes Divers
Creating a Manipulative Cat Illustration in Adobe Illustrator CS5 « Adobe Illustrator blog
Introduction In today’s tutorial I’m going to show you how I created a manipulative cat illustration using Adobe® Illustrator® CS5. If you’ve lived with cats before, you’ll know they are masters of manipulation and can turn a little scratch into a major incident! In this tutorial I’ll show you some interesting things with Art Brushes, as well as exploring Color Guides, sketching in Illustrator, and how I render fur in vector. Step 1 First create a New Document. Double click on “Layer 1″ and rename it to “Reference & Sketch” and click on Ok. Go to Image > Place to put your reference image onto the canvas, and use the Free Transform Tool (E) to rescale it. Step 2 I’ve sketched out the different elements I want in the illustration and given them different colors for each of the areas. Step 3 I Group (Ctrl + G) each of the elements with their corresponding colors, with the exception of the stack of plates and the single plate with the fish bones. Step 4 Step 5 Step 6 Step 7 Step 8 Step 9 Step 10
Brands On Air : shopping des produits vus dans les médias TV, Série, Cinema, Stars
40 Tutorials for Outstanding Text Effects in Illustrator
Fuzzy, sketchy, bubbly, viscous, sleek, shiny, retro, futuristic: you can do it all in Adobe Illustrator. In this showcase, we have collected 40 tutorials that show you how to create awesome typographic effects in Illustrator, step by step. Some of these tutorials require the use of Photoshop for finer details. With these tutorials, you’ll learn how to create these typographic masterpieces and develop the skills to apply them to your own personal creations. If you know of any other great tutorials for text effects in Illustrator, please share them with us in the comments at the end of the article. Create a Variety of 3-D Lettering Effects for Poster Design In this tutorial, the artist showcases three approaches to creating simple 3-D lettering effects for posters. Learn to Create a Variety of Script Lettering In this tutorial, the artist showcases three approaches, this time resulting in three different script styles. Compiled exclusively for WDD by Prakash Ghodke
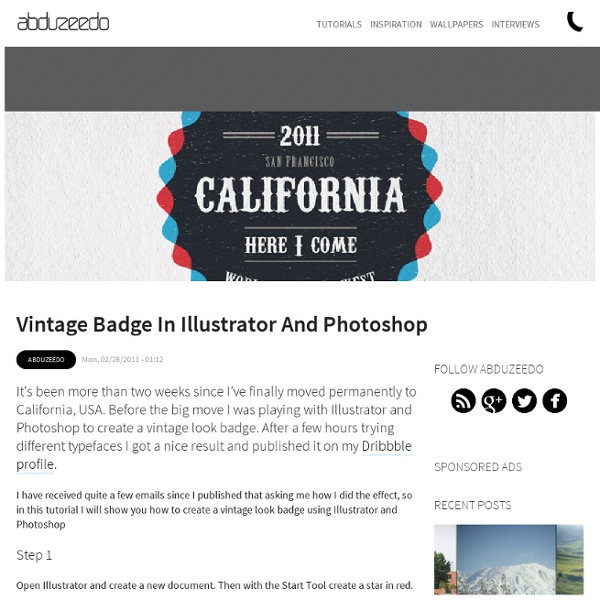
Create a clean retro badge in Adobe Illustrator
In this tutorial we are going to create a clean retro-looking badge/burst in Adobe Illustrator. These are great for adding to a website, advertisement, etc to help the text stand out. Step 1 First off we are going to open up a 1200x1200px document in Adobe Illustrator. Type out “AWESOME TUTORIALS BY DENIS DESIGNS” in black for now. Step 2 Change the font size of “TUTORIALS” to 250pt, “AWESOME” to 60pt, and “BY DENIS DESIGNS” to 35pt. Step 3 Now we are going to start adding some shapes to our burst. Step 4 Click on Type>Create Outlines, this will make our text into lines and points, which will be easier to deal with. Step 5 Go to View, and make sure Smart Guides is checked. Select the Ellipse tool (L) and while holding Shift and Alt, make a circle starting at the center of the box. We also want to make a star/burst that will be a little wider than the circle. Step 6 We want to take the inner circle we made and shrink it down a little bit, while holding Shift and Alt. Step 7 Step 8 Step 9 Step 10
50 Excellent Text Effects Tutorials In Adobe Illustrator
We are all well acquainted with the power of the Adobe Illustrator and how important it is to a designer. Be it creating appealing text effects or creating awesome characters, Adobe Illustrator is always there to help out designers. In this collection, we are presenting some amazing and helpful tutorials regarding creating incredible text effects by using Adobe Illustrator. Without further ado, let us move towards the collection of amazing tutorials. If you think we have missed some cool tutorials out there, then let us know or share them with us in the comments. 1. In the following tutorial. you will learn how to create a slick golden text effect. 2. In this tutorial, we’ll use 3D-rendering, blends, and an art brush for creating the final brick art. 3. In this tutorial we will learn how to create a neon text effect using Gradient Mesh, 3D Modeling, art brushes and a transparency palette. 4. 5. 6. 7. 8. 9. 10. 11. 12. 13. 14. 15. 16. 17. 18. 19. 20. 21. 22. 23. 24. 25. 26. 27. 28. 29.
How to Create a Cartoon House in Illustrator
Final Image Preview This Adobe Illustrator tutorial is not very difficult but still it is designed for those who know Adobe Illustrator at least a little bit. I will show you how I draw the elements of vector scene. Basically, I use simple techniques. You don’t need just to copy everything; learn some basic techniques and nuances of Adobe Illustrator’s tips. Step 1 So, let’s start! Draw a sketch of a house (I usually use Photoshop for this) and then paste it into Adobe Illustrator. Step 2 Below the sketch create an outline of the house with the Pen Tool (P). Copy and paste the result shape to the front (Cmd / Ctrl + C; Cmd / Ctrl + F). Step 3 With the Pen Tool (P) create a shape of a roof. Then create a shape of clarified part of the roof. Then create shades and reflection of the sky. Step 4 Create strips on the roof which will illustrate its heterogeneity. Create some more small details which will convey the play of light on the edges of the roof. Step 5 Draw a shade on the house. Step 6 Step 7
Create Sonic The Hedgehog Opening on Illustrator
The other day while I was cleaning up some stuff in my bedroom I've found my Sega Genesis - Mega Drive in Brazil, one of the first 16 bit consoles released in the 90s. I remember most of my friends were more into Mario Bros because they had a SuperNES. I played Mario Bros years later, but at that time my eyes were focused only on playing frenetically Sonic The Hedgehog almost everyday. So, continuing our "nostalgic tutorials" series this one will be about this classic game opening, sure this will probably give you some really good memories so let's do it. Just a warning before we can proceed: this is an more advanced and step forward tutorial, so a previous knowledge of the software and the character will be really helpful. Tunnel I kind of don't know If that's a tunnel or a giant ring on the opening titles, anyway the first thing you should do after creating a new document on illustrator is to create a perfect circle using the ellipse tool (L) + shift. Make another one inside of it.