
Friendship Bracelets {Craft Camp} I am excited to be offering 30 days of fun crafts to keep kids active and entertained this summer! You won’t want to miss a day of these fun crafts for kids from some amazing bloggers! Please be sure to pay them a visit! Hi I am Beckie from Infarrantly Creative and Knock Off Décor and I am back here on STML showing you how to make woven friendship bracelets As I was thinking about what project to do for this series I tried to remember what my most favorite craft was when I was a girl. These are different than the macramé knot tying bracelets. Supplies: Embroidery Floss Scissors Pins Nimble fingers 1. 2. 3. Depending on how you want your bracelet to look you will loop your pinky under that strand and pull the end loop (#7 and #8) through them all. 4. 5. 6. 7. Your girls will be kept busy making embroidery floss bracelets all summer.
The Zen of Making Homepage A couple weeks ago, I found a paint-by-number at an unbeatable price. I can't pass these things up even though I already owned this particular design. I thought that I could maybe use it to make a fun D.I.Y., but my new rule is that all thrifts that I purchase with the intent of restyling need to get done right away. Here's how I did it... I displayed our piece in our bedroom, on Jeremy's side of the bed. A couple weeks ago, I found a paint-by-number at an unbeatable price. stencil with freezer paper (harry potter tee) Yes, I am a nerd. I came up with a brilliant idea for a Harry Potter t-shirt and I couldn't resist. "Expecto Patronum!" However, you can make whatever kind of design you want with a freezer paper stencil. I learned about the joys of freezer paper back in my early college days. Basically, freezer paper is backed with a plastic coating that will stick to soft surfaces when ironed, but it peels off cleanly and easily. To make a sweet t-shirt you will need: paper & pencil a t-shirt an iron a piece of cardboard or poster board fabric paint & brush Start by drawing your design on some regular old paper. My design kept getting bigger, so I taped two sheets together. Next, place your design underneath a sheet of freezer paper and trace it neatly with a sharpie. The marker gives your lines greater width making it easier to cut them out and paint them in later. Now place a piece of cardboard under your freezer paper to protect your table while you cut. Important: Set these shapes aside.
How to make Jewelry for Everyone pinhole camera If you read part 1 of this DIY, you now know what a pinhole camera is! This post is devoted to how to build a pinhole camera from scratch and the next two posts will be decorating your pinhole camera and tips for great pinhole photos. :) YAY! this post is pretty long & technical. if you have any confusion on a certain step, there are tons of other tutorials all over the internet (each one being a little bit different). A huge thank you to my wonderful dad for doing most of this tutorial. He's super amazing at building things, so I was very lucky to have his help. Enjoy! Step 1. Step 2. Step 3. Step 4. Step 5. Here's my shutter.... I used a piece of craft foam and a piece of paper to make my shutter. Step 6. Step 7. 10.) This is how you take a photo! We hope that our tutorial has been helpful to you today! In Part 3 I'll show you how to paint and decorate your handmade camera with a cute custom strap!
DIY Wrap Bracelet You should all know by now that we are all about stacking bracelets on our wrists. The more, the better. In fact . . . the most, the best! With that being said, we’ll show you how to master a version of the ever so popular wrap bracelet. It’s so simple and addicting, you’ll soon be churning out these wristlets with your eyes closed. You’ll need (for a double wrapped bracelet) :* Lengths will vary depending on the size of your wrist (see comments for suggestions). Fold the length of leather cording in half to form a loop. Place the ball chain along the leather cording with the end of the chain meeting the end of the wrap. Continue wrapping while checking it for fit around the wrist. When you have reached the end of the ball chain wrap the linen cording around the leather strands 2-3 more times. Thread the hex nut through the strands and tie a second knot. Trim with scissors and your wrap bracelet is finished!! The materials are listed for a double wrap bracelet. It’s a party!
ISLY | I Still Love You » Art, Sewing, Design, Bookbinding, Photography, Crafts rag roll I love the look of naturally curly hair! My sweet friend, Katie, told me about rag rolling. It's a quick and simple way to get natural looking curls without using a curling iron! I asked her to share her method here on A Beautiful Mess because I knew you'd be itching to learn like I was! Enjoy... You'll need some cut fabric strips, a comb and some water. How to rag roll your hair- First, dampen the bottom of your hair (the part you plan to roll) using a spray bottle. Have fun styling!
Paper Wall Flowers Enter the d.i.y. solution: Billie Monster, an amazing artist and designer, created this great template for paper wall flowers to add some dimension to the walls, and the best part is it is super inexpensive! No buying the flowers from some company - you can do it yourself! Billie Monster also has tons of other great stuff on her blog, so go check it out. Using her template, I came up with this. I also have a tip about making the cutting process easier. Thanks for looking! This is totally unrelated, but here is a pic of my fur children (just had to get it in because it has been a while since I've shared their sweet faces with you.) Yes, they were sitting on the hubs as he was lying on the couch (hehe). They'd be right. ;)
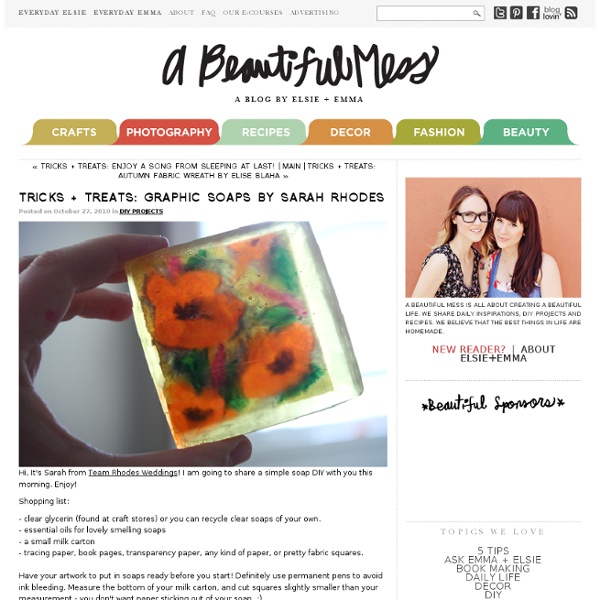
Just Something I Made | The Creative & Inspirational Journal of Cathe Holden Tricks + Treats: Wicked Witch Lemon Honey Lollipops by Katie Hi, It's Katie from I Go By Katie! One of my favorite Halloween images is of a witch silhouette in front of the moon. So for my Halloween treat DIY tutorial I've decided to make Wicked Witch Lemon Honey Lollipops! When they are all finished & packaged up they will look like little moons in the sky with a witch flying by. Ingredients:1 cup sugar2 Tablespoons water1/3 cup light yellow honey2 Teaspoons pure lemon extract/oil What else you need:Parchment paper, wax paper or a silicone baking sheetA package of 6 inch lollipop sticksPrintable transparent filmLollipop wrappersThin black ribbonMeasuring cupsPyrex glass measuring pitcherSmall saucepan3-4 baking sheetsCandy thermometerHeat resistant spatula To prepare the lollipops: Step1:To begin prep your baking sheets by lining them with your parchment paper or silicone baking sheets. Step 3:Quickly pour 2" circles on your baking sheets far enough apart to allow you to place sticks onto your lollipops. Step 4:
freezer paper stenciled reverse applique hand stitched pillow - artsy-crafty babe Now there's a title for ya! Totally inspired by Alabama Chanin, here's my spin on it. What you'll need is: 2 (two) 1/2 yard pieces of jersey knit + 1” strip of the under-layer piece long enough to go around the perimeter of the finished pillow coverfreezer papercraft paintspongeironsafety pinsneedle & buttonhole threadscissors For a 16” pillow cover, I start with an 18” square. Cut two pieces of freezer paper 18” square (pretty convenient that freezer paper is 18” wide), then cut two pieces of jersey 18” x 18”. Using one piece of freezer paper, fold it in half, then quarters, then diagonally if you choose – cut out shapes as you would if you were making a paper snowflake. With your design unfolded, place it plastic side down on the front of the jersey square that you plan to use as the outer layer. Thin your craft paint by about half with water. Lay your stenciled jersey square on top of the second jersey square. I'll now use my finished pillow for the remainder of the tutorial.
Knitting Crochet Sewing Crafts Patterns and Ideas! For this Kid's Fair Isle Vest I used a technique credited to a tiny island north of Scotland (aka Fair Isle) and a stitch pattern from another tiny island, this one west of Estonia (Muhu). In times and places where, by logic, function should have ruled sweater design, instead, knitters seemed to have taken sheer joy in form. It seems to me that, when they cast on for a new sweater, the women from these cold, isolated island places threw all of life's hardships and frustrations right out the window. Such knitting ingenuity from anywhere, anytime is awe-inspiring, and the creation of this vest was a wonderful opportunity to get inside the minds of the incredible knitting women who came before us. Armed with the beautiful book, Designs and Patterns from Muhu Island, I used a pared-down palette and design to bring a modern sensibility to this extraordinary traditional stitch pattern. The Kid's Fair Isle Vest is a fun challenge and also a truly satisfying trip into knitting history.