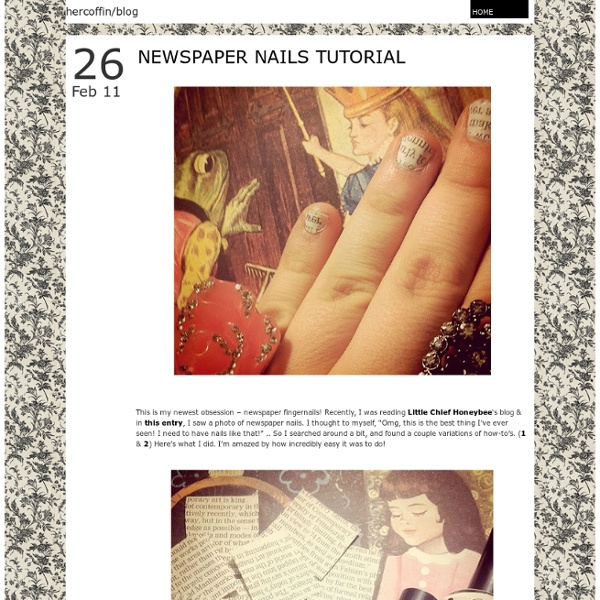
Water Marble Tutorial. Supplies: orange stick or...
Water Marble Tutorial. Supplies: orange stick or toothpick, shot glass or cup (the smaller the circumference, the less polish you end up wasting), room temp. water, nail polish, tape (optional, but it helps with the clean up) I like to begin by prepping my nails with base coat and one coat of polish. Here I used China Glaze Innocence for a nice neutral base. Steps: 1. 2. 3. 4. 5. 6. 7. 8. 9. 10. Most importantly, have fun! We would love to see pictures of all your water marbling attempts, so get dipping!
5 Hot Summer Nail Tutorials for Short Nails! | Life With 4 Boys
The other day I got sick and tired of looking at my plain old boring nails. This is summer dang it, we are supposed to be embracing the bright colors and pretty designs. So, I went on a search for summer nail tutorials. Unfortunately, while a lot of them are gorgeous, they are also super hard to do and are for people with really long nails. How many moms do you know with long nails? I did find a few great summer nail tutorials for short nails though that were simple and pretty, so I wanted to share them with all of my other mom friends too. 1. This one is simple, but really pretty and bright. 2. This one is really easy, it just requires a bunch of colors, but it is a great option for those who don't want to do fine details and it can work for long or short nails. 3. This design is a little harder since it does involve details, but with a toothpick it really isn't that hard to do at all. 4. 5. Kathleen Bunn
What I Made
Nails: Natural HomeMade Nail Recipes, cuticle soak, cuticle oil, foot soaks, cuticle cream
Natural recipes for nail care .............................................................................................. Cuticle Softener Ingredients: 1 tsp. olive oil 1 tsp. vitamin E oil Directions: Combine and massage into nails and cuticles Cuticle Cream 1 Tsp. natural clay 3 drops lavender essential oil Mix into a paste and put into a sterile ointment jar or small pot. Sweet Milk Foot Soak Ingredients: 1/2 cup sugar 2 tbsp. moisturizing lotion 2 cups milk 7 cups water In a large saucepan, heat the milk and water. Peppermint Massage Oil 10 tsp. grapeseed oil 3 drops eucalyptus oil 4 drops rosemary oil 2 drops peppermint oil these oils can be bought at any natural store or even some craft stores. Combine oils. Warm up oil before doing any massage. Hand & Foot Exfoliator 2 Tlbsp of fine sea salt 2 heaped tsp fine oatmeal (same kind as in your cupboard) 1 tsp. baking soda Combine ingredients, and add enough water to make a paste. Minty fresh nail Whitener 2 tsp.whitening tooth paste 1 tsp.lemon juice
It's because I think too much: Galactic Manicure
I loved how my glittery gradient mani turned out so much that I decided to do a variation on it, using the night sky as my inspiration! Here's how I did it: 1. Prep I grabbed deep navy, silver glitter, and gold glitter polish along with my favorite top coat. I also grabbed an orange stick and some nail art rhinestones. 2. 3. 4. 5. 6. 7.
DIY Ice-Cream Parlour "Make your own Sundaes" Buffet Concept for a Wedding or Party
I am lactose intolerant. This probably explains my unhealthy obsession with ice-cream. My favourite dessert is nothing fancier or more sophisticated than a simple Ice-cream Sundae. Nothing satisfies my sweet palate more than vanilla ice-cream with hot fudge sauce, whipped cream, crushed nuts, caramelised banana, wafer biscuit and the all-important cherry on top! Despite evidence to the contrary (what is with this crazy Melbourne weather?!), warmer months are just around the corner down here in Oz and I've got ice-cream on the brain! I absolutely love the idea of Make your own Sundaes for a party because it adds an element of creativity and fun to your event and is so easy to do. Here are the elements I've used in my Ice-Cream Parlour buffet concept: I've used a metal tub with ice to contain the ice-cream and whipped cream. I found this wooden box at The Works- Bed, Bath and Table. I also made little labels for the box. Got these from a deli at Prahran Market. I adore meringues!
nails
520 214 516 278 567 107 831 1006 920 762 1273 472 570 715 1160 567 828 778 293 261 459 700 688 181 901 1206 1010 844 1145 641 824 308 174 53 300 63 830 4063 168 292 677 358 638 173 361 203 528 191 112 904 144 335 477 746 148 419 280 585
Photo 2- Try Out These 3 Easy Nail-Art Designs
Feb 21, 2014 Five exquisite manicures designed by nail art devotee Sally Singer are captured as fanciful still lifes by regular Vogue and T Magazine photographer Raymond Meier. Conceived for NOWNESS in collaboration…read Dec 24, 2013 If you, like us, are having a really hard time deciding which winter nail trend to lean into for your New Year's Eve look, we've got some pretty exciting news. Butter London has just released three limited-edition…read
Nail Nerd » Creating Your Own Nail Transfers
Necessity is truly the mother of invention, and this one was a long time stewin’. I’ve been trying to figure out for months how I could create patterns and manicures for people without, you know, having to spend all of that quality time with somebody’s hand in my lap (I’ll admit to being super pokey with some designs and can literally waste away 4+ hours working on something… who wants to sit through that?!). The baggie transfer from the dry water marble nails *would* have been a cool way to do it, but — if you’ve ever tried this you probably know — peeling the nail polish off of the plastic is actually pretty difficult, and all the tender tugging can often warp or rip the polish, which obviously doesn’t do well for really precise designs (i.e. with lines). Last week while dinking around in the kitchen I thought to pull out all of the various papers and foils at my disposal to do a little spot test: put down a couple of layers of polish and see how it pulls up. No sticking. Nada. 1. 2.