background preloader

Charismatic Mega Doily

Charismatic Mega Doily
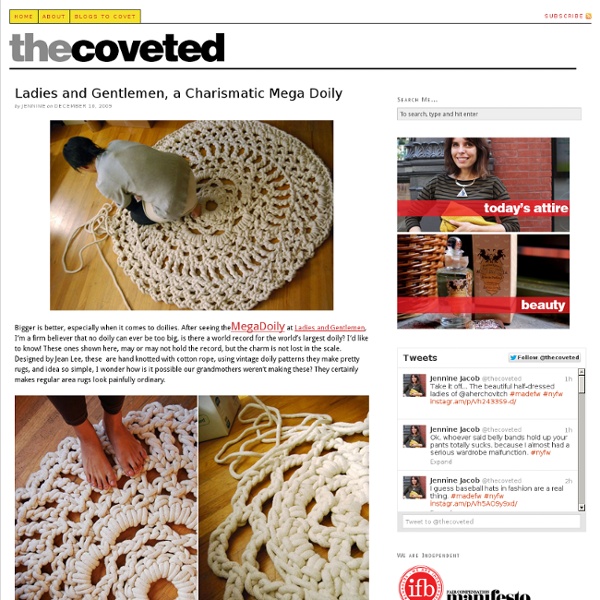
Bigger is better, especially when it comes to doilies. After seeing theMegaDoily at Ladies and Gentlemen, I’m a firm believer that no doily can ever be too big, is there a world record for the world’s largest doily? I’d like to know!

Knit A Nordic Wool Rug A very exclusive rug made from super bulky 100% Norwegian yarn, spun from Old Norwegian short tail landrace wool and mohair. It´s incredible soft and squishy to walk on, and we just love the look! YarnPickles Røslig2 nøster NeedlesLarge circular needles US 35 Gauge per 4"3 s / 6 rows Measurments36 x 53 " before blocking The rug can be blocked to achive a larger size. Cast on 28 s and knit garter stitch back and forth.

Koala Bear Amigurumi I found a Koala Amigurumi Pattern in the Woman’s Day website and I have some off-white and gray organic cotton yarns on hand, so I made a pair of these small little stuffed koalas for my kids in reverse color. Some ideas to make it differently: 1. This adorable little koala is about 3-5″ tall only (depend on your yarn and the matching hook size), install a key ring on it’s head and turn it into a key chain, hang it to the bag’s zipper. 2. If we sew the limbs closer to the center of the body and insert 4 small strong magnets to the tip of each limb, you can make it “huggy” and hug on a tree branch or at the edge of your curtain or your pencil, ruler etc… 3. 4. Follow the crochet pattern at the above pattern link to crochet all the parts of the koala, which consist of: 1 head (stuff firmly and complete) 1 body 1 nose 2 ears 4 limbs Remember to leave a long yarn end (about 6-8″) for every part so that you will have enough yarn to sew. Lastly, stuff and sew the limbs to the body.

Chan Luu Single Wrap Macrame Br... Chan Luu bracelets are just so cool! What's great about them is that they use simple macrame techniques to produce different results, this time with the addition of beads! This tutorial adds on to my previous Square Knot Friendship Bracelets, but utilizes the beads in a different way; on the outside of the knots as opposed to the inside. What you get is a totally different result! Step 1: Gather materials. Needed are 3mm glass gemstone beads, cotton thread for knotting, scissors, tape, and a bead and crimp for closure. Step 2: Start the knots. Once you have a couple of square knots, take either side of the thread and add beads to these threads. Take two beads right up to the last knot. Make a square knot, making sure the beads are caught in the knot and lie right on either side of the center thread. Step 2: Continue this method. Once you have gotten one square knot set, continue to knot in this way, until your bracelet is as long as you need. You're finished!

Coiled Fabric Bowls (Lots Of Photos) I made these fabric bowls using a tutorial I found here: CraftStylish tutorial! I found it incredibly easy and fun to follow. Time consuming, but fun. I made both of these bowls for superhooker for the Old Fashioned Random Swap. I made two different sizes, and different colors. Also excuse the photography... unfortunately my house is situated under a bunch of trees, which isn't great for photo lighting. Anyway, here are some finished pics: Side-by-side Inside of green bowl Outside of green bowl Inside of rainbow bowl Outside of rainbow bowl Close-up of my favorite part of the rainbow bowl Stacked And just for kicks, this: Became this: which was only part of the BOTTOM of the bowl... Stats! I used 10 yards of cord for the green bowl. For the rainbow bowl, I used 18 yards of cord for the rainbow bowl, and about 140 feet (~45 yards) of fabric strips sewn end-to-end. The best part is that I did not buy any fabric for these bowls. Edit to add from a later post of mine:

Yarn Bombing / Guerrilla Crochet – A Collection | STREET ART UTOPIA More info. More info. More info. More Yarn Bombing and Guerrilla Crochet: 1) B-Arbeiten 2) Agata Olek 3) Yarnbombing 4) Stickkontakt Leave a reply Related posts 12 beloved Street Art Photos - May 2013 Urban Art Biennial (BAU) - In Cochabamba, Bolivia By Alice for Urban Contest 2012 - In Rome, Italy FISHTAIL FRIENDSHIP (BRACELET) If you know how to do a fishtail braid to your hair, then you pretty much know how to make this bracelet. But for those of you who don't know about the fishtail and those of you who are curious about the logistics of my specific bracelet, well, read on! You will need embroidery/ friendship thread in various colors, some tape and a bead! I used 9 strands of thread in 9 different colors. I twisted this top part so it doesn't get all tangled later. Where you twisted the top part, tie it around your finger. Then tie a knot. I'm now taking one of the strands and tying it around the other, almost like a tie. Then pull the end through the loop you've created and pull into a knot. Tape the top down to keep the bracelet stable. Star by grabbing one color from the right side and pulling it to the middle. Pull the same color from the left side. Add the piece from the right side to the left group of colors. Now take the color from the left side and pull it to the middle (over all the other strands.)

Coiled-Rag Baskets Baskets have had many uses over the ages. Native Americans wove them so tightly they could hold water. Materials and Tools: fabric scraps torn in strips Rag Works 1" craft coiling large-eye plastic yarn needle scissors masking tape hot-glue gun and glue Steps: 1. 2. 3. 4. 5. 6. 7. 8. Rewind Knits and Crochet DIY Friendship Bracelet Tutorial For several months now, we’ve been receiving emails requesting a friendship bracelet DIY. Well, friends, ask and you shall receive! Today, we’ll give you a step by step tutorial on the classic chevron pattern. If you used to whip up friendship bracelets like a champ in grade school and have since forgotten how, consider this a refresher course. And if you can make these with your eyes closed and arms tied . . . umm, can we still be friends? You’ll need:embroidery threada safety pin or tapea pair of scissors Start by cutting several strands of embroidery thread at about 24 inches each. Start on the left side with the outermost color (shown here in red) and make a forward knot by creating a 4-shape over the 2nd color, loop it under and back through the opening. Pull up and to the right to tighten. Now pick up the outermost color on the right side (show here in red) and make a backward knot, creating a reverse 4-shape over the 2nd color, loop it under and back through the opening.

Rug-Hooking: History, How-to Tutorials Arts & Crafts : The Art and Craft of Rug Hooking Fiber Art "Rug hooking uses a hand hook, similar in shape to a crochet hook, to form a looped pile from fabric strips or yarn on an even-weave base fabric." — RugHookingOnline.com The folk artistry in authentic rug hooking goes beyond simple latch hook rug kits you buy off the shelf in your favorite craft store. Yes, you will learn more about this beautiful form of art and craft by reading Creativity Portal's collection of rug hooking articles written by professional rug-hooking artists such as Canada's Deanne Fitzpatrick and by browsing our collection of instructional rug hooking resources where you'll find Web sites that explain hooking rug history and processes; and those that share free tips, patterns, techniques, and tutorials for your creative rug hooking research and projects. More Articles by Deanne Fitzpatrick » Featured Rug Hooking & Fiber Art Articles Instructional How-to Rug Hooking Resources

Give Your Rug A Stunning Stencilled Makeover There are patterned rugs. And then there are customised patterned rugs in any colour or style you desire. Like the sound of the last one? It's easy enough to DIY - either give a new one your own stamp or revamp an old plain-coloured one. I went with a diamond pattern because it's effective but simple enough to do. Supplies A rug - I went with a soft, almost-blanket style rug, but hardier, natural-fibre ones would also work well.Contact paper - the thicker the better. Step 1: Measure Your Rug Decide which way you want the pattern to go. Step 2: Work Out The Width Of The Stencil Using the full height of the contact paper, I worked out how many diamonds I'd like across the rug (three full ones was the maximum) and divided the width of the rug by three to give me the width of the diamond. Step 3: Cut Up The Contact Paper Cut at your markers and you'll have a whole heap of contact paper rectangles. Step 4: Fold In Half With the shiny contact paper facing in, fold your rectangle in half.

Hooked Sink Mat Rag Rug Home » $5 and Under, cheap crafts, Decor, Headline, Tutorials 31 July 2013 68,718 views 18 Comments by summer I have always loved rag rugs. Project estimate: Sink mats, $1 each (I used two)Old sheet set or other fabric scraps, on hand Total: $2 and up First thing you will need to do is prepare all your fabric strips. Before you begin tying you will need to trim the two sides of the mats which will be joined together. Now you are ready to begin tying on your strips. To attach the mats to each other, place them so that the edges overlap and tie fabric strips through both mats. This is what your completed bottom will look like. Here is a quick close up of applying the material. When I completed my rug I put it in the bathroom. Disclosure: this article may contain affiliate links or other forms of sponsored content.

No Sew T-Shirt Shag Rug Tutorial Here it is, finally! My shag rug is complete. I love how it feels under my feet, and if it starts to look a little flat, I pick it up, shake it, and it fluffs right back up! It took some time but I finished it and I’m glad I decided to make one. Feel free to message me with any questions. How to Make a T-shirt Shag Rug Supplies: 1 XL t-shirt, cloth scissors, and lots of small t-shirt scraps the base with a few scraps threaded through 1. For the base of the rug, lay the X-L t-shirt flat and cut a large rectangle out of the shirt, as large as you would like the size of your rug to be. a rotary board makes cutting easier perfect sized scraps! 2. If you are me, you have scraps of t-shirts all over your apartment. Cut these t-shirts into strips that are approximately 5-6’’ long and 1-1 ½’’ wide. holes before and after scraps are threaded through 3. Starting 1’’ from the edge of the base, carefully poke or snip horizontal and vertical rows of small holes about 1/2 ’’ to 2/3’’ inches apart. 4. 5.

Making Rugs With Old Toothbrushes Story and photographs by Gina Jennings, Color photograph by Mary Schmalstig, Illustrations by Lisa Mestan Did you ever hear of anyone making a rug with a toothbrush? Maymee Campbell made some. So did several other women she knows about who learned how many years ago. The oval-shaped rug resembles both a braided rug and a crocheted rug. The rug begins with a braided center strip, but instead of rows of braids sewn together, the rows are interconnecting stitches made with strips of material as in a crocheted rug. The needle is made by cutting the bristle end off of an old toothbrush and filing this end 'into a point. Maymee Campbell has had her rugs for fifteen years and they still look great. The toothbrush rug is not difficult to make. The materials needed to make the toothbrush needle are: an old toothbrush, a pocketknife, some fine sandpaper and different sizes of rattail files. With a pocketknife cut the whole bristle end off of any old toothbrush which has a hole in the handle.

Related: