Lace Lamp
We are at our little cottage in Dalarna and we are fixing it up. So we are able to use it even in the winter. (Dalarna is in th middle/north of Sweden. First we used a huge baloon that I bought at a party store. Then you collect all the old Dollys (?) Paint them with lots of wallpaper glue so they are soaked. Hang the ballon on a string and put the soaked lace on the baloon. Then wait for a while. Pop the baloon when the glue is dry. Update 1:Some of you asked how to get the bulb into the shade. You mos def want to use a LED lamp or a energy saving bulb because it’s cold and it will not affect the glue either. I bought a nice looking iron wire in pink but when I opened the box it was red. Update 2: Problems making the lamp?! 1. 2. 3. 4. 5. 6. 7. 8.Good luck! xxx Isabelle If You want to link to this post please share with love.
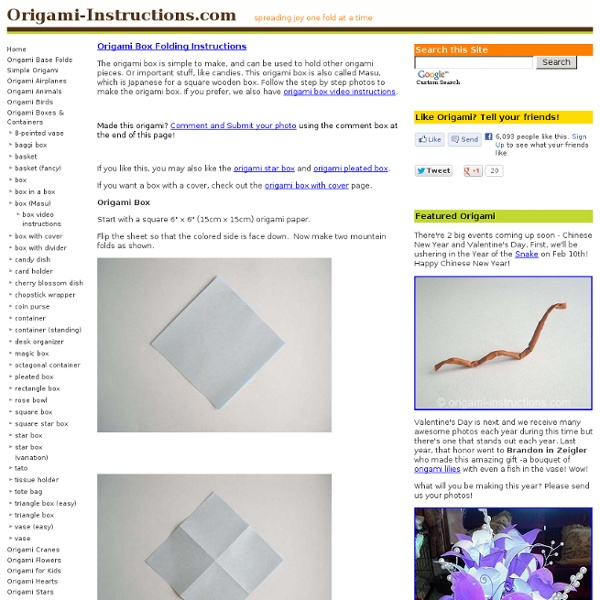
Origami Envelope
If you’d like to make these cute little “Flap Lock” Origami Envelopes–all you’ll need is a piece of square paper…any size. I used Christmas scrapbook paper. 1. Make sure your edges are even. 2. 3. fold the right corner about 1/3 of the way to the left. 4. 5. 6. 6. 7. 8. 9. And there you have it! Now scurry off and make a million of these–or at least 24 if you’re using them for the Family Advent Countdown Calendar. Not in the mood to fold your own?
Easy Dress
Two facts about me: I'm cheap. I love dresses. I wear dresses probably 6 days out of the week. Back in November when I really started Talk2thetrees I kinda just wore pajama pants and sweat pants. Dresses are so comfortable, I can sit around the house and feel comfortable and cute. The only problem.. they are expensive! Here is a tutorial on a High Waisted Dress: For under 6 bucks! First you will need a ribbed tank top. I got mine from Walmart for 2.50 You could also use a t-shirt 3 yards of matching fabric. Clearance section is my favorite. Cut the tank top almost in half. (I cut mine a little too short.. oops!) For the bottom part of your dress take the fabric and wrap it around your waist about 1 and a half times, and cut in a straight line. I never measure, I never use patterns... Next you fold your fabric in half. You have kind of a big blocky rectangle skirt. (You are sewing the raw edges, not the bubble hem) This is where I didn't get pictures.. awesome. We are going to create a ruffle.
Cake Treat Boxes
Finally, as promised, the tutorial! Yes, it really did take me two days to get this ready. I hope you enjoy it. Be sure to create a FREE studio on eWillow.com and upload photos of your cakes when you are finished. You can even sell them, too! Also, to help spread the word about eWillow.com and to build our community, please link to this tutorial and share the news that eWillow.com is FREE to use. Now, on to the tutorial! Supplies Download the Template (Print the template directly onto the cardstock. If you have a Cricut machine, click HERE for the template Scissors Hole Punch Bone Folder for Scoring Double-Sided Tape Assorted Cardstock, Ribbons, Punches, & Embellishments Instructions 1) Remember, to make it easier, print templates directly onto cardstock **Please note that you need ELEVEN of each piece** 2) Cut out cake pieces on solid lines and score on dotted lines 3) Apply double-sided tape to pointy flap and adhere as shown below 4) Apply double-sided tape to side flap and adhere as shown
Thing in a Jar
Thing in a Jar 7 inches by 4 inches, mason jar Pictured above is the Thing in a Jar that's usually sitting in my office at work. The coolest thing about the Thing is that everyone responds to seeing it by asking questions. Where did I find it? The Thing in a Jar is made out of Sculpey, acryllic paint and rubber cement. This is the third Thing in a Jar I've made. Here's a conceptual sketch I made of this Thing before I sculpted it. 1.5 by 2.5 inches, ballpoint pen Usually when I make a Thing in a Jar, I try to keep the shape ambiguous enough so that the viewer cannot really pin down exactly what they're looking at. The glass jar acts as a physical barrier, preventing the viewer from directly accessing its contents. I think this is much cooler than, for example, a painting, which basically has this big implicit sign hanging off of it that says, "I am just a painting of an object, not the object itself. Viewers of The Thing in a Jar do not have this preconception. Update OK here's what you do.
Lucky Wishing Stars
You’ve probably seen these little puffy origami stars before. They are really quick to make, and you don’t need any special materials to make them. You can buy lucky star pre-cut strips from origami stores, but you can just as easily make your own from medium weight coloured paper, e.g. scrapbooking paper, or even strips cut from magazine pages – as the strips are so narrow, the original text or image won’t be obvious in the finished star. Anti-clockwise from top left: pre-cut strips, paper cutter, scrapbook paper, magazine page. Now on to the tutorial! To give you an idea of size, I’ve made stars in 3 different sizes to show you: blue stars (from pre-cut strips): 35cm x 1.25cmpink stars (from a magazine page): 30cm x 1cmgreen stars (scrapbook paper): 15cm x 0.6cm The finished star will be approx 1.5 x the width of your strip, so pick an appropriate size for the size of star you’d like to end up with. For the rest of this tutorial, I will be using a paper strip cut from a magazine page.
Easy Tiny Envelopes
Guest tutorial by Ruth Bleakley I discovered this envelope making method completely by accident when pulling soggy rain-soaked mail out of my leaky mailbox - I had a total *eureka* moment when the envelope I gingerly opened up completely unfolded at the seams revealing an envelope "template" perfectly. I've seen many envelope tutorials online, some offer downloadable templates, some show fancy paper folding techniques and some suggest specific measurements to create your own D.I.Y. envelopes. 1. 2. 3. 4. 5. 6. 7. 8. 9. Ruth Bleakley is a paper addict who probably became a bookbinder soley as an excuse to obtain more paper.
Square Pillow Gift Box
Wrapping gifts yourself is half the fun of giving them. If this claim doesn’t convince you, there’s another, more down to earth, reason to prepare DIY wrapping - it’s so much cheaper than the bought one. Let the shops keep their pricey boxes and make one yourself just as we did!