
Phone Book Ballet Flats ***UPDATE***Make sure that you use FABRIC MOD PODGE or you might get cracking after you wear them for a while. I have worn mine constantly since I have made them and have had no issue. The FABRIC MOD PODGE can be purchased through PLAID. Mod Podge and Phone Books are a wonderful combinations that seem to be taking over the craft blogs I visit. I purchased a pair of ballet flats at Wal-mart for $3.00. Cut off the tag and discard. Take your mod podge and a foam brush. Rip a piece of phone book and press it down on the mod podge. Keep painting on the mod podge and layering on the phone book pieces. To finish off the bottom of the show you will want to put the corner on the piece like this. Fold it down, adjusting as you go. Then take your razor blade and run it along the very edge. Cover it with mod podge. Or you can place it on and when you get to the bottom instead of using a razor blade to remove the excess run your fingernail along the edge so it creases. Then fold the excess up.
>Project ReStyle: Easy No-Sew T-Shirt Necklace | A Pretty Penny I’m kind of ridiculously excited about this Project ReStyle challenge, and I’m really looking forward to learning some new crafting skills throughout the year. For my first ReStyle, I started with something really simple. I love the color of this boyfriend tee from Target, but it has a small stain on the front which renders it unwearable. Using this video tutorial from Threadbanger as inspiration, I transformed it into a necklace. Read more after the jump to find out how to make your own! All you need is an unwanted cotton t-shirt, a pair of sharp scissors, and about half an hour. Lay the shirt on a flat surface and smooth it out with your hands. Beginning at the bottom of the shirt and working your way up, cut 1-inch strips to make loops. Stretch out the loops you just made so the cotton curls in on itself and forms long tubes.Double up each tube, matching up the seams at one end. Group all of your tubes by size, keeping the seams together at one end. That’s it! 1 down, 51 to go…
Re-purposing: Tshirts into 5-strand-braided-headbands I was walking through Target a few weeks ago and noticed this little knit fabric headband that was not just braided together…….but woven. I decided they were charging way too much for something that could be made with t-shirt scraps. And that means free. So there you have it. (Or you may need one for working out. I kinda love it on my little girl . She always has little hair fly-aways that get into her face…….and this helps with that problem. It even works great with her hair down…..and keeps that hair tucked behind her ears. And yep, good for me too. Thanks little t-shirt scraps. Want to make your own? First, find some old t-shirts. Then, cut your fabric into long strips. Next, stack your 5 strips on top of each other and sew together at one end. Now, pull on each strip of fabric so that they kind of curl on the edges. Now, to create this 5 strand braid……..you’ll kind of be braiding on the left side and then braiding on the right. But let me explain a little better. And that’s it.
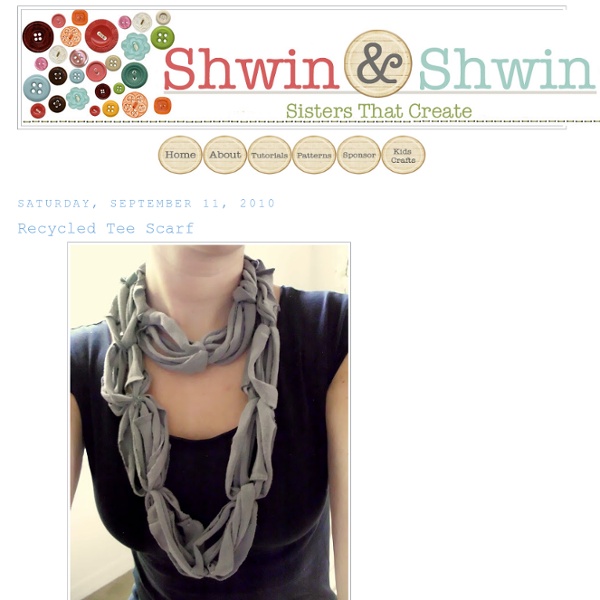
Recycled T-Shirt Scarf D.I.Y: Recycled T-Shirt Scarf 1} Gather a few old t-shirts you don't wear anymore; thrift them or buy new -- but choose thin, soft (preferably worn out) t-shirts. Find two t-shirts of different colors that go well together. 2} Lay the shirt flat on the table or floor. 3} Cut 1 1/2 inch strips, remove the hemmed edges. 4} Cut off the sleeves of the shirt and save them for the end. 5} Organize the strips by length and gently pull on them. 6} NOW GET CREATIVE! 7} Tie together, trim ends, and wrap with the excess sleeve fabric you saved.
DIY - MAKE YOUR OWN WAX FOR HAIR REMOVAL - Fashion + Beauty on Shine I was chatting with someone on my flight back from my vacation. She lived in another country where salons are hard to come by or if they are around, they aren't very good. So, sometimes a girl has got to depend on herself. You can make one on your own so easily. So when I described it to her, she loved it and she said I just have to put it up online. Wax recipe Ingredients 2 cups sugar ¼ cup water ¼ cup lemon juice Method Pour the sugar, water and lemon juice in a saucepan, and heat it over a low flame. How do you know it is done? Take a glass of water and put a drop of wax into it. Benefits of making your own WAX: 1. Waxing strips: We used to do this in college all the time. NOTE: The inner facing fabric of the jeans should be the one touching your skin otherwise if you use the opposite side, your skin will probably get blue with the denim color. Waxing technique Test the temperature before applying the wax to your skin. Benefits of Waxing 1.
Make a modular felt trivet Related to yesterday's coaster project, here's a template for making a larger modular felt trivet. No sewing or gluing required. Connect as many pieces as you like to make bigger projects, too--placemats, a runner, or sew two pieces together for a pillow cover. Download the pattern here. Begin locking pieces together by pulling the arrow-shaped tabs through the slots from the back through to the front side. To finish the trivet, trim off the excess felt around the edges and nip the points off the triangular tabs. DIY – Pretty things to make out of old t-shirts! {Kaleidoscope} Hi, my name is Amanda and I am excited to have been asked by the birthday girl Jess to help celebrate Epheriell Designs’s 3rd birthday. Wow, Jess! Congratulations on making it through 3 years of the highs and lows, stresses and euphoric moments of running a small creative business. Good on you for being brave enough to do what you have needed to do in order to make it a success! The internet is an amazing tool for creatives and crafters alike. If you are anything like me, you see amazing creations, by very clever crafters and think to yourself “It looks amazing, but I could never do that“. Recently though, I have noticed a crafting trend that I am very excited about! There are many tutorials doing the rounds at the moment turning the humble T-Shirt into fun, colourful and earth-friendly accessories. Necklaces [top image from Etsy] The second image uses scraps of fabric, but you could easily use strips of T-Shirt. T-Shirt scarves! I hope you were inspired by these ideas.
Recycling T-Shirts So way way back, in June, I wrote this Studio Organization post, about starting the process of organizing my studio by cleaning out the closet full of junk. Well, it's September and...let's just say the closet is a work in progress. Some of the things that are taking up space in the closet are shirts that I never wear anymore. I realized I could repurpose them into something else! Here are some tutorials for recycling shirts: Check out these t-shirt scarves! Create cute little bows for accessories or packaging with this tutorial. Gorgeous ruffled pillow tutorial here. Looks like I have a lot of projects ahead of me to keep me from cleaning out my closet!
Anthropologie vintage lace chemise DIY inspiration: Anthropologie vintage lace chemice in my closet: two white tops 2 gold rings from part of a chandelier and i bought some white ribbons mix all that together and the after: i saved over $190! Scrapbook Paper Christmas Trees I’m not a big fan of red and green. Like the red red and the kelly green. Blech. Gather your materials: • Two Styrofoam cone forms of different heights. Excuse the mess - there were multiple projects in progress. Start by tracing and cutting out your template petal on your scrap of cardboard. For a break in between the monotonous cutting, you can start to apply the petals to your cone form. Start from the base of your cone and work your way up in overlapping rows. All done! waiting Here's a picture of me waiting in the Radcliffe library for my date with a boy named J.D. His short stories are brilliant and have been published in The New Yorker, but I fear, entre nous, that he may be a little too misanthropic for me. Speaking of fiction, don't you love the outfit? Cut a strip of t-shirt fabric, stitch down the middle, gather, fold in half lengthwise, and roll it up. Blob some fabric glue on the back and stick it to a circle of fabric. Wear them on a date or stick them in a vase!
RIT Dye Tutorial It happens to me every year. The second spring hits, I’m standing in front of my closet going, I am so sick of all my clothes, if I see that shirt again I’ll throw up, but I don’t have any money for new stuff, I’M SO TIRED OF EVERYTHING I OWN. You know that feeling? Let’s kill it with instant-wardrobe-transformer (aka RIT dye). to these! And it’s not even hard. Now, there are other kinds of clothing dye out there, but I chose RIT because it’s got simple instructions on the back of the package, it costs about $3 per box, and you can find it almost everywhere in the U.S. I’m gonna show you how to do a basic stovetop dye job. But! OK! You will need: Something to dye: choose a white, off-white, or beige item of clothing made of natural fiber (cotton, wool, silk, linen), a blend of natural fibers (like a cotton/linen blend), nylon, or rayon. So now that we have our materials, let’s dye this elegant-yet-boring purse I found at a garage sale for a dollar! Step One: Fill your pot ¾ full with water.
Leather Cuff For this designer inspired DIY, I opted to use some pretty, floral tooled pleather I've had for quite some time - along with some wood shank buttons - for a more natural, bohemian look. Of course, you can use any kind of pleather/leather you'd like! Carly Cuff by Julie K. HandbagsCoutureCandy.com$62 Supplies:- Leather/pleather of your choice- Sewing thread, needle, scissors, and / or Xacto knife- Shank buttons 1) Cut a piece of pleather, depending on how wide you want your cuff to be. 2) Sew the buttons on. 3) On the opposite side, cut slits for the buttons to go through. 4) Fold the fabric width wise, and cut slits horizontally. Close up! 5) Cut along the length of the cuff. 6) Done! High End Cost: $62S&P Cost: $4 ... barely! love love love,kirsten
T-shirt headband (2) I should just rename my blog “Things Kitty Can do with a Tshirt” Anyway, I was walking through target the other day (wanting to buy every single dress I saw!) and glimpsed this headband. Ready for a great no-sew tutorial….AND my very first Vlog? A big tshirt is best (one without any seams on the sides of the tshirt) Cut 6 strips (by cutting the bottm hem off the shirt, and cutting strips off the shirt working form the bottom), Cut them about an inch wide, and stretch them all the way out. Loosely knot the 6 together, leaving about 3 inches extra at the top. Spread out your strands, and get ready to watch my first Vlog! A few things I've learned from this video 1. 2. Anyway, so you've gotten that woven. You've got a woven rope right? All I did next, is cut a piece of tshirt about 3 inches wide, and as long as you need it to finsh off your headband so it fits around your head. You know it starts to "roll" when you stretch out your shirt??