
Daisy flower Our most popular posts are still the fabric flower tutorials, like the fabric rosette tutorial and the organza flower tutorial. I love that this trend is still going strong! There are more ideas out there, too--we're not done with flowers. Check out this adorable daisy fabric flower tutorial from our cute friend Melynie. These are perfect to use up fabric scraps and would be adorable in a little girl's hair, or as an accessory on a bag. . .enjoy! Fabric Daisy Flower Tutorial Can you say cute? White fabricNeedle and white threadScissorsFabric glue (I used Fabri-tac)Hair clip (and ribbon to cover, optional)Yellow brad, button, or fabric covered buttonWhite felt Using scissors or a rotary cutter, cut six 2" squares. Like this. Now fold it once... twice... three times. Fold the edges down to form the petals. Clip the excess off, so it's even. Now stitch through the middle, making sure to catch all the layers. Repeat that for all six petals. Pull it tight. Now attach the center. Ta-da!
Bra to Bustier Top I've spotted bralets and bustiers - cropped and otherwise - all over Topshop, Urban Outfitters, etc. I never could find one that 1) fit me well and 2) was in a print I liked. So I set out to make my own, using a strapless bra. I almost want to call this a "faux" bustier because it's so easy - it's really just fabric wrapped around a strapless bra, in a sense. I made this top with high-waisted shorts/pants/skirts in mind, so it hits right above my waist. It's up to you how long or short you'd like your top to be. If you decide to make this, you MUST make sure that you're able to put on (and take off!!) (EDIT 6/12: Check the comments for an awesome suggestion by rhelm_2: "To make it easier to get off and on, you could do step seven first and instead of sewing all the way up to the top on this step, only sew until the last inch or two. Since this doesn't use a pattern, little things will vary for everyone, so here's a general run thorugh of how I did it.
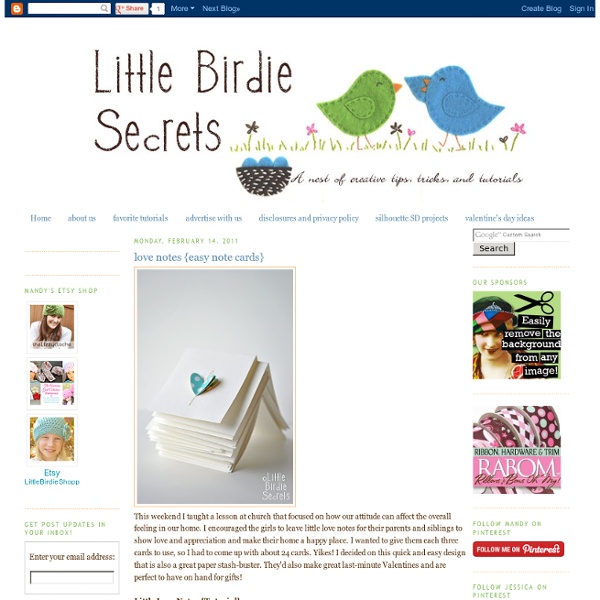
Wedding Ideas: DIY Stationery and Cards! | Wedloft by WeddingWindow.com - StumbleUpon If you have a small budget for your wedding, one major way to cut expenses is to DIY! Today I’ve rounded up a group of super fun DIY projects that would make for some FABULOUS wedding stationery! 1. 2. Photo Credit: A Day in My LifePin it 3. Photo Credit: Design SpongePin it 4. Photo Credit: Li’l MagooliePin it 5. Photo Credit: Design SpongePin it 6. Photo Credit: Make Grow GatherPin it 7. 8. Photo Credit: Little Birdie SecretsPin it 9. Photo Credit: MarthaStewart.comPin it 10. Photo Credit: MarthaStewart.comPin it Do you have any ideas for DIY wedding stationery?
Fabric Flowers I had a request for a tutorial on the fabric flowers I've made recently. I didn't realize how tricky it is to write one of these, so if I leave any important information out, let me know. These flowers are easy to make. Materials:templates- download herefabricscissorssmall piece of felt in a coordinating colorneedle and coordinating threadpin backbutton to be covered and small amount of fabric to cover it (or any button you choose)fabric glue (optional) 1. 2. 3. 4. 5. 6. 7. If you make any flowers, would you let me know? This finished flower is the charm on "Clara", the newest bag to go up in the shop. There are some really fun fabrics in this one. Post your fabric flowers to the fabric flower flickr pool! All my other tutorials can be found here.
DIY Solar Lamp: Make Your Own Eco-Friendly Sun Jars | Designs &Ideas on... The principle is simple and seductively clever: solar lights that store energy during the day and release light at night. These can be purchased ready-made in a variety of colors (yellow, blue and red) but they can also be built at home. A simple, less-technical approach involves buying a conventional solar-powered yard lamp and then essentially harvesting it for key pieces to put in a jar. This is simply a way of taking an existing solar lamp design and appropriating its parts to make something more attractive for display around a house or home. A more electronically-savvy individual can take the more complex route and built a solar lamp from the ground up using small solar panels – though the aesthetic result may not be as impressive. Whatever route you choose to go, these are fun and sustainable gadgets that make it easy to go green, automate the process of turning on lights at night and can add some color to your porch, patio, garden or windowsill.
Felt Alive's Guide to Needle Felting & Needle Felting Supplies What kind of wool do I need for needle felting? There are many, many choices out there. Roving, Tops, Batting...from so many varieties of sheep...and you can even needle felt with other animal fibers like Alpaca. Wool? Raw Fleece - unwashed, right off the animal Scoured Fleece - Scoured to remove lanolin (oil) and dirt but with the lock structure intact. I have found that wool in batting form (wide sheets) seems to work great for sculptural needle felting. Batting is loftier than wool and less organized. Once the core structure is complete, I cover this with dyed wool batting. For Doll Making, my Felt Alive Flesh Tones are perfect for the skin layer - and the variety of colors I offer in my Felt Alive Needle Felting Wool makes for fun creations. Merino Prefelt! I get asked so often about prefelt. My PSY doll is sporting a suit made from Felt Alive Kettle Dyed Merino Prefelt. Most of my needle felted dolls beg for hair.
Fabric flower headbands and barrettes As some of you may recall, I saved last year’s yo-yo crafts for this year’s girls camp. The girls with patience and determination loved making yo yos. For others, hand sewing was a bit arduous. So, I came up with an easier alternative: fabric flower headbands. It was a hit. Tutorial and photos after the jump! We used the same circles of fabric that were cut for making yo yos, but no sewing was required. The girls got pretty creative with it. How to make fabric flower headbands and barrettes Supplies and tools fabric (thin fabric works best) buttons or rhinestones scissors headbands (we used Goody Stayput headbands) or bobby pins, barrettes pencil, pen, or fabric marker cup, quarter, or other circle templates hot glue gun and glue felt 1. 2. 3. 4. 5. Note: The key to a fluffy flower is using as little glue as possible. 6. Note: These photos show the open end of the folded petals layered underneath the petal next to it. 7. 8. 9. 10. 11. 12. 13. 14. 15. 16.
Perfect Summer Bangle Here's a fun tutorial on how to make a message bangle that's one-of-a-kind, done in the sun, waterproof and weatherproof. Even after several trips to the beach, it won't fade or wash off! Essentially, it's the Perfect Summer Bangle. Used in this tutorial: Inkodye Red Prepare. All you'll need for this project is a raw wooden bangle (we got ours from DIYBangles.com), a black paint marker, plastic wrap, and some Inkodye! Transcribe. Perfect. Pour. Brush. Wipe. Wrap. Tape. Expose. Develop. Cut. Reveal. Wash. Enjoy.