
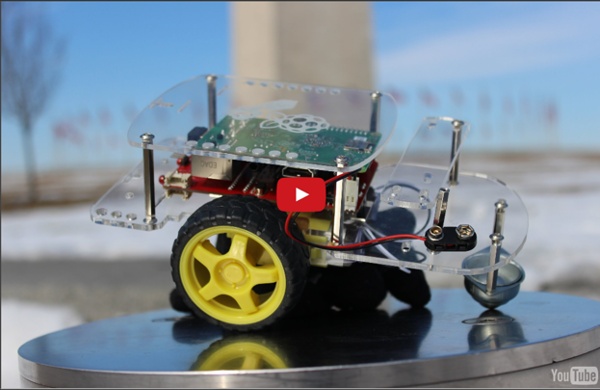
Raspberry Pi Scratch Robot | Eric Barton Fuller I found an application for the Raspberry in my classroom! With the endless possibilities of the Raspberry Pi in education, it is difficult to focus on one application. This is my attempt to document a focused application. I am sure this idea will branch out into other ideas or supplemental ideas will follow. Goal: The students are presented with an easy to develop hardware system on top of the robot chassis consisting of the Raspberry Pi, Pi Cobbler, Battery pack, H-bridge motor controller, and a Breadboard. The students are presented with an easy to use graphical/block based software programming environment using a modified version of Scratch for the Raspberry Pi which allows for control of GPIO pins. Students will be provided with resources such as wiring pin-outs, diagrams, schematics, hardware tutorials, software tutorials so they may create working robots in class (hopefully in about 10 minutes). Autonomous vs. Summary: This project will take a work on the back end. Resources:
How to Turn a Raspberry Pi into a Low-Power Network Storage Device Mix together one Raspberry Pi and a sprinkle of cheap external hard drives and you have the recipe for an ultra-low-power and always-on network storage device. Read on as we show you how to set up your own Pi-based NAS. Why Do I Want to Do This? The benefit of having an always-on network storage device is that it’s extremely convenient to have your data (or backup destination) always accessible to the computers both inside and outside your network. The downside, in most instances, is that you’re consuming a fair amount of power for the convenience. Our office server, for example, runs 24/7 and consumes almost $200 worth of power a year. We’ll be the first to grant you that a full fledged server is going to have more storage space and the capability to do more work (such as transcoding a multi-terabyte video collection in a reasonable span of time). What Do I Need? In addition to the gear you’ll need from the Getting Started with Raspberry Pi tutorial, you’ll only the following hardware: or
Using a camera with Scratch on the Raspberry Pi | Matthew Venn I needed camera control with Scratch on the Raspberry Pi for a primary school aerial photography project. I added a new python extension for Simon’s ScratchGPIO that allows either the Raspberry Pi camera or a regular USB webcam to be used with Scratch. Follow Simon’s instructions for installing over on his site. Add your camera – if you’re using the Raspberry Pi camera, follow their instructions here. After you’ve started scratch, all you need is to make a broadcast block and set it’s message to ‘photo’. This program starts automatically, then in a loop flashes an LED on pin 8 and takes a photo. Photos are stored in /home/pi/photos, each photo has a number that increases as the photos are taken. Make sure you delete/backup your photos regularly or you’ll run out of space fairly fast!
Make Your Own Wireless Printer With A Raspberry Pi Wireless technology is perhaps the best improvement to home printing for years. Fewer cables, flexibility about where you can put your printer – it’s win-win. Unless you have an older printer. While it might be easy enough to buy a new printer for under $50, you might have spent enough on your last one, and be unable to justify the outlay. Additionally, your old printer might have a special function, or manage duplexing in a particularly satisfying way, to bother replacing it. The solution, then, is to make it wireless. Benefits Of Wireless Printing If you haven’t already enjoyed the benefits of wireless printing, then this project is definitely the place to start. With a wireless printer you can move your printing into a separate room (perhaps even your shed) and collect your print jobs when they’re complete. Wireless printing really is about making printing flexible rather than “locking” it to the desk. Preparing For Wireless Printing With The Raspberry Pi To update, enter followed by
WTware for Raspberry Pi 2 — thin client operating system We're writing a FAQ for the weather station - help wanted! Hi Clive and Fellow/Fellowette Weatherheads EveryWhere! Yes, it's li'l ol' me, I'm still alive, and I've been banished to the badlands of Northwestern W(h)yoming ... by choice - I'm an hour East of Yellowstone National Park, the first NP in the world and home to the incredible, world-famous geysers, hot springs, and waterfalls! I'm taking charge of an incredible real Computer Science and Robotics program that includes dual-credit accredited college courses that qualify anywhere an accredited college transcript is accepted, one of the few high schools in the entire U.S. to have such an in-depth program. Somehow, the application I submitted for a "whether" station (as in, "whether we can get this to all work" ) a year ago February (when the Pi 2 was still brand new - remember those halcyon days?) This is going to be awesome, as well as awwwsome, as students realize, "Awww, some In-DUH-vidual connected this backwards ... oh, it was me ... never mind!". and here's Dynamic RAM:
Take Photos Through These Raspberry Pi Powered Binoculars The Over-Engineered version The Quick and Dirty version Read articles from the magazine right here on Make:. Upgrade a pair of binoculars (or a telescope or microscope) with a Raspberry Pi 2 and a Pi camera and use one of Adafruit’s touch LCDs to view and take pictures at a distance. This project is more time-consuming, expensive, and clunky than if you were to purchase a commercial product. We created two versions. 1. The Adafruit crew put together a specific version of the Raspbian OS to make it easy to interface with their 2.8″ capacitive touchscreen. Unzip the image after it finishes downloading. 2. Remove the microSD card from the adapter. Figure A Next, attach the other end of the cable to the Pi, silver tabs facing the HDMI port, blue side facing the network jack, again disengaging the clasp first if needed. Figure B Attach the LCD panel to the Pi — be aware that it fits a bit loose and floppy. Figure C 3. Boot the Pi. Go to Expand Filesystem and hit enter. Figure D A. B. Run 4. 5. 6.
Visual Programming Guide | 2017 Overview of Available Languages and Software Tools It wasn’t many years ago that using a computer meant literally learning a new language. Innovations like the graphical user interface exposed basic elements like the filesystem to a wider audience, and the Internet has become increasingly democratized as user-friendly tools like WordPress, Youtube and Soundcloud allow anyone to create, publish and distribute content without writing a line of code. Today an explosion of accessible prototyping kits is making it possible for amateurs and hobbyists to sink their teeth into the growing Internet of Things by cobbling together connected computing projects. But when it comes to making that hardware do your bidding, most tinkerers will still encounter a “language barrier”. Fortunately, some developers have started to step in and provide user-friendly, visual programming tools.