
Mommy by day... Crafter by night. 10 Free Tote Bag Patterns and Tutorials Totes make great handmade gifts. Here is a Tuesday Ten that shows a round-up of lovely totes. If you love to sew you might also like these free sewing tutorials right here on Skip to my Lou! Every tote needs a matching pouch. Pleated Zippered Pouch Lined Zippered Pouch 1. 2. 3. 4. 5. 6. 7. 8. 9. 10.
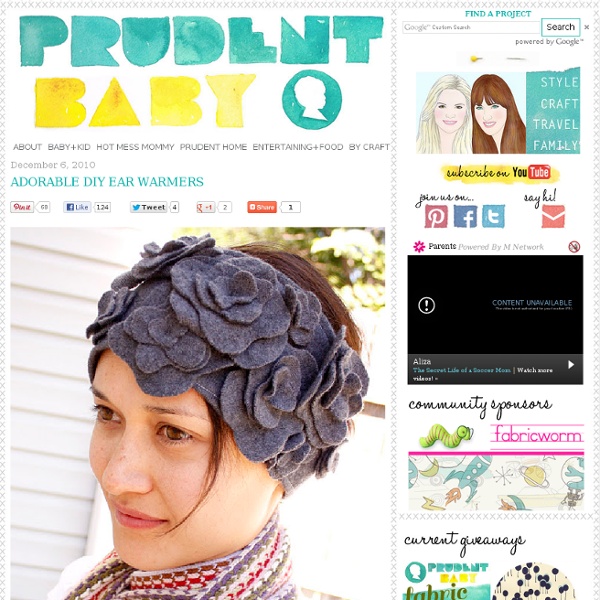
Free Knitting Pattern - Headband Ear Warmer (Thick Yarn Version) I have written a newer, simpler pattern. Please click HERE or see the sidebar on the right and click on the new pattern. (The decrease is easier) :)PLEASE NOTE - I AM NOT A CROCHETER SO I DO NOT HAVE A CROCHET VERSION OF THE PATTERN. 1/31/10 UPDATE: There have been a few questions so I'm adding very specific directions for the increase and decrease rows. Headband Earwarmer (Bulky Yarn Version) Materials: Size 10 knitting needles Cascade 109 LE Bulky (just under 1 skein) - This yarn is discontinued and sometimes hard to find--(I had some leftover from my Twilight mittens)--but any Bulky yarn will do. Size J Crochet Hook (optional)* Button Guage: 5 st/inch (in the rib pattern) Abbreviations: m1B – From the back, lift loop between stitches with the left needle, purl into the front of loop m1F – From the front, lift loop between stitches with left needle, knit into the back of loop. pfb – purl front and back Directions: CO 7 st Row 1 (RS): K1, P1 rib across Row 2 (WS): P1, K1 across Row 7: For The Flower:
Tsumami Kanzashi Flower Hair Clip I have recently discovered these beautiful folded flowers, and I absolutely cannot stop making them. Tsumami Kanzashi are traditional Japanese folded flowers, made from small squares of silk, that are typically worn by women as hair ornaments in traditional hairstyles. They seem really complicated and intricate, and they can certainly be that if you really want; but it completely doesn't need to be! These can be used in countless applications. There are a few tutorials out there on the internet, but to find a good variety in petal shapes can certainly be difficult, you just have to keep looking, and just grab a square of fabric and just test stuff out.
DIY Wrap Bracelet - Honestly WTF - StumbleUpon You should all know by now that we are all about stacking bracelets on our wrists. The more, the better. In fact . . . the most, the best! With that being said, we’ll show you how to master a version of the ever so popular wrap bracelet. It’s so simple and addicting, you’ll soon be churning out these wristlets with your eyes closed. You’ll need (for a double wrapped bracelet) :* Lengths will vary depending on the size of your wrist (see comments for suggestions). Fold the length of leather cording in half to form a loop. Place the ball chain along the leather cording with the end of the chain meeting the end of the wrap. Continue wrapping while checking it for fit around the wrist. When you have reached the end of the ball chain wrap the linen cording around the leather strands 2-3 more times. Thread the hex nut through the strands and tie a second knot. Trim with scissors and your wrap bracelet is finished!! The materials are listed for a double wrap bracelet. It’s a party!
Pleated tote (beach bag) tutorial Before we went away, I decided that a new bag for the beach was a must – something big and roomy to hold books, magazines, sunscreen, hats, and all that other good stuff. So I made this big pleated tote, and it worked perfectly. This is a picture of it in action: And here’s a little tutorial in case you want to make one for yourself – doesn’t have to be for the beach either, it could come in handy for schlepping all kinds of things around town. Here’s what you need: two pieces of your main fabric cut in shape A four pieces of the top shape (B) in a contrasting fabric two pieces of a lining fabric in shape C one piece of the long rectangle for the strap in the contrasting fabric two pieces of the top shapes (B) and one of the strap in a medium weight interfacing 1) Along the longest (22″) edge of the main fabric pieces, mark along the top at the following intervals: 3″ – 4″ – 6″ – 7″ – 9″ – 10″ – 12″ – 13″ – 15″ – 16″ – 18″ – 19″ 13) And voila, this is what it should look like.
Free Knitting Pattern - Headband Ear Warmer I have written a newer, simpler pattern. Please click HERE or see the sidebar on the right and click on the new pattern. (The decrease is easier) :) 01/09/10 UPDATE: Please note that I have added updated pictures with another flower option (same headwrap--new flower). The large flower was made using Susan B. Anderson's Felted Flower pattern from Itty Bitty Hats. 01/22/10 UPDATE: The gauge for this pattern is 9 st per inch, 6 rows per inch. 1/31/10 UPDATE: There have been a few questions so I've added some more explanation to the increase and decrease rows in this pattern. This headband is perfect for those brisk morning walks or for taking the kids to school. Headband Earwarmer Materials: Size 6 US knitting needles Rowan Wool Cotton (just under 1 skein) - this is a DK yarn Size J Crochet Hook (optional)* Button Small shank button (optional - for embellishment flower) Finished Size: 22.5" long and 4" wide at widest part Abbreviations: pfb – purl front and back Directions: CO 9 st Begin the decrease
Dolce and Gabbana FLower Sunglasses 10 Beautiful Fabric Flower Tutorials | Skip To My Lou - StumbleUpon It is spring! If the flowers are not blooming yet here is a round-up of awesome tutorials to help you make your own flowers! Here you will find 10 beautiful fabric flowers, but don’t miss these five fabric flower tutorials! 1. 2. 3. 4. 5. 6. 7. 8. 9. ..And how about updating your spring wardrobe with this beautiful rolled rose bracelet. 10. Just had to add one more! 11. If you need more flowers don’t miss the round-up of crochet flower tutorials and these darling fabric flowers!
renske’s minimalist tote bag A talented seamstress with a mission, Renske Solkesz decided to create her own wardrobe after finding herself frustrated with high fashion prices. When we saw her chic and modern wardrobe creations, we asked if she’d be willing to create and share a fun accessory tutorial with us. I’m super excited about what she’s come up with: an amazing self-closing utilitarian tote! I’m a huge fan of the graphic contrast and the leather and rivet details. Like her fashion designs, this tote is made from inexpensive materials, yet looks totally luxe. CLICK HERE for the full how-to after the jump! When I designed this bag, I wanted to integrate the grip/straps in a more functional way with the rest of the bag. A friend of mine called it a “yin yang bag,” which is pretty accurate, I think. Materials Tools HammerSewing machineScissorsPinsChalkMeasuring tapeIronPattern template Instructions 1. 2. 3. 4. 5. 6. 7. 8. 9. 10. 11. 12. Finished!
Crochet Star Pattern "Did you find everything you need?", asked the cashier at Trader Joe's. "Everything but the sugar," I replied. The cashier called over to the manager to ask about the sugar, and the manager said it had been discontinued. Something about rising prices and not being able to secure a good deal. "It's a food crisis," joked the cashier. We might be out of sugar, but there will be no shortage of crochet thread in my house. As promised, here's the crochet star pattern. Materials: Crochet thread, size 30. Step 1: Chain 5, join with slip stitch to form ring. Step 2. Step 3: * Chain 5. 1 single crochet in 2nd chain, 1 half double crochet in next chain, 1 double crochet in next chain, 1 triple crochet in next chain. Make lots and lots. Now for my next project: researching how to grow sugar beets and extract sugar from them.
DIY Fabric Covered TOMS Tutorial My first tutorial!!!! And I'm not even using my sewing machine ;) Original idea came from Pinterest, of course. Image HERE. Ok, first you need to gather your supplies. Here is what I used: E6000 - I used this because it's flexible and waterproof.Tiny scissors - makes trimming close to the sole much easierFabric scrapsOptional embellishments - I used embroidery floss and buttons Go ahead and first repair any holes. Then stuff your shoe with anything. Ok, next I placed a large scrap over the top of my TOMS in the same shape that was already there. Cover the area in E6000. Let the glue dry for a minute so that it's nice and tacky. Next grab another scrap of fabric and make sure it fits along the shoe. Lay your next strip down and repeat steps above. On the side where the TOMS tag is I cut little slits in the fabric so it would slide easily behind the tag. That's it!!! I've worn them around all day and this is how they still look!!!