background preloader

Sewing Tutorial: Turtle Pincushion {With Pattern}

Sewing Tutorial: Turtle Pincushion {With Pattern}
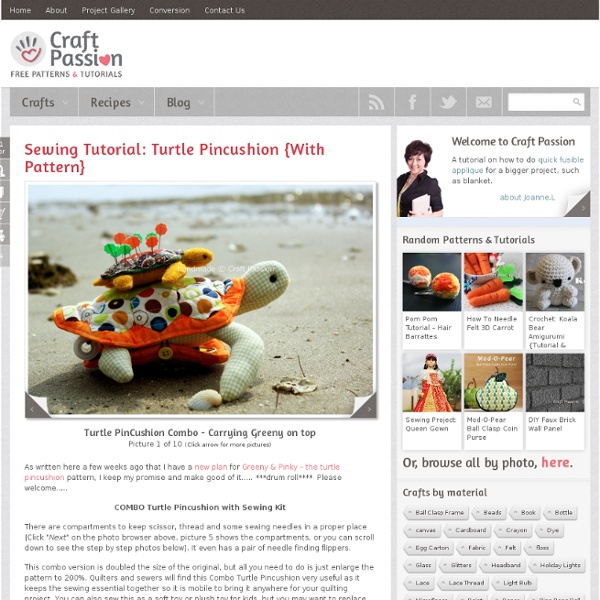
As written here a few weeks ago that I have a new plan for Greeny & Pinky – the turtle pincushion pattern, I keep my promise and make good of it….. ***drum roll**** Please welcome….. COMBO Turtle Pincushion with Sewing Kit There are compartments to keep scissor, thread and some sewing needles in a proper place [Click "Next" on the photo browser above, picture 5 shows the compartments, or you can scroll down to see the step by step photos below]. This combo version is doubled the size of the original, but all you need to do is just enlarge the pattern to 200%. Previously, I gave out the Greeny & Pinky turtle pincushion pattern upon request. In this tutorial, there are 2 versions of turtle pincushions you can make: To make a smaller felted body version of Greeny & Pinky, use the written instruction below.To make the Combo version as shown on the pictures above, use the step by step photos after the written instructions. Oh, by the way if you would like to know where the scenery is….

100 Delicious, Dirt-Cheap Recipes for the Starving Student | Online College... Most students don’t have a lot of cash to spend on food, but that doesn’t mean you have to go hungry. With the right recipes and some kitchen savvy, you can eat great even on a student’s budget. Here we’ll share 100 tasty recipes that you can make on the cheap. Breakfast Get a good start to your day with these cheap-o breakfasts. Hash browns: Hash browns are cheap and easy to make, and cheaper than a trip to IHOP.Puff pastry chicken and bacon: You can make bacon and chicken in puff pastry using this recipe.Microwave scrambled eggs: Make scrambled eggs in the microwave with this recipe.Breakfast burritos: You can make these burritos ahead for a quick microwave breakfast.Onion quiche: This quiche makes a delicious, incredibly cheap breakfast.Omelet in a bag: Boil eggs and some handy ingredients for this simple, cheap omelet.Frittata: Add eggs to cheese, vegetables, and herbs you have handy in your fridge to make a frittata. Ramen A college staple gets dressed up in these recipes. Sandwiches

Make It and Love It: Pin Cushion Warning: Speedy Project You’ll Need: Mini Candle Holder (This one is for tea lights. Decide what type of holder you would like to use. Glue your fabric to two sides of the holder. Start shoving it full with batting. Tuck the last side in and glue it down. Cut out any shape or design out of your felt and then hand stitch it into place. Stick your pins in and now you have them nice and handy. Related posts: Heart Hotpads – how to sew bias tape the proper way and the cheating way I love hotpads, potholders, whatever you prefer to call them.But here’s the thing….I hate to make them.So here’s my semi-handmade version!And with Valentine’s Day just around the corner, hearts were in order. Using these cheap potholders from IKEA and the thrift store: I made my own bias tape and bound my old hotpads with the new trim. In this tutorial, we’ll walk through the proper way to sew bias tape and the short-cut cheating way. So let’s get started.Grab a potholder. And you’re half-way done! Okay, now grab your 1/2 inch-wide, double-fold bias tape. Okay.The PROPER way to sew on Bias Tape.Sometimes I sew bias tape the proper way….and sometimes I take the lazy short cut. Unfold the bias tape. When you get to the bottom of the potholder, sew the two ends of the bias tape together. Okay, start sewing the bias tape onto the back side of the potholder. When you’re done, flip the potholder over and fold the bias tape over to the front side. And you’re done! And there you go!

Eyeshadow application By applying eyeshadow in different colours and textures, you can intensify or soften your regard, create a certain mood, and even improve your eye shape, depending on the look you want to achieve. To obtain the best results, you not only need to choose the right eyeshadow colour, but also apply it in the most flattering way. In this article you will learn how to put on eyeshadow according to: the situation you are making up for. the texture of your makeup product. the shape of your eyes. Videos Situation For a quick makeup fix, the simplest way to put on eyeshadow is to apply only one medium-bright base colour. Apply a base shade on entire mobile lid. For a more polished look, use two colour-coordinated eyeshadows in light and dark shades. Apply the dark eyeshadow on the outer corner of the eye in a horizontal “V” shape. For sophisticated evening makeup, you can use up to four colours of eyeshadow. Apply base colour on the upper eyelid. Texture Eye shape

30 Fonts Perfect for Vintage and Retro Style Design A Vintage or retro style design is meant to transport it’s audience decades into the past. Designers try to do this by using various design elements such as textures and patterns from a certain time period. But it’s also important to use accurate typography from the time period you are trying to represent. In this post, we’ve rounded up 30 excellent vintage and retro fonts that you can use in your designs. You’ll notice that these font’s range from a 1920’s look all the way up to the retro typography style of the 50’s. Matchbook Bazar, Medium Embossed Black Ugly Qua Hill House Shrewsbury-Condensed Bold Caslon Seaside Resort Fontleroy Brown Fusty Saddle Dirty Ames Bolton Dymaxion Just Old Fashion Riesling Goudy Bookletter 1911 Opera-Lyrics-Smooth Carnivalee Freakshow Circus Ornate Upper East Side Brandon Grotesque Regular (free until April 15) Ballpark East Market BP Script Rocket Script Arwen Anagram Louisianne Lemon Chicken Anastasia About the Author

Texas Freckles: Pincushion Crazy! I've gone pincushion crazy! I wanted to make another pincushion to help me create instructions on how I customized the measurements, so I did that last night. But most of my photos were really dark since my sewing room has insufficient light at night, so I made another one today so I could re-take many of the photos. I don't think I've violated any copyright by doing this, but let me state for the record that this IS NOT my pattern and I am not redistributing the pattern here. You will need to purchase your own copy of Anna Maria Horner's book Seams to Me: 24 New Reasons to Love Sewing in order to obtain the pattern for the Pin Cushion Caddy. Alright, with that out of the way, if anyone is interested, I made a pdf worksheet you can download here to customize the pattern. In addition to the supplies listed in the book and your typical sewing notions (rulers, etc.), you will need a drafting compass, some tracing paper (I used vellum) and a calculator. This is my drafting compass. Perfect!

Technique: Understanding Bias and making Bias Tape Bias Tape. What is it? What is it used for? What the heck does “bias” mean? And how can you make your own? Let’s talk about it! Have you walked by the zippers and threads in your fabric shop and wondered what all those cute packages of solid trim are? If you need a solid colored bias tape, the store bought stuff is convenient. With a few tools and an iron, a 1/2 yard of fabric is transformed into 9 yards of double-fold bias tape! You can watch a full video of this tutorial by pressing the play button below. And when you’re ready to sew it on, jump to our next tutorial: How to Sew Bias Tape. But I’m getting ahead of myself. Inside all those pretty packages are some interesting trims:* Bias tape usually comes in solid colors of polyester/cotton blended fabric, is 3 yards in length and varies in width and use.* Quilt Binding is a fancy name for wide bias tape. For this tutorial, however, we’ll focus mainly on Bias Tape. Bias tape is a type of trim and also a binding. Okay, still with me?

tutorials We get a lot of emails asking how to use brushes correctly so I hope this helps you out a little! A brow brush is designed to be stiff and angled for a reason. And we use the slanted edge to shade and the tip of the edge to outline. Put those components together and a brow brush is quite frankly a thing of perfection! Here’s how to use it properly: READ MORE… Last week we explored four different ways to wear Spring’s biggest Cobalt blue trend. This method has been around for centuries! A nod to the Uptown Girl, this look is very put together and polished. Highlighting Pencil — Try Too Faced Instant Attitude Highlighting Pencil.Taupe Pencil — I used Le Metier de Beaute Pencil in Champagne. Note: This is a really light nude lip so to keep it as chic as possible, add a hint of blush to the cheek so you don’t get washed out.

Turning the VistaQuest VQ1005 Digital Keychain Camera into a Spy Cam Wiki Attach | Edit | Revisions Related Content Ever since I was a kid, I have been facinated with the spy world. The VistaQuest VQ1005 digital camera is perfect for modification into a spy cam. The first thing to reduce the visibility of this camera is to remove the key chain. Now, it's time to take apart the small digital camera. After pulling two-halves of the case apart, the first thing to remove is the useless viewfinder. Next, I want to eliminate the beeping sound. Therefore, I took a chance at rendering the digital camera useless. There is a pair of red and black wires under the lens on the other half of the plastic case. After doing these modifications, you will have a nice little spy camera. Comments & Discussion >> Attachments

Wrist Pincushion Attach your sewing pins to your body and you’re pretty much guaranteed not to misplace them. I’ve had pincushions on the brain after this post, so today I made a handy wrist pincushion. Simple to sew, it’s made from one fabric scrap, some filling and velcro. Instructions are below. DIY 20 Minute Beach Cover Up ** NO SEW VERSION CLICK HERE!****HIGH-BACK VERSION/STREET WEAR- CLICK HERE****HALTER VERSION- CLICK HERE****MAXI WITH THICK STRAPS HERE** Need more help? Click HEREProbably my favorite 'la vie' project... ever. I was browsing through a swimwear catalog and saw an adorable beach cover up. Maybe it seems a little too early to be thinking about the beach... but seriously, I can't wait. So- without further ado- the 20 Minute Beach Cover Up! (1) Cut it. (2) Braid it. (3) Attach it. Another option: if it's bunching too much in back, you can add in a tapered curve. (5) Wear it. It was so simple!

How to re-use Kodak MAX One-Time-Use disposable camera? How to re-use Kodak MAX One-Time-Use disposable camera? The Kodak MAX One-Time-Use disposable camera is available in two flavors: outdoor camera or flash camera. To dissect the camera, you will need a mini-screwdriver set. To modify the camera, you will need a cutter. dissect the camera Each disposable camera body is held together by a set of tabs. Remove the packaging stickers covering the body. After dis-lodging the second set of tabs, there is one last tab. Below, you see the inside of the camera. If your disposable camera has flash, you will need to remove the battery to prevent from being shocked, while working on the camera. modify the camera Before we can re-use the camera, we have to modify the film advance wheel of the camera. Remove the film advance wheel. Snap all the camera parts back into place in the reverse order. reload the camera The original film can supplied by Kodak are slotted with notches to match the teeth on the film advance wheel. There! Comments & Discussion >>

craft blog : I've Got A Fever And The Only Prescription Is A Crochet Hook Holder The last couple days I've become a sneezing snot factory, culminating in fever of 99 degrees last night, which is super-high for me since I'm normally 97.6 degrees. I say "culminating" as wishful thinking because I don't want to get any sicker ... please. When I first start getting sick, I usually can't sleep. I'd done a quick sketch of a horizontal thing, but for some reason, in my sick-haze, I decided to change the design to a vertical panel with diagonal pockets. I'm pretty impressed that I was able to do this without my contacts in and (most likely) with a fever. First, I cut all the little pockets, sewed the opening seam, then sewed them in a strip so the top of each one was off from the next by one inch. I can't find the right words to explain what I did, but it involved sewing individual pieces of 1" wide stabilizer behind each pocket and then sewing the thing the background in between each pocket. I used all sorts of gifted and leftover fabric (recognize yours?).

Related: