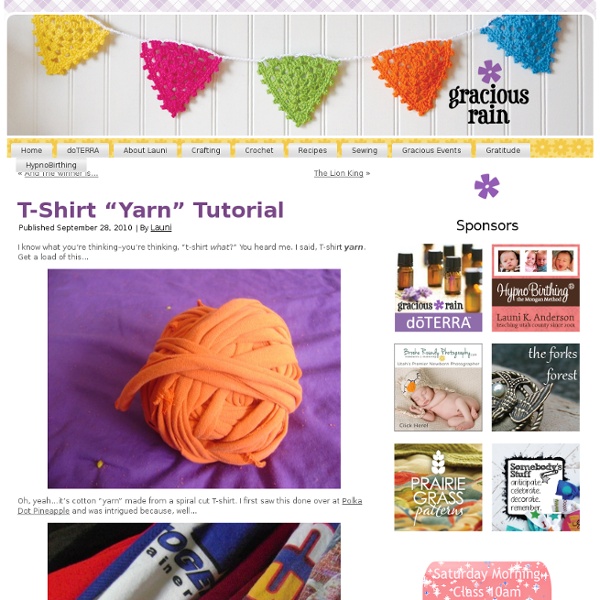
background preloader

T-Shirt "Yarn" Tutorial

T-Shirt "Yarn" Tutorial
I know what you’re thinking–you’re thinking, “t-shirt what?” You heard me. I said, T-shirt yarn. Get a load of this… Oh, yeah…it’s cotton “yarn” made from a spiral cut T-shirt. I first saw this done over at Polka Dot Pineapple and was intrigued because, well… does everyone on earth have a huge pile of orphan T-shirts that nobody wears, but they can’t seem to part with… or is it just me? So let’s get real green and do something useful with some of them…shall we? Start with a regular t-shirt that has lived a good life…no guilt now. Cut off the bottom hem. Now cut the top off just under the sleeves… so you have a tube of fabric. Fold it nearly in half, leaving the under side sticking out about an inch. Now cut from right to left all the way up to and just past the top fabric, but leave the one inch margin of the lower fabric uncut. it should look like this. If you need more instructions click HERE for a sweet little diagram and bag pattern. but that color is too…too…orange not to be used properly.

The Technique Zone: Acrylic Paint Transfer - StumbleUpon Supplies needed: Acrylic dabbers, photocopy of an image, water spritzer bottle, paintbrush, card stock, craft sheet and heat tool (optional) Take the lid off the dabbers and brush the paint onto the card stock, ensure you get a good coverage Take your photocopied image ( remember that you will get a reverse of the image, so don't use bold words), flip it over and place it in the acrylic. Lightly press it down making sure it's smooth and not wrinkled Leave to air dry for at least 15 minutes and then if you wish give it a blast with the heat tool Only move onto this step when you are sure your paint is completely dryTake your water filled spritzer bottle, spray the back of the paper no more than two squirts, you don't want it too wet Next start to rub the paper very gently with your finger Keep rubbing and extra spritzing if you need too Eventually you will get rid of all the paper, but it does take a bit of patience as you have to be careful not to wet it too much and rub the image away

Free Scarf Knitting Patterns" Braiding adds another dimension to an otherwise very simple pattern. Choose a soft yarn -- it will follow the curves of the braid better than a stiffer one. Size Width: 4" (10cm) Length: 55" (140cm), not including fringe What You'll Need Yarn: Soft worsted weight yarn, 288 yards (263.5m) We used: Debbie Bliss Alpaca Silk (80% alpaca, 20% silk; 72 yards [66m] per 50g ball): #12 Grape, 4 balls Needles: US size 8 (5mm) Notions: Tapestry needle to weave in ends; size 8/H (5mm) crochet hook Gauge 18 stitches=4" (10cm) in single-rib stitch pattern Making the Scarf Cast on 10 stitches. Row 1: Work in knit 1, purl 1 rib pattern to end of row. Row 2: Slip first stitch knitwise, (purl 1, knit 1) to end of row, ending with a purl stitch. Repeat row 2 for pattern until piece measures about 64" (162.5cm). Bind off all stitches in pattern. Repeat the above instructions 2 more times to make 3 individual 64" (162.5cm) strips. Make the Braid Lay the 3 single-ribbed strips next to each other on a flat surface.

how to add elbow patches to a sweater! Elbow patches are one of my favorite trends this season! Last month, I shared how to hand print hearts on your jeans and we recieved many requests for a patch tutorial! I asked Amanda to show you how she would do it in this next feature.... Enjoy! Supplies needed: cardigan, fabric (this is a great way to use scraps!), fabric marker/crayon, 1 sheet of card stock, scissors, pins, embroidery thread and embroidery needle. 1. 3. 6. Thanks so much, Amanda! Happy Monday, everyone.... xo. Double Knitting - Knitting Community - StumbleUpon Double knitting is the exception to many knitting rules. You can double knit a stockinette scarf, and it will lay flat instead of curling. Color knitting will be reversible, showing a negative of the image on the back of the work instead of floats. How is this possible? Cast on Cast on with double the number of stitches The cabled cast on is great for double knitting because it creates a flexible edge. Cast on with yarn held double You could also use the cast on of your choice, but with the yarn held double. How to Double Knit Single color double knitting instructions This is the easiest way to do double knitting Cast on an even number of stitches *Knit 1, slip 1 purlwise with yarn in front, repeat from * across the row Repeat stitch pattern on each row Bind off (using any method) Double knitting with one color in the front and one color in the back Bring both yarns to the front and purl the next stitch with only the contrast color Repeat these two stitches across the row

How to Cable Without a Cable Needle | Lion Brand Notebook - StumbleUpon November 7th, 2011 by Jess Now that you’ve learned to use a cable needle, what do you do if you want to start a cabled project and don’t have a cable needle on hand? Don’t fret; you can cross your stitches without using a separate needle! Here’s how to do it. Now, a few notes on this technique. Cabling without a cable needle works best on smaller cables. Spud & Chloë — Blog Hi Spud & Chloë Friends, After an overwhelmingly positive response for the Oink preview and for adding wings….. here he is! This project is so fast to work up you will barely blink an eye and a pig will be flying around your house. I promise. Oink’s body has a Hi Bounce Pink Ball inside but it is optional. Here is some information you might like to know: Finished Measurements: 3 ½ inches tall by 2 ½ inches wide Yarn: Spud & Chloë Sweater (55% superwash wool, 45% organic cotton; 160 yards/100 grams), 1 hank each in Watermelon #7512, Popsicle #7501 and Igloo #7517 (optional for the wings only) Needles: US size 5 double pointed needles, set of 4 or size to obtain gauge Tools: Yarn needle Scissors Tape measure or ruler Polyester fiberfill (small amount) Hi-Bounce Pinky Ball (optional and available on Amazon.com) Black embroidery floss Stitch marker Gauge: 6 stitches per inch in stockinette stitch Pigs really do fly! Have fun and hopefully Oink will bring some smiles to you and those around you.

Refashion Tutorial - Long Sleeves to Bow Sleeve T-shirt If you've ever checked out my blog you'll know I love to change things up, my Hand-Me-Down Horror series has been all about buying yucky or just plain boring clothes and making them into something I'd be proud to wear. Hack off those sleeves, raise that hemline and bob's your uncle a cute custom piece, for pittence. This project is no different except I'm using a top that fits me and nothing goes to waste in this tutorial. So without further ado get your sewing needles and thread out and sharpen up those scissors! Before, a plain long sleeve Tee from Old Navy, that cost me a wopping $2.60 1. 2. This is what you'll end up with, don't throw anything out, nothing goes to waste on this project. Next you'll be making the bows, out of the sleeves (I know, genius right!) 3. Whole sleeve pinched together 4. 5. 6. 7. 8. The finished neck edge, it looks great doesn't it and to think it's just a piece of t-shirt scrap! 9.

How To Crochet: Broomstick Lace You can use a very large knitting needle for bigger loops and you can create different rows with different size stitches. The only stitch that you need to know is single crochet, can you believe it? For this tutorial, I used my favorite crochet thread in size 3 with a size C crochet hook and a size 17 knitting needle. The usual grouping of stitches is 4 to 6. Chain 20. Insert crochet hook into each chain, yarn over and bring the loop up onto the knitting needle. You should now have 20 loops on your knitting needle. In groups of 5, gather the stitches off the knitting needle. Now begin to draw up your working yarn and chain 1 to close the group. Now make 5 single crochets in the space for the gathered stitches. Continue across row gathering 5 stitches, and making 5 single crochets in each group. Now 4 groups of 5 stitches made. Hook a loop onto your knitting needle at the working end of your row. You should now have 20 loops on the knitting needle.

The 30 Minute $6 Dress Tutorial | papernstitch - StumbleUpon Guest post by Rachael at Talk 2 the Trees. The perfect dress is hard to come by. I like my dresses to be cheap, and long enough. Here’s Your Supplies List: 1. Here’s How you Make it: 1. 2. 3. 4. 5. 6. 7. 8. 9. 10. 11. 12. Here’s the tutorial in pictures… Believe it or not, this dress only took about 30 minutes to make. About the author. 10 Awesomely Altered T-Shirts | The New Home Ec By ashleyhackshaw | Do you have a bunch of t-shirts lying around that you just aren’t into anymore? Don’t throw them out…..alter them into something amazing! I’ve rounded up 10 cute t-shirt tutorials that will make your friends ask “Where’d you get that adorable top?!” It will be fun to say “Oh this old thing? (more after jump) nggallery id=’125698′ Scrappy Tee Make a trendy scrappy striped tee. Men’s Shirt to Maternity Shirt Painted Doily Tee Paint a doily tee using simple fabric paints. Ruffle Top Turn an ordinary t-shirt into a pretty ruffled version! Dip Dyed No sewing involved......a dip dyed t-shirt. Girly Cap Sleeve A regular tee turned sweet and girly! Sweet Cami A cute drawstring cami made from a large t-shirt! Ruffled Laerying Top Love this adorable ruffle layering top. Romantic Ruffle Make a sweet t-shirt shrug form an old shirt. About ashleyhackshaw ashleyhackshaw Ashley Hackshaw is the editor, designer, and DIYer behind the wildly popular Lil Blue Boo.

fear of commitment cowl - cocoknits Your options are wide open with the “fear of commitment” cowl! Button it right up close to your neck for maximum warmth. Too warm? Skills Needed General knitting skills. Size One size, approximately 9" wide by 33" long. Materials Yarn 250 yards any soft, bulky yarn which calls for #10.5–11 needle. Sample: Debbie Bliss Cashmerino Super Chunky (55% Merino, 33% Microfiber, 12% Cashmere, 72yds/50g) Needles Size appropriate for your chosen yarn. Notions buttonselastic cord Gauge 14–15 sts = 4" (row gauge not important) in stitch pattern.

Related: