Typechart - Browse Web Type, Grab CSS.
72 Creative And Smart Typographic Logo Inspiration | Graphic and Web Design Blog -Resources And Tutorials
If we are starting to go crazy in typography style, then let’s continue with typographic and smart logo designs, shall we? Here you’ll find 72 beautiful logos created by talented designers. This showcase just proves the point how much can one/two words, icons tell using correctly white, negative, positive spacing, colors, accents creating interesting associations. Explore and get creative as I did! 1. Who killed letter i? 2. Really smart logo! 3. Typeface: word-play: face from the type and letter T. 4. Just loving this logo, great stylization! 5. Very popular logo already, but thought I still share it in typography section. Author’s comment: “Logo was made for a bold creative team consisting of two people. 6. Just smart logo, which rings the bell! 7. Author’s comment: “Gizzy bear is how a little kid might say grizzly bear. Just genius! 8. Simple, artistic and very clever – all in one place! 9. Very good logo – yes, sticky! 10. Oh, snap – logo with very clear message. 11. 12. 13. 14. 15. 16. 17.
CSS Text Wrapper
125 Creative Text Based Logo Designs For Design Inspiration | Showcases
A Logo is a graphical element that, together with its logotype (a uniquely set and arranged typeface) form a trademark or commercial brand. Typically, a logo’s design is for immediate recognition. The logo is one aspect of a company’s commercial brand, or economic or academic entity, and its shapes, colors, fonts, and images usually are different from others in a similar market. Logos are also used to identify organizations and other non-commercial entities. These types of corporate identities are often developed by large firms who specialize in this type of work. All of these logos are very creative and following different trends like PhotoFill, Concealed, VariDots, Candy Stripe, Flip Flop, Sequential, but most importantly Texting which is a common element among all of them. You may be interested in the following related articles as well. Feel free to join us and you are always welcome to share your thoughts that our readers may find helpful. Resource Link Worth Mentioning
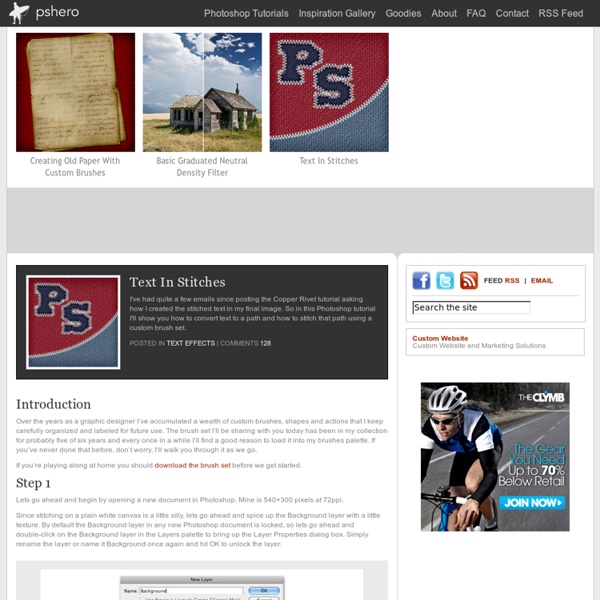
Brandon Muth
5 Principles And Ideas Of Setting Type On The Web - Smashing Magazine
There are some basic approaches, guidelines and goals to consider when working with type on the Web. Overall, the medium of Web typography involves readability, accessibility, usability, and brandability. On the Web, these aspects function together to accomplish design’s goals of communication and user interaction. There are many ways to approach Web typography in order to create effective and expressive results. 1. In web design every typographic decision needs to simultaneously accomplish a variety of results. In some cases, this poses a problem. deviate from the brand guidelines to maintain optimal search engine friendliness or use an image replacement solution which embeddes the required font in an image ( statically 5 or dynamically 6 ) or consider using sIFR 7 , a rich Flash-based dynamic font embedding technique which allows not only for embedding fonts into content presentation but also interacting with them (almost) as you would do with plain text. 2. 3. 4. 5. Conclusion
The Showcase Of BIG Typography – Second Edition - Smashing Magazine
Advertisement In Web typography doesn’t have to support the overall design. It can dominate. It can be loud. Few months ago we have already presented some sites with quite BIG typography. Please take a look at the following posts as well: The Showcase Of BIG Typography Designfabrika4Görsel Işler’s porotfolio with a vibrant typography from Turkey. Defining the Designer of 20155AIGA uses only typography in its design and uses it effectively. Azzabee.com.au6Azzabee uses big typography in a rotating Flash-based promo. Natl.tv7National Television is a project which uses bold, loud and sexy typography within a Flash-based design. Fl-28Apparently, Fl-2, a design agency from Denver, Colorado, has a clear focus on typography. Neubau BerlinLetters, letters, letters. JLern Design9JLern Design presents the typography from a quite unusual perspective. Are you a virgin? Hungry Man11Hungry man seems to be hungry for job as well. 256tm.com12256TM is a font foundry by Thomas Huot-Marchand. Mike Precious18
How To Create Great Typographic Wallpaper In Photoshop | Graphic and Web Design Blog
This tutorial will teach you how to create a really interesting and unique typographic wallpaper in few easy steps. Even a beginner will be able to recreate this effect, and add their own style and thought in it; I am sure you will enjoy and learn a lot from this tutorial! You will learn how to create good looking background, add lightning effects and work with fonts, sizes, colors to make the necessary places stand out! Let’s get started! Step 1 – Creating background First, open a blank document with size 1920×1200 pixels. Set layer opacity to 50%. Step 2 – Lightning Create a new layer and name it Lighting. Draw the gradient as shown below. Set layer to Overlay and opacity to 55%. Step 3 – Adding Brushes Download Adys grunge brushes, create new layer and brush around a little bit. Step 4 – Creating Main Text Download BEBAS font, create a new layer and type your text. Step 5 – Add Background Text – Important Step Lower your text opacity to around 15%. Step 6 – Creating effect