Coloriage Renard en Origami
Un nouveau projet créatif, facile et très ludique, idéal à faire avec ses enfants : un renard en origami ! Nous vous fournissons le modèle, il suffit de le colorier en ligne avec des motifs, de imprimer, puis de le plier en suivant les instructions et les photos pas à pas. Elsa, les enfants et moi nous sommes beaucoup amusés à créer toute une famille renard avec le papa renard, la renarde, et plein de petits renardeaux ! Le renard est un modèle traditionnel de l'origami. Pour commencer, vous devez colorier votre renard : renard roux, renard polaire, renard des sables, à vous de choisir. Le plus simple est bien sûr de le colorier en ligne en bas de cette page, puis de l'imprimer avec l'icône Imprimante. Une fois le modèle imprimé, pour créer votre renard, il suffit de suivre les instructions suivantes illustrées par des photos de chaque étape : J'espère que ce renard en origami vous plaira, et que vous peuplerez les commentaires de cet article avec les photos de vos renards en papier !
Marbleizing Paper « Skip To My Lou
To make this fun and easy marbleized paper you will need: 1/2 tsp alum (helps paint adhere to the paper), 2 cups liquid starch, liquid acrylic paints, a long wooden skewer , a 9 X 13 pan and white copy paper cut to fit the inside your pan. You can change up the size of the pan, just keep the proportions of starch and alum the same. The starch should be 1 to 2 inches deep in your pan. Pour 2 cups of liquid starch in the pan then add 1/2 tsp alum stirring until mixed. Gently drop acrylic paint on the surface of the starch. Take the wooden skewer and drag the paint through the starch. Lay your piece of paper on top of the starch. Lift the paper out of the pan and allow the starch to drip off the paper Rinse the paper under running water removing any extra starch. After the paper has been rinsed, lay it out to dry. You may find that you can print two sheets of paper before adding more paint to the starch. Have fun! Like this: Like Loading...
homepage of Eric Joisel, master of the Japanese art of origami, sculptor and paperfolding artist
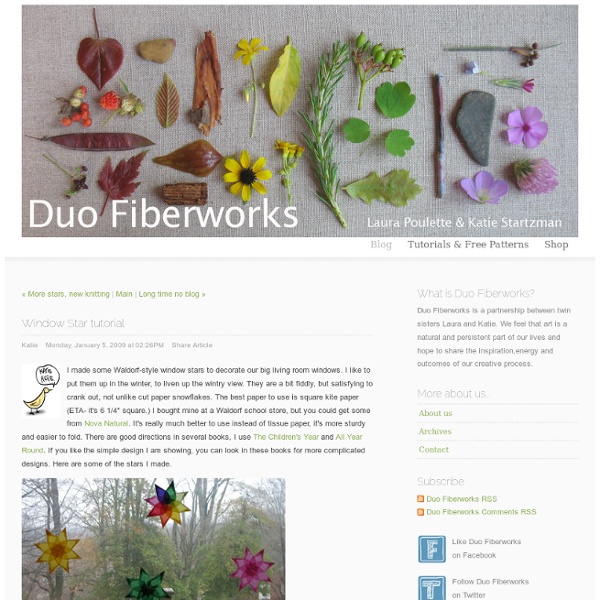
Starstruck at Christmas « Kate's Creative Space
Regular followers will know of my obsession with all things paper, and with projects which take very little time or specialist skill. As Christmas draws ever closer, I’ve been experimenting with different types of festive stars and bring you some simple projects to try today. My usual reassuring criteria apply; these had to be things I could a) get right the first time – or very occasionally the second; b) could do in front of the TV, merlot in hand, and c) look far more elegant and skilled than the actual labour would suggest. Below you’ll find my instructions on how to make each of these stars; the classic 5-point Amish barn stars, 6-point folding stars and concertina or snowflake stars, which look beautiful hung in windows. Five-point stars are in some ways the most striking and simple stars; reminiscent of Amish barn stars and New England folk decorations, they are the kind of stars that children draw in their first pictures. They make gorgeous gift-toppers too…. Finally, fold!
The fox is blak
Netflix Instant Watch has to be one of the best things technology has gifted us. You can find so many new movies and television shows from so many different genres, any time that you want. One of the best parts for me is the documentary selection, which is surprisingly large and full of very interesting features. There are quite a lot of PBS and National Geographic specials as well, which oftentimes go overlooked as you flock to things like Man On Wire or The Wild Parrots of Telegraph Hill. One PBS gem I watched recently was a documentary called Between the Folds about origami artists. The documentary was absolutely fascinating, detailing this complex artform from building paper all the way to folding a sheet one hundred and fifty times. The film spans the world and artistic medias to showcase what origami has become.
magic wallet
You will need: Card in three different colours Ruler Pencil Scissors Glue What to do 1. For the main body of the wallet, cut two rectangles 18cm x 9cm (7 x 3½ in) from one piece of coloured card. 2. 3. 4. 5. 6. Back to the Science Projects menu... Back to the Other Stuff projects menu...
Artist proves he is a cut above the rest with dainty models made using glue, a scalpel and just one sheet of A4 paper
By Daily Mail Reporter Updated: 15:55 GMT, 24 December 2009 Artist Peter Callesen proves he is a cut above the rest with these dainty models made using glue, a scalpel - and just one sheet of A4 paper. Peter, 41, cuts intricate patterns from a white sheet of paper and uses the cutout to fold breathtaking designs such as skeletons, insects and buildings. The precision work transforms a piece of paper worth only a few pence into a piece of art that sells for £2,800. Artist, Peter Callesen, cuts intricate patterns from just one sheet of A4 paper, a sharp scalpel, and glue Each model takes up to two weeks to sketch, cut and fold. If Peter makes a wrong cut or realises he is unable to achieve the fold he wanted he has to rethink his design and start the painstaking work again. Peter likes his models to tell a story and believes transforming a flat piece of paper into a three-dimension model is a 'magical process'. Precision work: Each model takes up to two weeks to sketch, cut and fold.
Paper Flowers – Anyone Can Do That | FindInspirations.com
Japanese Kusudama, this tutorial is featured on Craftuts Anyone can do that, I assure you. The proof: I can, just take a quick look at my result below. Below you can see my very first attempt to create paper flowers. What you will need to make your own Kusudama paper ball? 1. 3. 4. (optionally) I prefer torn paper instead of cut. You have to start with a single petal. Now you have to glue your 5 petals into a flower. Apply the glue to only one side of each petal, except for the last one, in this case cover both sides with glue. Your first flower is done. Don’t glue every petal right after you make it. When all 12 flowers are finished you have to glue them together. When two halves of Kusudama Flower Ball are ready you have to glue them together.