
Little Bags It all started when I saw Milky Robot's bag. Then MrsMcPorkchop's. I had to make my own! The design is so cute! I love the looping straps... the velcro inside... the back pocket. I think they're perfect either as a little camera case or just as a cute wristlet for carrying essentials when you're on the go. The pattern is from Keyka Lou, you can get it and make your own. creative jewish mom: DIY Home Decorating Projects You may or may not have enjoyed learning geometry, but now is the time to cast aside your emotions, and delve into this stunning project! Don't panic when you see the diagrams, it's really quite simple, and once you get the hang of it, you'll be making these in all sizes and colors with minimal effort. Really!You'll Need: lightweight cardboard, such as cereal boxes or paper plates a ruler, and good scissorsvery tacky glue, double sided tape or hot glue (less perfect results)paints, stencils, (optional) How To: Do the first one as an experiment to figure out the directions and to see how large the results will be.Using something perfectly round and at least 3" in diameter, such as a mug, a glass, a small plate etc.Draw around the perimeter of the object to create your circles. To determine the exact position of the triangle within the circle, you may be able to use one of the drawing programs on your computer. I can't stress enough, don't be daunted by these diagrams!
Paper Flower Tutorial I came across these incredible paper flowers and I just had to make them (then made like 100, I loved them so much) Now, I’ve created a tutorial to share the love! Perfect adornments for gifts, cards and even wall art! Art project using these, here! I found helpful tutorials here and on YouTube but I tweaked them using my own pictures and directions to make it simpler and more my style! you'll need: double sided patterned paper OR two types of patterned papercircle punch (I used Fiscars 1 ½ inch punch)glue stick or liquid glueflower center (I used vintage buttons) Punch out 8 circles on double sided paper or 16 circles (8 with each pattern). If your using 2 types of patterned paper, using a glue stick, glue both circles together (patterns facing out)Fold them in half and then half again, so that the circles are divided in four quarters. Fold two sections in so that you will get a point. Turn the circle over and fold again so that the two edges meet in the middle.
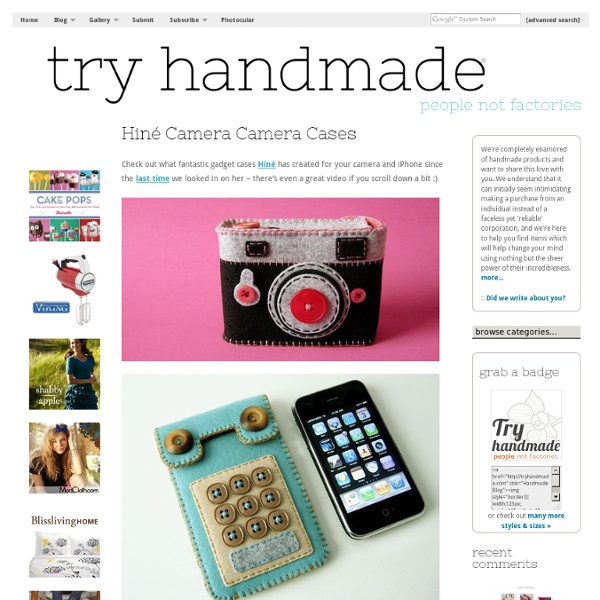
TetraBox Light by Ed Chew Liquid to Light Designer Ed Chew takes a green step in the right direction with the TetraBox lamp, a light object made from discarded drink packets that would have otherwise ended up in landfills already packed to the brim. The design is achieved by unfolding the packets and refolding them into hexagonal and pentagonal sections that are then pieced together to form a geodesic sphere or any other desired shape. Here, the Epcot-like ball makes an attractive overhead light and casts an impressive web of shadows and shapes on the surrounding space. Designer: Ed Chew Make Your Own Camera Bag! How many of us would love to have a camera bag like this!? High five cause I certainly would too! But at $170 a pop it's juuuuust not in the cards for me right now. Besides I think I would rather spend that extra cash on a new lens, or filters, or editing software. Did I mention that it's super basic and easy too? Another reason I love making it myself? So how did I do it? I chose a purse that had lots of room! Here is the cost break down: Purse from Ross: $18.00 (you could make this more expensive or cheaper depending on what bag you get. This was totally in my budget! DIY Camera Bag Tutorial! What you'll need: Purse of your choice1/2 yard Material of your choice (you'll have a little material left over probably but it's better to have more then less)1/2 yard of Half inch thick foamAt least 1/4 yard of Velcro. 1. This can be made to fit any bag. 2. 3. Now turn your pockets insides out. Now to close up the pockets, you'll want to fold the fabric inward making a seam and then pin it down.
Interchangeable Summery Cupcake Stands If you’re new here, welcome! I’m AmberLee, and Giverslog is my place to share recipes, gift ideas, pretty wrapping ideas, and whatever else is on my mind. I also own an online chocolate shop, The Ticket Kitchen. Stop by if you get a moment! Are you ready for a peek at how my new stands turned out? I’m more than a little thrilled with them. Being able to take these apart to switch out plates is a big deal for me. Best of all, I figured out a new trick that will let you use any candlestick you fall in love with at the thrift store. The shopping is really the best part. Supplies & equipment:1. Here is a candlestick I took apart and found I could dissasemble and have two pieces with a hole all the way through the middle of each. Yea for Krylon. Now comes the easy part… Here is the how-to for putting it all together, whether your candlestick has a hole through the core or not.1. 3. Here is a set I assembled by screwing an all thread through the center. Here is a set I made by using a cork. 3.
DIY - Tutorial - How to make a leather bow cuff bracelet You will need : - A piece of leather, approx. 22cm x 10cm (approx. 8.7" x 4") - Scissors - Leather glue or super glue - Thread - A snap button 1. Cut an oval piece of leather, approx. 22cm x 10cm (approx. 8.7" x 4"). 2. 3. 4. 5. 6. And Voila! Please let me know if something is unclear or if you have any question regarding this tutorial. Have a lovely day! sewing 101: making a pouf Add a burst of color to your room with this crafty pouf! At 17” wide and 10” deep, it’s large enough to serve as floor seating or a foot stool. (And if you have pets, I have a feeling they may want to make this their new favorite spot!) This project is a little challenging to sew, but it’s not too difficult, so if you’re comfortable with the basics of sewing, give it a try. I love the idea of making a set of these poufs in a range of sizes, for a sculptural stack of cushions that will become a room element in their own right. CLICK HERE for the full how-to after the jump! Finished Dimensions: 17” diameter by 10” tall What You’ll Need ¼ yard each 12 coordinating fabrics (I used quilting cottons) 1 yard muslin 3 pounds fiberfill stuffing 2 large buttons (approximately 1 ½”) 2 flat metal washers, slightly smaller than your buttons 12” upholstery needle (get this where upholstery supplies are sold) fishing line sewing thread hand sewing needle sewing machine sharp scissors iron 1. 2. 3. 5. 6. 7. 8. 9.
Summer bracelets DIY When M. came home from her camp with school, she showed me this yellow bracelet she made with 'scoubidoo' strings. One of her friends taught her how to make these and of course I wanted to have a go at it too. Instead of scoubidou string I used strips of fabric for one and leather - what did you think?!- shoelaces in offsetting colors for another one. So, in case you 're in need of a fun summer project here's a how-to in 16 pictures with a short description below. This is what you'll need for an adult size leather bracelet. - a 52cm long strip of fabric or leather shoe lace - a second strip of fabric or leather shoe lace of approximately 95 cm - a big-eyed needle - a cylindrical object to hold the loop so your project stays put while braiding (the neck of an Elmer's glue bottle works just fine; when out on the beach, the finger of a helper's hand might do the trick as well) Steps: 1. With special thanks to my little girl M. for teaching me how to make these...
untitled Framed Jewelry Organizer Necklaces always seem to get tangled in a jewelry box. This is a DIY tutorial to make a framed jewelry organizer that both displays your pretty necklaces and keeps them tangle-free. You can either hang it on the wall or lean it against a vanity table. thrifted vintage frame peg board cup to size wood glue scissors ribbon knobs or hooks spray paint (optional) Start with a vintage thrifted frame. You’ll want a piece of peg board cut down to the size of the inside of your frame. Before securing the peg board to the frame I make a couple loops for hanging dangling earrings. I double knotted the back. Next I glued with wood glue the peg board to the back of the frame. I picked up some of these knobs and hook on sale from my local Anthropologie. The hook’s holes didn’t quite line up with the peg board’s so I tied ribbon through like I did for the earring loops. Then I installed my knobs and hung my jewelry.
A Beautiful Mess: Home Decor Hi guys, Mandi from Making Nice in the Midwest here! Recently I was really impacted by this Don Draper quote that come across my Pinterest feed: "Make it simple, but significant." Lately I've been attempting to live out this mindset in how I decorate our home, and seeing that quote was a powerful way of putting what I've been feeling into words. I think having less things can be challenging for certain people (like myself), but really cutting back and focusing on the impact of simple and beautiful things can make a home environment more enjoyable to live in. We've been updating our little mid century ranch little by little, and most recently purchased this beautiful vintage-inspired light from CB2. Supplies: One 30" square piece of .5" baltic birch plywood (I recommend baltic birch because it has strong layers and more layers than other types of plywood which help prevent warping and are less likely to chip. Step Five: Use the jigsaw to cut out the starburst shape. -Mandi
not martha - to make: marble magnets I finally gave in and made marble magnets. Not surprisingly they are quite fun, smooshing the glue out to make a perfect little magnified image is very satisfying. Here, in order of appearance, are the places I referenced: paper candy instructions with pictures (this is the first place I saw this project) dogmestic with instructions and pictures photogeek pictures ugly green chair cute ladybug magnets – pictures with packaging threads at Glitter:onetwothree I bought all of these supplies at Michael’s, including the glue I went back for since I got the wrong kind to start with. These are great packaged in those Altoid-sized tins, I’ve seen them in office/gift shops like that.
whitney’s mason jar lights growing up in the south, i have a special place in my heart for mason jars. i enjoy them filled to the brim with icy sweet tea, but this fun project from d*s reader whitney gaylord may be my new favorite way to enjoy them. unlike most of our other diy projects, this one will require a bit of professional help (installing anything involving electricity is no joke) but the majority of the steps are easy to handle and will require only a quick call to your local electrician (home depot offers these services, too) to install the final project. click here for the full instructions or just click “read more” below – thanks to whitney for sharing! mason jar lights what you’ll need: -vintage mason jars -hanging lamp kit with low wattage bulbs (try your local lighting store, home depot or lowes) -ceiling light plate 3. tighten the lid back on the jar and adjust the bulb to its desired height (using the tension clasps).