
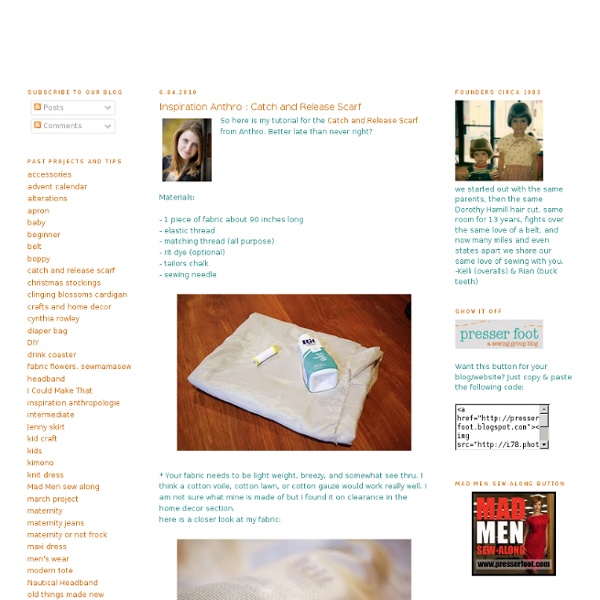
Make Your Own Lace Scarf! This next D.I.Y. is incredibly cute and easy too! Kinsey made this ruched scarf with a pretty polka dotted lace. You don't need to own a sewing machine for this project and it only takes about 30 minutes to complete! 1. Here are three cute ways to style this scarf! I hope you have fun creating your ruched lace scarf! no big dill Scripted Scarf Earlier this year, I had my eye on a scarf from We Are Owls . It was cashmere, hand-painted, and gorgeous. But also more than I was willing to shell out for a scarf. source: we are owls Because I’m trapped in way-hotter-than-I-would-like weather in steamy Washington DC, I wanted to focus on cooler times: nights when the slight chill in the air calls for a scarf messily thrown around your neck, but still allows you to look polished. I told you it was simple, right? I chose some phrases out of Shakespeare’s Sonnet 47 . A Few Tips Make sure you lay something underneath the scarf/pashmina. If you try this, please do send me a link to your final version! [Love handmade products?
Crafts: Ginger Honey Sugar Scrub Sugar scrubs are so easy to make and customize to your tastes. This is one of my own recipes and a personal favorite. Ingredients 1/2 cup brown sugar 1/4 cup white sugar 2 tbsp ginger 1/2 cup Macadamia Nut Oil 2 tbsp honey Thoroughly mix the brown and white sugars, the white sugar will keep the brown from clumping too much so there will be an even consistency. Sugar is a humectant, and will help retain moisture. Then add the ginger, which is a natural anti-inflammatory. Then add the oil and honey mixing very thoroughly. There are many other oils that can be substituted or mixed if you prefer, vitamin E, sesame, grapeseed, olive, jojoba, almond, apricot and sunflower, to name a few. Now you'll want to pour/spoon the scrub into a container, mason jars do nicely, and add a ribbon if it's a gift or if you just like pretty things.
Ruffled Scarf for SEWING REPUBLIC Adjusting to our third child has been a lot different than I thought it would be. I guess people are right when they say the 3rd one’s a charm. This new little baby in our home has been so sweet and mellow…….which is so different from the first two. [So don't worry, I paid my sleepless-nights-because-they're-eating-every-2-hours and fussy-evening-hour dues with them.] But this dear baby girl just rolls with it all and even quietly endures all of the extra noise and curious toddler fingers all over her. So if you have emailed me and I haven’t responded, or left a comment and are still waiting for a response……………you can most certainly assume that it’s because I’m on the couch cuddling our new little one. But if you’re interested in checking in to see new projects, I saved up a few projects from before she was born. ~Ashley Remember how I have made a few projects for Bernina’s Sewing Republic? (Click here and here to jog that memory…) A simple little ruffled scarf. Enjoy! Related posts:
Tutorial Tuesday - How to make personlised Buttons from shrinkback plastic I came across this great little tutorial on Oh!! I Like that... for making your own personalised buttons using little more than pre-cut shrink buttons, a permanent ink pen and a oven or heat gun for shrinking them. I think this could be a great way to capture your childrens drawings or expressions or could even be a great childrens rainy day craft. Fringe Scarf Everyone needs a go-to fringe scarf in their fashion repertoire. Here’s an easy way to make your own. What You Will Need: -Old T-Shirt -Good Scissors Step 1: Go through your old T-shirts and find a daring print or color combo. Step 2: Cut horizontally across the shirt, just below the armholes, to create a rectangular tube. Step 3: Working your way around the tube, make a series of vertical cuts that extend from the raw edge upward. Step 4: Tug down on each strand to elongate it. photo credit: Cathy Hayes for Lakeland Local
Make Photo Necklaces, Earrings, Magnets and More Using Shrinkable Plastic Seems like everything keeps getting smaller these days: computers, dogs, headphones… And now even photographs are joining in the smallness, thanks to the magic of biaxially oriented thermoplastic polystyrene (that’s Shrinky Dinks to you). You can print photos on plastic using your inkjet printer, and shrink them down small enough to make into necklaces, fridge magnets, earrings, or practically anything you can think of. See? Just like that, the world is your bivalve mollusc of the family Ostreidae! How to Turn Photo Shrinky Dinks Into Wonderful Things Photo credits: city: Christopher & AmyCate, giraffe: milkfat, tree: left-hand, bird: lucianvenutian What You’ll Need Inkjet-printable shrink plastic (clear or white)– Michael’s and Pearl usually have it Oven or toaster oven Cookie sheet Parchment paper — check the grocery store next to the plastic wrap and tinfoil Scissors and/or X-acto knife Hole punch (optional) Choose Your Photos Print on Plastic Don’t Make Me Cut You Preheat the Oven More Ideas
Upcycle Cross Body Bag Tutorial | Home About Me Tutorials » Party Stylings! Blogs I love!! Upcycle Cross Body Bag Tutorial I came across this black and white damask print cross body bag and thought it would be perfect for my trip to Disneyland!! I loved it from the get go and so I grabbed it!! Here is what I used! Fabric glue sticks from Aleens, I bought a brand new glue gun just to use with these glue sticks! I also bought a jelly roll of fabric that I loved!! I used 4 of the strips and simply uses a straigt stitch to gather the fabric to create ruffles! I took the first ruffle and simply glued it where I wanted it to be. I ran a line of glue along the stitching and on the bag and pressed it down with my fingers so it was nice and secure!! I placed each ruffle overlapping the top of the row beneth. I started on the left side of the bag and made sure to overlapp the ends of the ruffles to make it look finished. The bag has an ouside zipper pocket that I covered with the 4th ruffle. And there is the finished bag! Share this:
Free Pattern Month Day 10 - Adventures in Dressmaking: Paperbag Skirt Pattern I've been following Adventures in Dressmaking so long I can't remember exactly when or how I stumbled across her blog. But what I do remember is that I was instantly caught by her cute Anthropologie replicated designs. The nice part about Suzannah's blog is that she shows you exactly what patterns she used to make the dress and other examples of similar dresses that inspired it so that you can create the exact same look! Like the one we're seeing today! It's no wonder that Suzannah became such a fabulous sewing blogger. For a while now she's been planning her wedding, INCLUDING sewing her own wedding dress. And see some of her dress progress below. I mentioned once that I might post instructions on how to make a paper bag waist skirt. Today, let's look at some of what I'm going for with this paper bag skirt: a slightly more formal look than a basic gathered or elastic waist, usually involving pleats, also including a belt and belt loops. Here are some images of the basic idea: By Tulle: 1.
Jersey Scarf Repurposed T-shirt Necklace/Scarf Well we are three days into September and I am working hard to put my stash to work. Today I'm going to show you how to make a simple scarf/necklush from an old T-shirt. I think that this is my first step in preparing for fall. Want to make one for yourself? The first thing that you need to do is select an old t-shirt that you are willing to donate to the cause. The shirt that I chose was a failed bleaching experiment. Once you have your shirt you will want to lay it out flat and cut it apart just below the arm holes. Next you will cut the bottom section into strips. Next I cut the sleeves and the neckline off of the remaining piece of fabric. If you have selected an appropriate knit then your strips should curl easily when pulled. Next gather your curled strands together with seams meeting up (the seams generally don't curl). Using the smaller strips of fabric (from the top portion) I made two long braids. You can wear your scarf anyway you want it.