background preloader

Envelope Book

Envelope Book
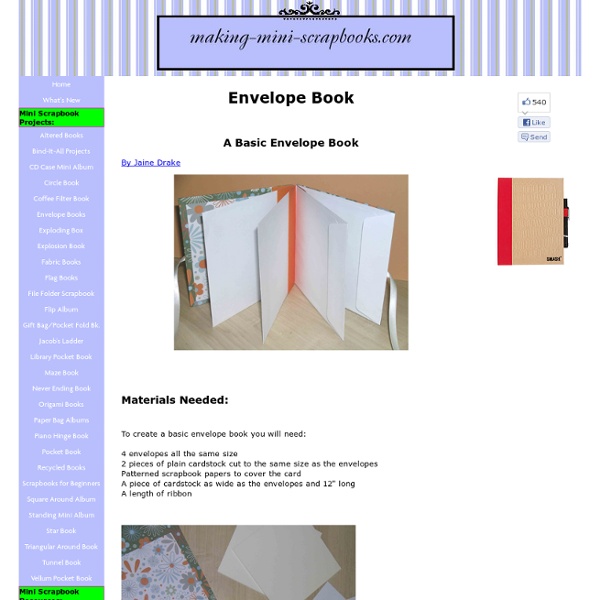
A Basic Envelope Book Materials Needed: To create a basic envelope book you will need: 4 envelopes all the same size2 pieces of plain cardstock cut to the same size as the envelopesPatterned scrapbook papers to cover the cardA piece of cardstock as wide as the envelopes and 12" longA length of ribbon Cover the plain cardstock with the patterned scrapbook paper, snipping the corners to get a neater finish. Fold the long piece of cardstock accordion style. Lay the ribbon across the centre of both covers, tape down to stabilize if necessary and glue the spine in place. Cover the inside front cover with patterned scrapbook paper and an envelope to the back cover. It's up to you whether to cut the flaps off or leave them on -- either way looks good.

Tutorial Tuesday: Owl Army from Moonstitches OMG, this is the cutest Tutorial Tuesday ever…or should I call it ? Whatever we call it, I’m sure you’ll agree that this owl tutorial from MOONSTITCHES is just so adorable and that you’ll want to snap it up and hug it and squeeze it and make a million of little owls. I know I do….I want to make my own adorable stuffed owl army! Alex from MOONSTICHES put together this really well done tutorial, which was inspired from a pattern she found in a book (info on the front page of the tutorial). Since Alex does not share the pattern from the book, you can buy the book (although it’s in Japanese) or come up with your own pattern and use Alex’s tutorial as an inspiration for your own owl. Also, be sure to join the Tutorial Tuesday flickr group and share your owls or any pics from your completed Tutorial Tuesday projects.

Repurposed Cot Recently our little Squeak made the transition from the cot to her first big girl bed. I dutifully moved the cot into our study waiting to be dismantled and either stored or passed on, but kept finding reasons not to do it. The thing is, I'm certain there will be no more babies for us. Kind of certain. OK, 99.99% certain. * baby cot with a removable drop side * mdf/particle board cut to mattress size * blackboard paint Our drop side had already been removed so all I had to do was adjust the base to the highest newborn setting. I cut two sheets of thick mdf to fit snugly into the mattress base to provide a table top. It was then easy to use hooks and suction hooks to create storage on the cot sides. The paper storage box is made from an empty muesli box, I cut the front to make the paper accessible then primed and painted it before super gluing it to a thick piece of card for extra strength. The girls have been having a blast with it already :-)

31 DIY Ways To Make Your Backyard Awesome This Summer | While you’re impatiently waiting for summer to just GET HERE already, start planning your outdoor space. 1. Set up a movie theater. 2. Plant a bunch of these giant allium flowers. 3. 4. 5. 6. 7. 8. Here’s a very cool personal fire pit you can make for less than $25. Perfect for s’mores night. 9. 10. 11. 12. 13. Turn the tent into a pillow-filled reading nook. 14. 15. 16. 17. 18. 20. 21. 22. 23. 24. 25. 26. 27. 28. 29. 30. 31. Comments comments

A DIY “look for less” LOVE! | The Adventures of an Urban Socialite™ Top two images from Honestly… WTF (total cost about $5)/ Bottom image from Oak– retail $372.00 Love this clever project from Erica and Lauren of Honestly… WTF… so much so I might even attempt it– I love these bracelets! The best part is, there are tons of options in terms of hex nuts (they have bronze, steel, etc.) and twine color, size, etc. and the project is super straight-forward. Have fun! Via MCSpice

diy week {vinyl chalkboard UPDATE: The giveaway is now closed, Kaylene has the last counting comment. I know chalkboards are a bit of a craze right now, but I couldn’t help myself with this. If you are unlike me and can’t imagine painting your walls with chalkboard paint, you might fancy a vinyl chalkboard. I am sure most of you have seen the vinyl companies out there that provide all kids of custom graphics and text for your walls and other surfaces. Did you know you can buy sheets of vinyl? Supplies: 1 sheet of chalkboard vinyl Exacto Knife Letter decals scissors cup (if you want rounded edges) Cute masking tape (to tape it if you aren’t ready to apply it to the surface) Chalkboard Marker Step 1: Use a cup to trace rounded corners Step 2: Cut the rounded corners Step 3: Apply letter decals to create the words you want permanently on your chalkboard Now you can apply it to your surface for a very simple, clean chalkboard. Optional Steps: Step 4: Using an Exacto Knife (that is very sharp) cut out the design of your choice.

25 Handmade Gifts Under $5 If your gift list is long and your budget is small here are some great Handmade Gifts that you can make. Keep in mind that handmade items are not just beautiful but special… I love to give them and I love to receive them. Jersey Knit Bracelet Lovely! This would make a perfect gift for any of your girlfriends. You can choose the colors and recycle t-shirts that you have around the house. Cheap and cute! tutorial Paper Clip Earrings Tutorial This is a brilliant idea… and the possibilities are endless. Love it! Printed Candles Who doesn’t love a candle? Think about how many different stamps you could use to customize this project. tutorial Hot Chocolate Art! What a great gift for neighbors and teachers… I am personally a hot chocolate lover so this would make a great gift for me tutorial Tile Coaster You can buy these plain tiles at Home Depot for under a dollar. I’ve seen them with family pictures also… Way cute! tutorial Bow Belt I was amazed how easy this tutorial was. So Pretty! tutorial Paper Plate Clock Cheap?

Lana creations My knitting work, knit project and free patterns catalogue That made me think, a lot of people come to this blog through searches for "balaclava pattern". What is the balaclava? A close-fitting, knitted o sewing cap that covers the head, neck, and tops of the shoulders, worn especially by mountain climbers, soldiers, skiers, etc. I found this free pattern in last night online for a fleece balaclava. The main thing - do not confuse the inner and outer side of the fabric - for a fleece-like material that matters. How do it - fold the fabric so that the sides found each other with the entanglement of approximately 0.5 cm, and chop off so Topstitch seam "zigzag". Remember: If sewing using a flat-stitch technique seam allowances are not needed. Lining (optional) If you have chosen to add a lining, follow these steps. A balaclava, like a ski mask, is a warm, close-fitting winter hat that's designed to keep your head and neck warm in winter weather. Balaclava pattern in PDF, free download

Creative Kismet » Blog Archive » little guiding stars Since the new year has started I’ve been trying to think of ways to be more kind to my self. Especially when that nasty gremlins try to creep in and stump me. I remembered this origami star video on You Tube and had to get them involved in my plan. I thought it would be fun to make a whole bunch with kind words and “you are….” phrases inside. I made 60 of them, enough to last me the whole year if I open one a week, plus a few extra just in case. I used 12 x 12 inch scrapbook paper and cut 1/2 x 12″ strips, then followed the video HERE*. *UPDATE! Be Sociable, Share!

wednes-diy | Free People Clothing Boutique Blog some DIY inspiration from wanderlust- a jar lantern chandelier! so beautiful. i did some hunting online and found some similar ideas that are so lovely… i really love the idea of putting some sand in the bottom and dropping in a tea candle. i think that would be the perfect outdoor lighting at my family’s beach house. Be sure to check out our new DIY Projects category for more DIY Inspiration! Trending on FP.com: Floral dresses, high waisted bikinis, bralettes, off the shoulder tops, party dresses, gladiator sandals, lace dresses Tags: craft, décor, design, handmade, wednes-diy Headband Refashion Our headband had a flower that was starting to look a little tired and worn so we made it new again! This braided ribbon could embellish many things— a hair clip would be cute too! These headbands would make great handmade gifts for little girls to make each other! Woven Ribbon Headband Gather a headband and about 4 1/2 yards of ribbon. Begin by finding the middle of the ribbon. Now bring the bottom ribbon up and make a loop and send it through the beginning loop that you just made by crossing the ribbon. Pull the right side snug. Now repeat for the other side, picking up the right side, making a loop and sending it up through the loop just made on the other side. Pull the left side snug. Pull right side snug. Continue braiding until you have a piece long enough to cover the headband. Bring the other side over and then trim. Hot glue ribbon to headband. Finished!

Fleece hood and balaclava | Olive Leaf Journal We’ve had frigid temps in our area, and sounds like most people across the US are having the same conditions. While staying indoors is a great way to stay warm (unless your power is out) dressing for the weather good also. My oldest son has one of these, and loves it, so he and I copied it and made, I believe, seven of them for Christmas gifts. Flurries Snow Showers Blizzard This is a quick project, and is very practical with many options of how to wear it. You need 3/4 of a yard of fleece. The three pieces needed are easy to draft off a rectangle, and you don’t have to be precise, close will do. Here is my low tech drawing of the pieces you’ll need. For the hood you need a rectangle 15″ X 13″. For the scarf piece you need a rectangle that is 11″X13″, placed on the fold. The neck cover is a little more tricky, but again, this doesn’t need to be exact!! Everything should be sewn using a small zigzag stitch, or surged (where possible). It will look something like this from the bottom.

Stitch Your Own Cell Phone Case Tutorial So for a few months now I've been ogling the cross-stitchable cell phone case from Connect Design. It's super cute and I LOVE the idea... But as far as I can see it there are several problems with this particular cell phone case.... #1. #2. #3. So... when faced with these seemingly impossible obstacles there's only one thing for a crafter to do... Enter the sketchy cell phone accessory kiosk at my local shopping mall... where I managed to find myself one of these: It's a clear rubbery cell phone case! Next I need to gather my supplies: For this project you will need: A pattern (I'm using our Justice League Pixel People Pattern but you could use any small cross stitch pattern) and the appropriate floss colours 14 count plastic canvas or Aida cloth - available at any decent craft supply store or needlework shop. Small sharp scissors and an X-acto knife Your clear cell phone case First thing's first... you need to make a template so you know how much plastic canvas/Aida cloth you'll need to cut.

Beautiful Bird Mobile...and Possible Cat Toy | Apartment Therapy Los Angeles We were over at our favourite cat blog, Moderncat when we noticed these beautiful bird mobiles from Spool Sewing. Our youth demographic decor site Ohdeedoh was already on top of these last year, but we think these are worth revisiting not just as a decorative mobile, but also as a stylish DIY catnip toy for your favourite feline. Learn how to make your own below... Michael Fulkerson's pattern for "Mr. Blue Bird" is available for download and requires: Materials: 10" x 10" square (each) of 2 fabrics, scissors, marking pencil, thread Directions:1. Fill these up with a thin stuff of catnip, and you're sure to have a toy that not only gets the attention of your feline, but also looks good around the house as he/she carries it around in crazed pride!

Backlit Canvas Art Do you have one project that you've been longing to do, but just haven't found the time yet? This is it for me. I call it my Backlit Canvas Art and the inspiration piece has been pinned in my "Crafts to try" Pinterest board for ages. My "pin"speration is an artist's piece made from metal that has hand cut flowers all over it. So I decided to give it a go and create my version. There are two main differences between the two: 1. 2. The idea of the canvas is that during the day (ie. with the Christmas light off) you have a beautiful sculpture while at night (you guessed it, with the Christmas lights on!) How about a tutorial? Supply list Mounted canvas (mine is 10"x10") cardstock to fit on your canvas (mine is 12"x12") stamps ink pad X-acto knife light source* *I wasn't sure if I wanted to use a single bulb or Christmas lights so that is why both are in the above picture. I decided to go with the same flower theme as my inspiration piece. I randomly stamped various flowers across my cardstock.

Related: