
How to Emboss a Metal Tin August 20th, 2008 976Email 190 users recommend Use hardware-store foil tape to create lovely embossed surfaces on ordinary candy tins. It's easy! Diane Gilleland Look in your local hardware store for aluminum foil tape. An ordinary pencil makes a great embossing tool. Photo: Diane Gilleland Here's a clever way to turn an ordinary candy tin into a striking one with some simple embossing. What you'll need:Small candy tins, such as Altoids tins, emptied and cleanedAluminum foil tapeScissorsPlastic spoonX-Acto knifeSelf-healing cutting boardPencilEmpty ballpoint pen (optional)Sharpie markers in assorted colors (optional)Cardstock (optional) I love aluminum foil tape! Sharp edges. Aggressive adhesive. Foil tape is most commonly available in a 2-inch-wide roll (although you can sometimes find it in 4-inch widths). Use the back of a plastic spoon to burnish the tape down smoothly. We actually need two layers of tape in order to provide a deeper surface for embossing. View 2 member project galleries
Enveloppes Enveloppes pour offrir petits mots et petits sous Publié le 29/11/2009 à 18:59 par citronelle A imprimer sur papier cartonné type Canson. N'hésitez pas a découper votre feuille pour qu'elle rentre dans l'imprimante. Enveloppe pour Noël Publié le 29/11/2009 à 16:34 par citronelle Enveloppe pour Noël Publié le 28/11/2009 à 19:07 par citronelle A imprimer sur papier cartonné type Canson. envellope postale pour "envoyer vos vacances"2 Publié le 31/07/2008 à 12:00 par citronelle Si vous aimez mon blog laissez moi des coms... envellope postale pour "envoyer vos vacances" Si vous aimez mon blog laissez moi des coms... enveloppe métal Publié le 02/06/2008 à 12:00 par citronelle Angrandir au maximum l'enveloppe pas la carte. Enveloppes sur mesure Publié le 30/05/2008 à 12:00 par citronelle Angrandir au maximum l'enveloppe pas la carte. enveloppe à imprimer Publié le 29/05/2008 à 12:00 par citronelle Angrandir au format voulu (pour moi c'est maximum). enveloppe et roses Publié le 27/05/2008 à 12:00 par citronelle
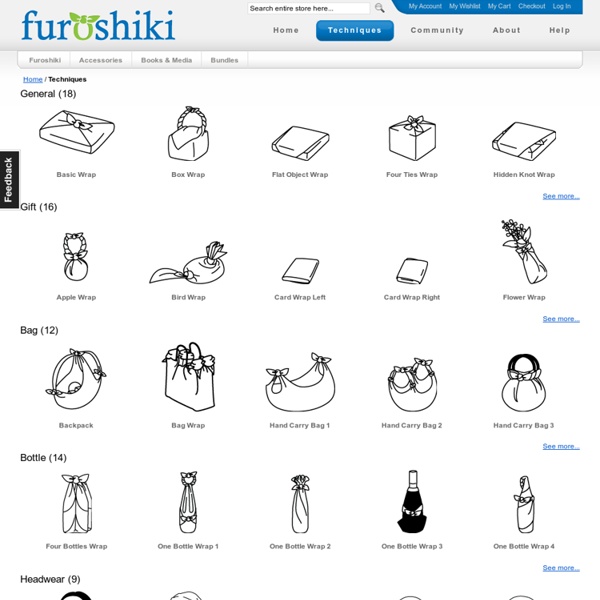
DIY or DIE Daily Grammar - Improve your writing with our free grammar lessons You + Me* DIY: Furoshiki wrapping | Brooklyn Bride - Modern Wedding Blog Everyone we know loves vintage scarves, and they can often be had at thrift stores for between $.50 and $2. Consider adding some color to your table by wrapping your favors Japanese-style (the proper word is furoshiki) in vintage scarves. Look for scarves that are square (or have a tailor or seamstress sew the rectangular ones you find into squares). To wrap them, just place your favor in the middle of the square. Fold one corner over the box and tuck it under. [images from Angela Gaspar] Angela Gaspar and You + Me* Lifestylists are sponsors of Brooklyn Bride Leave a Comment
Make It and Love It Fun with Foam Printing - Easy Tutorial I loved this idea because not only can you recycle these horrid polystyrene containers, but the process is really simple. You could even use tracing paper and trace your design so you don't even need to be able to draw. You could make a whole series of cards like this or just a colorful print to hang on your wall and cheer up the place. Materials needed: Foam or polystyrene container pencil paint or ink small roller 1. 2. 3. 4. 5. Happy printing! Original image courtesy of themetapicture
Speaking tasks for advanced learners of English. Use our 'Get Speaking' task sheet to practise presentations, discussions and topic vocabulary. From this page you can download a free, photocopiable Get Speaking Task Sheet. To download the free task sheet place your cursor over the link below. a) Right-click (Windows) or hold down the mouse button (Mac OS) and then choose b) Save Target As from the pop-up menu. In the Save As dialogue box, specify a name and location for the PDF file, and then click Save. Right Click, Save Target As >> Download Task Sheet If you have trouble downloading the task sheet contact us with your email address and we will forward the current edition to you. These Task Sheets are particularly useful for you if you're preparing for an English speaking exam like IELTS, BEC, TOEFL, TOEIC, Cambridge CAE (Certificate in Advanced English) and CPE (Certificate of Proficiency in English). Need a weekly reminder?
DIY Cloth Wrap Tutorial Lately I’ve been using all my fabric leftovers to make cloth wrap squares. It just occurred to me that this might be something worth sharing in a tutorial. It takes about 3 steps and 5 minutes. And zero sewing. Which is why it is totally my style. DIY Cloth Gift Wrap Start with a square of fabric. Side note. Pick up your sponge roller and roll it either in fabric glue or this good stuff. Roll a thin even border around the edge to stop fraying. That’s it. p.s. Tagged as: DIY gifts by GiversLog, favorites, gift wrap and pretty packaging, Giverslog tutorials, pretty packaging
Revolutionaries: A Project for Fall! Hello my blog friends! I'm so pumped to share a project I finished today! It's simple, cheap, quick, and fall-y (yes, that is a word). Anyway... I've been diligently collecting these for what seems like forever: Why? [Side note: please pin from the original source so the credit goes to the right person! But I also love projects involving trees/branches like these: Then, I saw this yesterday and even though it's not made from toilet paper rolls, I thought, hmm.... color behind the toilet paper rolls? So basically... What you need: 1. 3. How to do it: 1. 2. 3. 4. 4. 5. 6. It's so.. fall. And I love that I used things I already had in my craft stuff and I recycled toilet paper rolls! Would it be bad to keep it up all year? Update: here are some more pictures that I took in better lighting! Looking for more toilet paper projects?
TGIF: It's a wrap! Happy friday lovelies! Today we're using our fabric wrap to create a little shopping bag. This tutorial was inspired by a sweet bride (Kendall, that would be you!) who wanted to use our wraps as welcome bags for her guests. Luckily our "Give Joy" wrap is in Kendall's yellow and gray palette.Place wrap face-up on your work surface. Fold into a triangle. Tie a knot on one side. Repeat on the opposite side. Turn the wrap inside out from the open end. Tie a third knot to create handles. Voila! TGIF: It's a wrap! Just in time for some valentine wine and dine, today we're using our fabric wrap to gift TWO bottles of wine! We chose the blue "Give Luck" from our collection for this feature. Lay the wrap face down.Tip: The two corners with the "give luck" message should be on either side of you.Place the two wine bottles in the middle of the wrap. Lay bottles flat with bottoms facing each other. Start rolling... ... and rolling till you reach the end of the wrap. Gather the ends and bring bottles upright. Tie a knot and spread the ends so the "Give Luck" message is visible. Voila!
Mommy Cooks: Furoshiki I've been doing a lot of crafts lately, especially fabric-related things, it seems -- don't worry, we're still eating. I've been in a bit of a slump, cooking-wise, it seems, and anyway the weather has been so dreary for the past few weeks that photographing it would be next-to-impossible. ("No, honey, you can't eat it yet. This morning I made a furoshiki, the Japanese cloth wrap originally used to carry bundles, tie up clothes, and whatnot, now used mainly as a way to wrap gifts. This fabric is a beautiful dahlia print by Kaffe Fassett called "Floating Flowers". The furoshiki can be made in pretty much any size to suit the particular gift, although different folding methods can be used to adapt a large cloth to a small package. Furoshiki (Wrapping Cloth) 1 yard of fabric, for a cloth approximately 35 inches square Launder and press the fabric according to the manufacturer's instructions. Fold the edges under 1/4 inch to the wrong side, and press. Top-stitch the folded edges into place.
Fabric Paper Tape: A little Tutorial | annekata I have fallen in love with all the Japanese tape that I am seeing everywhere online. But I am a little thrifty when it comes to small decorative items that I think I can make myself. Yesterday my eye caught an old blouse my child had never worn, and a light bulb went on. Fabric tape! Using all my little fabric bits. And this is how it looked after the first attempt: It’s so easy. - Fabric scraps - Brown Paper Tape found at office supply stores (I had 2 inch tape and cut it to 1 inch width after I was done) - Sandpaper if your packaging tape has a shiny surface - Glue (I used white school glue, because that’s what I had. Now, let’s assume you are using a cutting mat (if you don’t have one, a kitchen table and scissors will work just fine and then the kids can do it, too).INSTRUCTIONS 1. 3. 4. Use tape for: packages (obviously) letters bookmarks stickers (just take the scissors and cut some shapes) gift tags Have fun making lots of fabric paper tape.