making things beautiful again
No-interfacing Storage Basket Tutorial
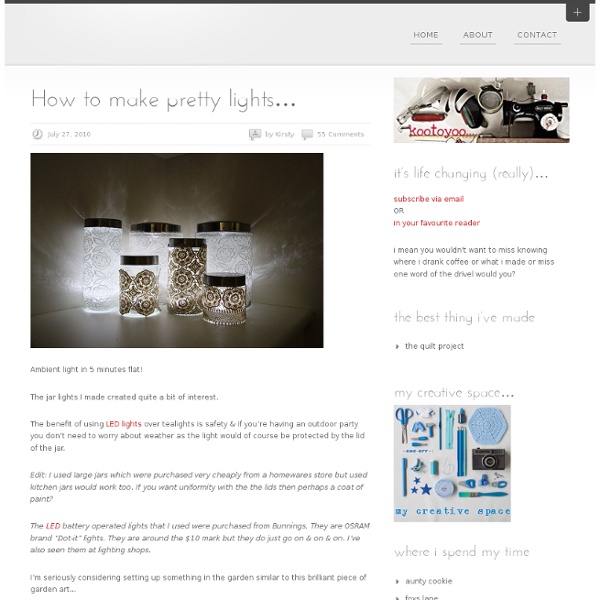
As promised, a recipe for making washable stand-up storage baskets: You'll need to cut 2 of each of these pieces (click on the pic to enlarge it to a readable size). The measurements are in centimetres because that's the way I was brought up (sorry). A seam allowance of 1cm is included in these measurements. This basket's base is 15cm wide, but you could make any size using this slightly haphazard formula, where x is the width of the base and y is the height of the basket. And 2 is cm and seam allowance. Pieces cut, sew right sides together along these seams: Sew the boxed corners of the linings by folding the pieces open, matching the side seams with the bottom seams, and stitching across: Zig-zag the top edge of the smaller lining piece. Hem the bottom edge of the outer sleeve piece, turning up 1cm all round and stitching it down. Turn the lining pieces so that their right side faces out, and slide the outer sleeve over. Almost done, except for the fiddly part!
Fabric Paper Tape: A little Tutorial | annekata
I have fallen in love with all the Japanese tape that I am seeing everywhere online. But I am a little thrifty when it comes to small decorative items that I think I can make myself. Yesterday my eye caught an old blouse my child had never worn, and a light bulb went on. It’s so easy. - Fabric scraps - Brown Paper Tape found at office supply stores (I had 2 inch tape and cut it to 1 inch width after I was done) - Sandpaper if your packaging tape has a shiny surface - Glue (I used white school glue, because that’s what I had. Now, let’s assume you are using a cutting mat (if you don’t have one, a kitchen table and scissors will work just fine and then the kids can do it, too).INSTRUCTIONS 1. 3. 4. Use tape for: packages (obviously) letters bookmarks stickers (just take the scissors and cut some shapes) gift tags Have fun making lots of fabric paper tape.
Wacky Watercolors
Wacky Watercolors Here's a recipe to make your own watercolor paints. These vivid, non-toxic paints can be used wet or allowed to dry and used like regular watercolor paints. We had great fun making and using them! Materials: 3 Tbs. baking soda 3 Tbs. corn starch 3 Tbs. white vinegar 1-1/2 tsp. light corn syrup food coloring Steps: 1. 2. 3. 4. Tips: Use paste food coloring if you want especially vivid colors and lots of color choices. Take the opportunity to teach little ones about color mixing. You can make a larger batch and make the paints in an old ice cube tray. The more food coloring you add, the more vivid the paints will be. These take a long time to dry! If you make them in bottlecaps, you can store the dry paints in a plastic baggie or even tie a few of them in a small cloth with a ribbon as a sweet gift. Here's a painting made with our paints. To the Crafts Index All works on this site Alicia Bayer unless otherwise noted.
a cluster of gleeful jam jars... how-to
yes indeedy! it is a time for gleefulness and a time for handcraftedness now before we begin i must tell you several things, thing #1: this cluster of gleeful jams jars how-to, is perfectly suited to any random sized jar you have lurking around your nests. i found some in the back of my fridge, saved some as they became empty, others i decanted the contents so i could continue uninterrupted in my need to clothe little glass jars in warm jackets. indeed the more different sizes you have going on, the peachier it will look. thing #3: the only material i used in this gleeful cluster that has not been used and loved before is the cream yarn. thing #4: i believe the pictures pretty much speak for themselves in how the jackets are made, the crocheted little number i have given more instructions to. but as we go along you will see they are quite simple in their construction and also rather addictive. so without further ado, here are three little jacket ideas for this gleeful season... ingredients
Make fabric prints with tape
I'm still on that tape kick. I have a deep love for anything self-adhesive; peeling and sticking are two of my all-time favorite activities. So I tried an experiment with painter's tape to make a pattern on fabric. You'll need: fabric, a measuring tape or yardstick, scissors, masking or painter's tape, fabric paint (I like Jacquard Textile Color), a foam brush, a protective surface of some kind, and any sewing supplies you'll need to turn the painted fabric into something. I decided to make simple envelope pillow cover. To prepare your fabric, cut out a piece a few inches larger than the total amount you'll need for your project. With painter's tape, make a pattern on your fabric. Place the taped-up fabric on a plastic tablecloth or other protective surface. Let the fabric dry, then pull off the tape pieces. Then sew the fabric into something nice.
Doily Paper Fan Craft
All girls love to make paper fan crafts, especially when it is hot outside. They seem to make them out of anything they can get their hands on. This one is so pretty they will want to keep and use it all the time. Older girls can get fancy and do some extra decorating with markers, glitter, stickers and streamers. Directions for Paper Fans: 1. You will need: 2. 3. 4. together to form a loop. 5. 6. full of refreshing tea! Dress it up even more with dots of glitter on the lacy flowers, gem stickers or tie long streamer ribbons around the handle and curl. Additional Information: Return to Tea Party Crafts from Paper FanVisit Tea Party Guide
DIY Woven Chain Bracelet
Chain link bracelets, with colorful threads woven through them, have been popping up here and there. We adore Aurèlie Bidermann‘s Do Brazil bracelets and thought it was about time we graduate to the ultimate “grown-up” friendship bracelet. With a curb chain bracelet and some embroidery thread, we’ll teach you how to make your own woven chain bracelet. You’ll need:a curb link braceletembroidery threadtwo bobby pinsa pair of scissors Cut 2 sets of 15 strands of embroidery thread, with each strand measuring four times the length of the bracelet. Lay the second color (blue) over the first color (coral). Repeat the steps until you reach the end of the bracelet. (top images from here and here, rest of images by Honestly…WTF)