
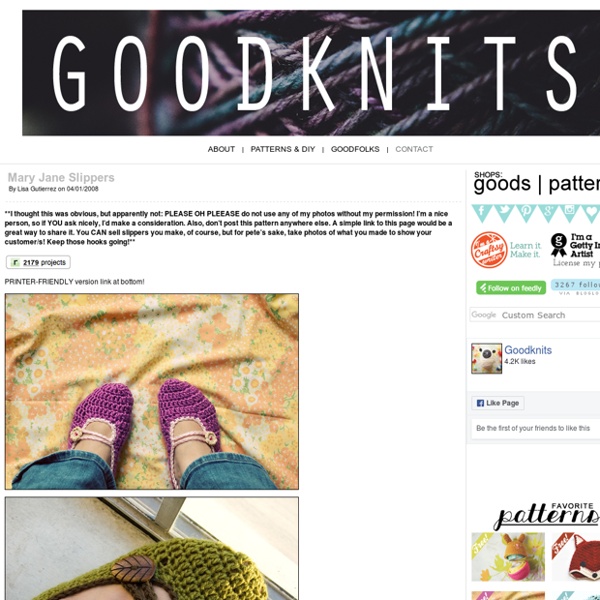
Sling Bag Tutorial - Part 1 I tend to have a short attention span when it comes to projects, that's why I like making a variety of things. My Etsy shop has an assortment of stuff in it for that very reason...I don't want to make the same style of the same product over and over! Bags are one of my favorite things to make when I feel like changing up the pace a little. I whipped up a few of these hobo/sling bags to put in the shop. Fun! It will look like this when you open it up. We are going to be very thrifty with our use of fabric, and use the cut out pieces from the straps as the pockets. Measure down from the top straight edge, nine inches. Trim off the rounded bottom. Cut a strip of narrow elastic, 8 inches long. Your pocket should now look like this. Do that to all four pockets. Now sew just the outer edges of the bags together. With RIGHT sides together, stuff one bag into the other. Sew the two bags together. Reach your hand through there and pull the bags right side out. Stuff one of the bags into the other.
CRAFT Pattern: Bunny Hop Slippers Thrummed Bunny Slippers in 3 Adult Sizes By Nikol Lohr These slippers are soft as a bunny, thanks to their thrums — unspun wool knit right in for a warm, cushy, fleecy lining. They’re also quick as a bunny! Knit in bulky yarn, they have the same stitch count as your average worsted hat. Download the Pattern PDF | Subscribe in iTunes (Right click to save PDF to your computer. Choosing a Fiber Light, fine, bouncy fibers like Merino, Bluefaced Leicester (BFL), Corriedale, Rambouillet, and down wools make the best thrums (bypass the stronger, less-crimpy fibers like Lincoln or Wensleydale). Unsoaked, commercially dyed top (compressed, with a chalky hand), hand-dyed top (fluffier and dense), and top from a small mill (loose and airy). Break (do not cut!) Pull off a little lengthwise strips, about 1/8″ – 1/4″ thick. I get 15- 20 strips from a piece of typical commercial top or about 7-10 from the fluffier type of top you get from a smaller mill. Most roving will require some preparation.
Sweet Slipper Republished! The Sweet Slipper has been published in an online newsletter through All Free Crochet! Woohoo! :) I am just reposting to make finding and printing it easier. I am very sorry for any inconvenience you had trying to get the pattern. Enojy! ***To Print, click file on your tool bar, click print preview, there will be 4 pages to this post. Fits women's size 7-8, can be customized tofit any size by repeating R9 to desired length. Materials ~ww yarn for the slipperdk/sport weight yarn for the trimsize G crochet hookneedle to sew up end Gauge ~4 hdc and 3 rows are 1” Notes ~~ Turn after each row.~ The slipper is worked from the toes to the heel in 1 piece. Begin ~R1 Ch 10, hdc in the 3rd ch from the hook, (2 skippedchains count as the first hdc, now and through out) hdc inthe next 6chs, 7 hdc in the end chain. R2~4 Ch 2, hdc in each hdc around, join with a slst to thebeg. ch2. R6 Ch2, hdc in each hdc around. R7 Ch2, hdc in the same sp as joining. R8 Turn, ch2, hdc in the same space as the ch2.
Mini Mario Mushroom Amigurumi « Amy's Odyssey The mini mushrooms in the world of Mario are tasked with many things. The little red ones have the special job of helping Mario and his friends grow bigger and stronger to assist them on their adventures. However, not all the mushrooms are sure of their fate. This mini Mario Mushroom is questioning whether it is really his destiny to help people grow large. He is off on a journey of self discovery, to see whether he can find a more fulfilling place in the world. He is very grateful for my hospitality and has shared with me the secret of how the mini mushrooms are created. My patterns are written down as I create my amigurumi, but let me know if there is anything missing. Techniques You will use the basic amigurumi crochet techniques: magic circle, slip stitch, single crochet (sc), increase, and invisible decrease.Note: US crochet stitch terminology is used. ch=chain, sc=single crochet, 2sc in next sc=increase, sc2tog=decrease (crochet two sc together to make one sc). Materials Pattern
How to Make Simple Crochet Slippers IMPORTANT NOTE: This pattern uses US crochet terminology. You can find the SLIPPER SIZE, YARN and HOOK specifications at the end of this article !!! (To see more of my patterns, please visit my ONLINE SHOP!) I am an addict. An addict for crochet slippers. It all began when I saw slippers similar to these somewhere on the internet. I loved them so much I couldn’t get their tempting image out of my head. All I needed was a pattern. But because I am terribly, terribly impatient, I found creating my own pattern quicker than looking for an official one on the web. And since I’m no crochet guru, the pattern turned out to be really simple. Actually, these slippers might be the simplest slippers in the universe. Or not. But they might. This is what I did… Round 1: 5 ch (chain stitch); join into ring with sl st (slip stitch) Round 2: 3 ch; 7 dc (double crochet stitch) into the center of the ring; join with sl st Round 3: 3 ch; 1 dc into first stitch; 2 dc into each next stitch; join with sl st Row 14: turn (!)
art crochet Style HaNi design: dress for beachFigure knitting braids Crafts for Spring : colorful hat, crochet pattern If you want to have any crochet products and translate patterns to English , please order, you can see more products in my shop. Thanks. Crochet Ornament craft: cute motif crochet Ornament craft: cute motif crochet Crochet rabbit patterns Crochet fish patterns Crochet butterfly patterns Crochet snail patterns Crochet duckling patterns Crochet ladybug patterns Crochet flowers patterns Crochet apple patterns Crochet cupcakes patterns Crochet owl hair Animal Scarf Crochet Patterns, OOAK Animal ScarvesAnimal Scarf Crochet Patterns, OOAK Animal Scarves Cat Cuddler Scarf - Animal Pet Warm DIY Fashion Tutorial Winter Fall Autumn The Cat Cuddler Scarf Pattern.
PIxie Dust Lap Blanket This is a where-did-you-get-this?! kind of blanket. Big, loopy stitches; hand dyed, extraordinary color; and smatterings of sparkly "pixie dust" all conspire to make this no ordinary blanket. The yarn comes from the incredibly creative yarn company, Knit Collage. You won't be the only one who thinks your new blanket is awfully cuddily. I can't think of an easier way to makeover a room than to whip up this show stopper. The Materials 7 skeins of Knit Collage's Pixie Dust, a blend of Wool, Mohair and Pixie Sparkles. Other Ideas! We also knit up the Pixie Dust Lap Blanket in a cool white "Snowflake" version. Or try doubling up Knit Collage's Sister. The Pattern Gauge 1 stitch = approximately 1 inch in 1 x 1 rib Finished Size Approximately 26 inches wide by 56 inches long Begin Cast on 27 stitches. Row 1: *K1, p1, repeat from * to last stitch, k1. Row 2: *P1, k1, repeat from * to last stitch, p1. Bind off in pattern and weave in the ends.
A Fabulous Pair of Crochet Slippers There are currently no images from other crafters. close Terms & Conditions You must enter into this Agreement if you want to submit digital images or other content to Prime Publishing through Sharing Customer Images (the "Service"). 1) Eligibility. 2) Definitions. 3) License Grant for Materials. 4) Removal of Materials. 5) License for Name, Trademarks and Likenesses. 6) Specifications and Guidelines. 7) Representations, Warranties and Indemnities. 8) Restrictions. 9) No Obligation. 10) Changes to Agreement. 11) Prime Publishing Intellectual Property. 12) Communications. 13) Waiver. 14) Disclaimer. 15) Miscellaneous. Sharing Your Own Images Who can share images? You! What should I share? Please share images that will help other visitors. Do include captions for your images. What shouldn't I share? Behave as if you were a guest at a friend's dinner party: please treat the Prime Publishing community with respect. The same guidelines apply to your captions and notes. Where will my image appear?
Chain-Chomp This is Chain-Chomp from the Mario Brothers games. I made this because my middle daughter begged me to. LOL. When writing out the pattern for it, I tried to make it as plain as possible, but I'm still learning how to write out patterns for someone other than myself to read, so bear with me. If anything is confusing, please let me know and I'll do my best to explain or change it. If the cube portion of the pattern just isn't working for you, you can always make a cube by crocheting 6 squares that are 3 to 4 inches in size and sew them together to form a cube. Materials: WW black, grey, white and red yarnsG HookSmall amount of white feltThread to match the feltYarn NeedleFiberfil This pattern requires a little more advanced work than most of the patterns I have to date. Gauge isn't really important, but your hook, yarn and natural tension should combine to create a moderately tight stitch. Using black yarn, make two half domes as follows: Rnd 1: 6 sc in magic ring. (6) Using red yarn: Ch 16.