
1920's Cloche Hat Crochet Pattern (12-15 stitches for 4 inches) If I could go back to anytime in history I’d probably travel to the 1920’s!.. The swing music and catchy Charleston, the unforgettable hats and fashion and Walt Disney’s film debut are just a few of the many reasons I love the roaring twenties! Unfortunately I don’t own a time machine, so I guess I’ll just have to settle with watching Downton Abbey and The Great Gatsby for now. I have to admit though, that while wearing this cloche hat with my pair mary jane heels, I truly felt like a flapper, and it was wonderful! I would highly encourage you to listen to this little collection of some of my favourite swing music while crocheting this cloche hat… Trust me, it will make the experience that much more enjoyable! What You’ll Need Tapestry Needle Finished Size Teen/Adult – Hat Circumference: 21.5″ (55cm) Stitches & Abbreviations – Pattern – (Chains at the start of a rnd count as the first stitch of that rnd) Taking your 6.00mm crochet hook, start of by making a Slip Knot, then crochet 3 chains.
Make a Hippie-Chic Handbag From Upcycled Clothes I am a girl who goes for comfort and casual, earthy and artsy in style and in living. A DIY handbag is signature accessory of my lifestyle. (photos by Bob Farley) I hate to go shopping, so I will wear my favorite clothes until they are completely worn out, and my husband is the same way. So when we wear our old duds past their prime, what should we do with them, throw them in the trash? A pair of chinos, pockets from cargo pants, and a bright paisley print will make a hippie-chic bag. Click on the corner of an image below to view the steps and pictures in a larger photo gallery. Sassy Bow Free Pattern Click HERE to Pin to Pinterest Click HERE to Favorite or Queue to Ravelry Now you can crochet a bow tie from this pattern in just under 60 minutes with interruptions! This crochet pattern is to make a bow tie measuring 4” x 2”. I am putting these on my Christmas tree this year- simple and easy bow ties! I’ve clipped them on to shoes & slid them on hair bands. Hello Kitty fans can run a clip or barrette through it and make it their own. Imagine this as a belt buckle or on a hat. You can make anything cuter and more vibrant with a bow tie of any color imaginable! Use them as embellishments for your Baby’s outfits or headbands. I spent months searching for a cute bow tie pattern I liked and decided to wing it. Materials need: Caron’s Simply SoftF-hookYarn NeedleScissors Abbreviations: ch- chainsc- single crochetsl st- slip stitchea- eachst- stitchsts- stitches Finished product is 4” x 2.5” Thank you for your support!
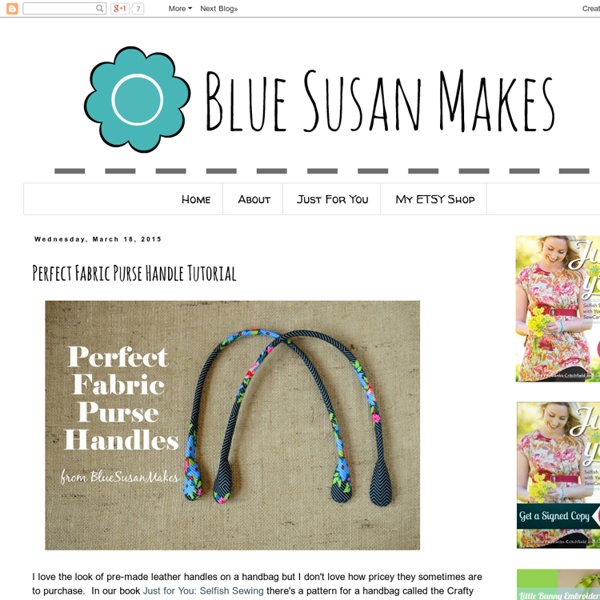
DIY: Bow Clutch Sewing Tutorial And fiiiinally... the tutorial you've been waiting for. This is my first real sewing tutorial - which scares me a bit, because I've never actually taken a sewing class, so I don't know all the terminology. What I do know is that I've learned to sew lots of things by reading tutorials, so hopefully I can make this simple enough that even you beginners can feel confident making a bag. And yes, a bag with a zipper! It can be done, I promise.There are plenty of photos, so hopefully that will help. If you have any questions, please leave them in the comments section and I'll be happy to clarify. **Also, please note except where I say, "Sew close to the edge," I am using a 1/2" seam allowance throughout. Ok, let's get started! 1. 2. 3. 4. Sometimes, at the end of this step, if my strap doesn't feel sturdy enough, I'll cut a thin strip of interfacing and tuck it inside the crease before sewing. 5. 6. 7. 8. 9. 10. 11. 12. WHEW!
tuto picots Comme je suis en train d'en faire à nouveau, et que les explications sont en anglais, je me suis dit qu'un tuto pourrait aider certaines d'entre vous. C'est parti! ça peut paraitre trop détaillé, mais c'est pour être excessible à tous les niveaux de tricoteuses. En espèrant vous avoir rendu service.... Bon week end au soleil, dans les jardins... profitons-en au maximum!!! Fully lined zippered box pouch - pattern and tutorial - it's a Pretty Modern life I love the look of a zippered box pouch...so incredibly cute. I found many tutorials on the internet, but was disappointed after making pouches following these tutorials to find that they were not fully lined; looks so much nicer when you open your pouch and there are no seams. It took me a long time to figure it out and I thought and thought and thought...then I got it♥ I don't want to keep this knowledge to myself, so here it is. I'd like to thank Jane at Projects by Jane (the only other tutorial like this that I was able to find on the internet - wish I'd found it sooner). ♥♥♥Thanks so much! The finished pouch is 3 high x 4 wide x 7 long (inches) Here's what you need: 1 twelve inch zipper 2 10x7 inch panels for the lining (my lining fabric is the green one) 2 10x7 inch panels for the exterior (my exterior fabric is the brown floral one) 2 4x3 inch pieces of complementary fabric for the pulls at the end of the zipper STEP 1. STEP 2. STEP 3. STEP 4. STEP 5. STEP 6. STEP 7. STEP 8.
MoCrochet - Melinda Miller Designs: Stained Glass Scarf This scarf was inspired by the stained glass works of Frank Lloyd Wright. I love the vibrant colors with the black outline; however, it also looks very pretty in pastels or shades of the same color. LOOK HERE to see several versions in my Ravelry project gallery. They are all very nice. Remember, you must be logged in to Ravelry for the above link to work. Designed by Melinda Miller This scarf was inspired by the stained glass designs of Frank Lloyd Wright. Skill Level: Advanced Beginner Materials: 3 oz. Gauge: 12 sc = 3 ½ “ Stitches: Sc = single crochet Hdc = half double crochet Dc = double crochet Tr = triple crochet Size: Length = 70” without fringe Width = 5 ½ “ With CA, ch 275, leaving a 10 yd. tail to finish border. Row 1: (right side): Sc into 2nd chain from hook, 1 sc into each ch to end, ch 1, turn. Row 2: Work 1 sc into each sc to end. Row 3: Attach CB. Row 5: Attach CA. Row 6: Work 1 sc into each of sc to end. Row 7: Attach CC. Row 9: Attach CA. Row 11: Attach CD.
Travel Accessories: Plenty of Pockets Tote When you're on the road, doesn't it always seems to be the ordinary, everyday things you are suddenly in desperate need of: gum, nail clippers, your headphones? I get a little panicky, certain I've left behind the most obvious items... as if perhaps I'm on an arctic expedition and won't see civilization for weeks. But the opportunity for replenishment doesn't matter; I want my stuff close at hand. We offer a full set of pattern downloads below for the tote body as well as all the pockets. We recommend using a twin needle to do the decorative stitching on this project. Our tote uses a heavy, solid-color duck for the exterior, a fabric that is readily available at numerous outlets, including this pretty 7 oz. duck in brown from Fabric. com. The finished size of the tote is approximately 12½" tall x 11½" wide with 2" deep sides and base. Sew the 1½" button to the center top of the tote front opposite the button loop. Contributors Storage Solutions Related Articles
Cone Christmas Tree Crochet Patterns A huge thank you to Consumer Crafts for supplying the materials used to make these Cone Christmas Trees! This trio of crochet Christmas trees is perfect for decorating a mantel or creating a beautiful festive tablescape. And they make a great base for you to add your own creative touches and embellishments. I have included the links below to the products I used from Consumer Crafts … Here is what you will need: Click here to reference the Crochet Abbreviations Chart. Trees are worked in unjoined rounds. Small Tree Using all three colors, change colors randomly after each round. Make a magic ring. Round 1: Ch 1, work 4 sc in ring — 4 sts. Round 2: *Work 2 sc in next st, 1 sc in next, rep from * — 6 sts. Round 3: Work 1 sc in each st around — 6 sts. Round 4: *Work 2 sc in next st, 1 sc in each of the next 2 sts, rep from * — 8 sts. Round 5: Work 1 sc in each st around — 8 sts. Round 6: *Work 2 sc in next st, 1 sc in each of the next 3 sts, rep from * — 10 sts. Fasten off, weave in ends. Medium Tree
Tutorial: Fabric Bucket/Basket | The Stitchin' Chicken It’s been a long week! I meant to post this sooner, but other things kept getting in the way. Better late than never? Anyhow, please read through the entire tutorial before you start. I will have a few tips at the end, that may help you to make decisions on the materials that you use. This bucket/basket (I will refer to it as a bucket as we go through) is approximately 8″ wide x 6″ deep x 6″tall. Materials: Approx. 1/2 yd each – fabric for outside and fabric for liner Batting – 1/2 yd in length (please see notes at the end) Matching thread for assembly (you can use a contrasting thread for final top stitching if you choose) graph paper (or your choice of material to draw a pattern out on – see notes at the end) ruler pencil pins walking foot for machine (not required, but it makes it a lot easier to sew with the batting) First I am going to show you how to draw out a pattern. Pattern Drawn Out I start out drawing out what will be the base of the bucket first. Side Ends Batting, lining & outside
Difícil nada... Eu me meto em cada uma... Pensei que era tão difícil... A primeira vez que li a receita, não tinha entendido nada ou não quis entender. Ontem, calmamente, li a receita e coloquei em prática pra ver se era ou não era um bicho de sete cabeças... e, não era! Há! (fotinha ruim, mas eu tinha que tirar foto do progresso do negócio, entendeu?) E, tcharam, o pegador ou descanso de panela prontinho, prontinho! Essa receita é muito legal e dá um efeito muito bacana! Fiz bem coloridão pra conseguir identificar o que eu estava fazendo! Receita free no Ravelry: "Stir me up potholders" by Pepperknit Gostei tanto que já fiz outro: Os fios usados são de linha 100% algodão mercerizado. Agulha de crochet 3 e 3,5 mm. Inté!