
(87) Pagan/ Wiccan / Witchcraft. Make a magic bottle - a tutorial. Good morning everybody!

It's time for another crafty tutorial, don't you think? So today, we'd like to share how to make a magic bottle. We've shared a tutorial last year about how to make snow domes already, but for those of you who would like something magical on your desk or windowsill all year, why not make a magic bottle? It even involves a few less steps then the snow globes. Plus you don't need to let any glue dry. Gather the ingredients: Beaded Frost Luminaries. I really love the look of luminaries, especially in the garden.

I have an herb garden that has plenty of green, but really no color to speak of. I’ve planted a few flowers in there each year to pretty it up, but it never seems to be quite enough. These soft colored luminaries add just the right amount of soft color and light and, since my herb garden is near the front door, double as a lovely way to welcome people to my home.
Needle Felting. Look, what have I made from the plain mini felt Easter eggs?

I have turned them into little tweet tweet birdies and some other cuties. Hope this will get you into the mood of spring and Easter. Previously, you have learned how to make felted egg with wet felting, now, you can decorate the eggs into some cuties with needle felting method. This tutorial is showing little birdies by adding wings, beak, eyes and tail with felt and wool. You can adapt the method and make them into egg-shaped chicks or embellish the eggs with polka dots and stripes just like those at the back. Stylish custom designs for life. Stylish custom designs for life. Wp-content/uploads/2011/05/flower-week.png. Rolled paper flowers {tutorial. Welcome to flower week – five days of simple and delightful flower projects.
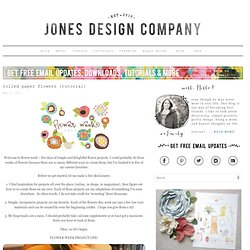
I could probably do three weeks of flowers because there are so many different ways to create them, but I’ve limited it to five of my current favorites. Before we get started, let me make a few disclaimers: 1. I find inspiration for projects all over the place {online, in shops, in magazines}, then figure out how to re-create them on my own. Each of these projects are my adaptation of something I’ve seen elsewhere. 2. 3. Okay, so let’s begin. Diy & crafts. HELLOmynameisHeather. Henrietta and I have a new friend at the studio.

Meet Effie, keeper of pink pins and patron of happy thoughts. Doing tricks and back flips is Effie's younger brother, Ollie, the circus star. Several religions claim that the world rests on the back of an elephant, standing on a tortoise. Though neither is ready to carry the weight of the world, Effie & Henrietta are happy to hold some pins for you. Tomato Pincushion. Sewing / "Homegrown" Tomato Pincushions - Martha Stewart Crafts. Search results for marthastewart. Johnnie (Saved By Love Creations) Lanier (savedbylove) on Pinterest. Scottie Dog Days of the Week: {Cross Stitch & Embroidery.
Here’s the latest vintage cross stitch and embroidery set from my personal collection, it features a lively scottish terrier character for each day of the week…use for kitchen towels or whatever else you like.

The details and individual downloads are available below, I hope you like them! Playful Scottie Dogs Vintage Scottie Dog Pattern Set This pattern contains motifs to be worked in the simplest of embroidery stitches to be used on kitchen towels or other kitchen linens. Toweling should be used for towels. Material Requirements: One Towel: 1 yard of 16 or 18 inch materialSix strand cotton in each color to be used. Transferring Pattern: Hem each towel end. Embroidery: Follow Color Suggestions and work crosses, cross stitch; continuous lines, outline stitch; single lines, single stitch; broken lines, running stitch.
Instructions For Stitches - Click To View Larger Size Directions: Click on image to access larger pattern (jpg file format), right click on it then save to your desktop. Puppy Days of the Week: {Cross Stitch & Embroidery. Home / Crafts / Puppy Days of the Week: {Cross Stitch & Embroidery} Vintage Puppy Pattern Series Here’s the latest set of Days of the Week (DOW) free vintage embroidery and cross stitch patterns.

This is a cute puppy series from Laura Wheeler circa 1960s (I believe), each day features a puppy doing a daily chore. Here are the details and instructions: This pattern contains directions and 7 cross-stitch motifs to be used on towels or dinette cloths. Material Requirements. 50 Recycled T-Shirt Tutorials. DIY - recycle / upcycle / 50+ Upcycled T-Shirt Projects. Delightful Busy Bees – Days Of The Week Set. This month’s vintage pattern freebie is from the 1940s or 1950s and has a sweet embroidery design for every day of the week (7 in total) with each featuring a charming “bee” couple performing a certain task for the day.

Each motif has a wise piece of advice or goal such as “Thrifty”, “Tidy”, “Tasty”, etc., and are intended to be used on dish towels. You’ll also find three additional designs that are suitable for pot holders (does not include directions for making the pot holders). The free file downloads are found at the bottom of the page but first, here are the original pattern details… Little Susan Days-Of-The-Week Motifs {1950s. Here’s a pattern set from the 1950s for this month’s vintage pattern freebie, it’s reminiscent of “Sunbonnet Sue” featuring a young girl wearing a bonnet doing chores around the house.

She also has a little friend tagging alongside her while she runs about, a sweet little Scotty dog. Pattern Cover – Click To View Larger Size There’s a different motif for each day of the week as well as one that is suitable for embellishing an apron and four little square designs to use on potholders. You’ll find the files at the bottom of this page (each in jpg format) but first, here are the original details from the back of the pattern envelope… Little Susan happily dashes through each day’s chores as easily as you embroider. There are four cute motifs to use on pot holders or kitchen mitts and an extra Little Susan to put on an apron or cloth. Craftiness / 50+ Glass Bottle Projects. Be Healthy. Craftiness / 1950's Days of the week embroidery patterns (download)
Craftiness / 50+ Cereal box projects. Crafts+diy / Helpful tennis ball. It all started with paint: fabric flower ‘how to’ I have a new obsession to add to my growing list of obsessions … Numbers – check Hooks – check Board & Batten – check Drop Cloth as Fabric – check And now fabric flower rosettes … … check.

Inserting Spring into My Wreath. Have you been following me for a while? Do you remember this base wreath (below) that I bought from Target a while ago? I challenged myself to use this wreath through every season for one year. Well, I’m now about 6 months in and I have given this wreath its fourth transformation. I injected some pretty yellow paper flowers into the wreath to greet the budding flowers and trees outside my window.
From Christmas – Valentine’s Day our wreath was red, white and green: Happy Fall Leaf Bunting! (no-sew) Bunting is so popular right now, and I have wanted to try my hand at it for a while. I have been mulling over exactly how I wanted it to look though, and finally came up with this idea the other day. Since I live in New England, I felt that fall leaves would be fitting - because you see vibrant foliage everywhere, and this is a fun representation to have inside the house! Here is how I did it:This is the leaf shape, and stem shape - to use as a guide. For each leaf, cut a piece of fabric, a piece of heat-n-bond, and piece of felt, each big enough to fit one leaf. Apply the heat-n-bond to the wrong side of the fabric according to package directions.
Trace the leaf shape onto the felt and cut it out. I chose scraps of yellow, orange, and green fabrics for my leaves, and used orange, brown, tan and green felt for the backs. Cut stems out of stiff brown felt. You Made a Wreath Out of What?! A Linky Party. 20 Ways to Decorate With Book Pages {and other things about the book party} Satin Flower Pillows. I'll admit it - I'm not ashamed - I have a small obsession with making pillows! Eventually I would like to turn my obsession into profit by opening an Etsy shop, but for now I enjoy making pillows for my home, family and friends.
So when my friend celebrated her birthday last month, it came as no surprise that I'd make her a couple of pillows(in the colors of her choice). Rather than cut out a bunch of felt I decided to purchase some polyester satin to embellish her pillows. I purchased the polyester satin from Hobby Lobby. It was cheap, and easy to work with and a very forgiving fabric. Lace bellbottoms DIY. Key ring notebooks... I am sorry, I can't show you the other ones anymore. I sold them at my first market (and had no time to take pictures before.
Finally sleep won the battle! ^^) The sides are covered card boards. Burlap & Doily Luminaries: Rustic meets Romance. Doilies are dainty. Candles are romantic. Burlap is rustic. Here I’ve combined all of them to make these pretty luminaries that would be great for a romantic Valentine’s Day meal or even as a wedding reception accent. Play around with different ribbons, buttons, twine and burlap while experimenting with various doily designs as well. I found my doilies at the thrift store for about $0.35 each. But they aren’t as pretty and they are solid in the center, missing the lovely designs that real doilies possess. Burlap and Doily Luminariesprintable version. Final-collage.jpg (563×362) Glass jars turned vintage. Lately I've been intrigued by those lovely vintage blue glass jars you see on the tables of chic outdoor weddings. DIY - Bird Cage Lanterns. How to Make a Scrap Paper Tree {stationary.
Two-Liter Jewelry Stand. Many a potion bottle « Cheeky Magpie.