
Green Roofs: An Introduction with Pretty Pictures. It's not just for hobbits anymore.

The logic of green roofs is becoming more apparent. We can minimize our bills while maximizing the beauty of the urban landscape. And every day it's becoming a little easier to live in a house that just happens to have plants growing on it. Vegetated roofs, or green roofs have a layer of living plants on top of the structure and the waterproofing elements. There are really two types of green roofs, intensive and extensive. Intensive green roofs often have a soil depth of a foot or more, and require substantial structural elements to support the weight of the whole roof. Extensive roofs are much shallower, typically only 2 to 4 inches deep, and are planted with particularly hardy plants. Why are green roofs such a great idea?
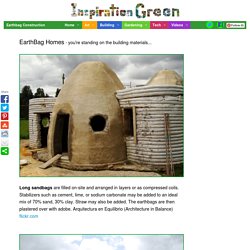
Green roofs also protect the roof membrane from sunlight, which breaks down the roofing material. Earthbag Construction - StumbleUpon. EarthBag Homes - you're standing on the building materials... earthbag home Long sandbags are filled on-site and arranged in layers or as compressed coils.

Stabilizers such as cement, lime, or sodium carbonate may be added to an ideal mix of 70% sand, 30% clay. Straw may also be added. The earthbags are then plastered over with adobe. Arquitectura en Equilibrio (Architecture in Balance) flickr.com earthbag home Plastic bags recycled into plastic bags -- if plastic does not break down for a thousand years, this building is sure to last several lifetimes. Earthbag construction Foundations differ as per site. Earthbag construction The time consuming part, filling the bags. Earthbag construction Testing the strength of an arch. Earthbag home Project Seres, Guatemala. projectseres.org, flickr.com earthbag home CalEarth -- Emergency Shelter Village, Hesperia, California. Green Living Ideas - StumbleUpon. Jayride - Cheap & FREE Carpool and Rideshare Travel in Australia. Natural Pools - Natural Swimming Pools and Ponds - The Daily Green.
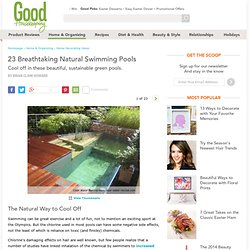
Swimming can be great exercise and a lot of fun, not to mention an exciting sport at the Olympics.

But the chlorine used in most pools can have some negative side effects, not the least of which is reliance on toxic (and finicky) chemicals. Chlorine's damaging effects on hair are well known, but few people realize that a number of studies have linked inhalation of the chemical by swimmers to increased asthma rates (in fact a new Irish study published this April reported a significant link between the number of years a boy had been swimming and the likelihood of the child being wheezy in the past year.) A Norwegian study also documented an increased risk of wheezing among children who swim in pools before 6 months of age. Further, in an unpleasant reaction, pee and sweat in water can react with chlorine to form toxic breakdown products known as chloramines.
DIY Solar Lamp: Make Your Own Eco-Friendly Sun Jars. The principle is simple and seductively clever: solar lights that store energy during the day and release light at night.

These can be purchased ready-made in a variety of colors (yellow, blue and red) but they can also be built at home. A simple, less-technical approach involves buying a conventional solar-powered yard lamp and then essentially harvesting it for key pieces to put in a jar. This is simply a way of taking an existing solar lamp design and appropriating its parts to make something more attractive for display around a house or home. A more electronically-savvy individual can take the more complex route and built a solar lamp from the ground up using small solar panels – though the aesthetic result may not be as impressive.
Whatever route you choose to go, these are fun and sustainable gadgets that make it easy to go green, automate the process of turning on lights at night and can add some color to your porch, patio, garden or windowsill. Spectacular and See-Through: Dude, Where's My Canoe? Glass-bottom boats are nothing new on scenic tours, but with a see-through canoe you can go wherever you want and have a personal up-close view of whatever is below you.

Lighter than a wood or aluminum canoe, tough as bullet-proof glass and entirely transparent on the bottom, these designs provide a completely new way to experience water life around you. It gets better: the kayak equivalent to the transparent canoe is a carbon kevlar frame design that has a military-grade transparent urethane skin – and it folds up small enough to carry with you in a backpack.
Setting it up to be water-worthy takes about a half an hour but the lightweight portability means you can bring it virtually anywhere. Whether you choose the canoe or kayak these are both ideal for wide ranging travels and potentially challenging water conditions as well as brief vacation jaunts. And no, they do not come equipped with any of the toned and tanned people you see in the promotional photographs, sorry.
Perfect Summer Bangle - StumbleUpon. Here's a fun tutorial on how to make a message bangle that's one-of-a-kind, done in the sun, waterproof and weatherproof.

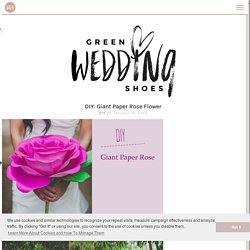
Even after several trips to the beach, it won't fade or wash off! Essentially, it's the Perfect Summer Bangle. Used in this tutorial: Inkodye Red Prepare. All you'll need for this project is a raw wooden bangle (we got ours from DIYBangles.com), a black paint marker, plastic wrap, and some Inkodye! Transcribe. Perfect. Pour. Brush. Wipe. Wrap. Tape. Expose. Wedding Trends for Stylish + Creative Brides - StumbleUpon. If you loved the beautiful DIY wedding this morning and Nata’s gorgeous paper flower bouquets, you are in luck as Nata is sharing how she crafted them with us!

She was inspired by a template created by Morgan Levine on Martha Stewart (as was I in the flowers I created for this styled shoot). I just love that this basic idea has inspired different brides to create their own version of giant paper flowers – you might remember these equally awesome giant paper flowers from this wedding I shared last year. :) Thanks so much Nata for sharing how you created your giant pink paper rose + special thanks to Studio Castillero for the photos of the DIY + her wedding!
Materials (to make one giant rose) Step 1: Cut the petals Cut 5-6 teardrop petals and 15-6 heart-shaped petals from the petal colored crepe paper. IMPORTANT: Crepe paper is directional so it matters which way you’re cutting the paper. Repeat until all of your petals are cut Step 2: Cut the leaves + calyx Step 3: Make the rose stem. Explore more. Web pages, photos, and videos.